

The objective of this shorter blog post is to provide an end-to-end setup example for creating a custom component in Langflow with access to an external endpoint, and to import the “tool” flow made with Langflow into watsonx Orchestrate Development Edition.
Working with AI agents is an exciting adventure — every iteration brings a new “aha” moment. In this post, I want to share my personal experience of exploring how to add a custom component from Langflow to the watsonx Orchestrate Development Edition, a part of the watsonx Orchestrate ADK.
This wasn’t about building the perfect solution right away — it was about learning how things connect, testing it small, and understanding how custom tools created in Langflow can come to life inside watsonx Orchestrate.
Table of contents
- Why I Wanted to Try This
- The Setup and Approach
- Running the example
- What We Can Learn Along the Way
- Summary
- References
1. Why I Wanted to Try This
Since version 1.12.0, the watsonx Orchestrate ADK (Agent Development Kit) supports importing Langflow flows directly. That instantly caught my attention — mainly because I had already worked on a similar example in my earlier post: Create Your First AI Agent with Langflow and watsonx
So I thought: what if I could take that idea further — build a custom component in Langflow, connect it to a simple external API, and then see how it behaves inside watsonx Orchestrate?
The result: a small but complete end-to-end setup to get real-time temperatures from an open weather API.
2. The Setup and Approach
Before diving into code, we need to make sure we have everything set up correctly. For this, we use the local watsonx Orchestrate Development Edition, and we will run the example with Langflow included by using the --with-langflow option.
Here’s the high-level process we will follow:
- Set up the watsonx Orchestrate Development Edition
- Create a new flow in Langflow
- Add and configure a custom component (our weather tool)
- Test it in Langflow’s playground
- Export the flow
- Import it as a tool into watsonx Orchestrate
- Add the tool to an out-of-the-box agent
- Verify it works end-to-end in the Lite Chat UI
3. Running the example
Step 1: Set up the virtual Python environment
Start a new terminal in folder watsonx-orchestrate-adk and insert the following commands.
- Create a folder called
watsonx-orchestrate-adk. - Create a new virtual Python environment
- Load the virtual environment
md watsonx-orchestrate-adk
cd /watsonx-orchestrate-adk
python3.12 -m venv .venv
source ./.venv/bin/activate
python3 -m pip install --upgrade pip
Step 2: Install the watsonx Orchestrate CLI
python3 -m pip uninstall ibm-watsonx-orchestrate
python3 -m pip install ibm-watsonx-orchestrate --upgrade
orchestrate --version
Step 3: Generate the environment file for the ADK
touch .env
Configuration for local usage and watsonx.ai.
To get the relevant information for the local configuration with IBM Cloud and watsonx.ai, please visit the blog post Getting Started with Local AI Agents in the watsonx Orchestrate Development Edition or the IBM watsonx Orchestrate ADK documentation.
# Developer
export WO_DEVELOPER_EDITION_SOURCE=myibm
# IBM ENTITLEMENT
export WO_ENTITLEMENT_KEY=<YOUR_ENTITLEMENT_KEY>
# IBM API KEY
export WATSONX_APIKEY=<YOUR_WATSONX_API_KEY>
export WATSONX_SPACE_ID=<YOUR_SPACE_ID>
# Optional configuration
#export WATSONX_REGION=us-south
#export WATSONX_URL=https://${WATSONX_REGION}.ml.cloud.ibm.com
Step 4: Start the watsonx Orchestrate Developer Edition
You may need to reset the server configuration.
orchestrate server reset
Start the server with the local environment configuration, Langfuse for agent observation, and Langflow to build our tool.
orchestrate env activate local
orchestrate server start --env-file .env --with-langflow --with-langfuse
orchestrate --version
Step 5: Start Lite Chat
orchestrate chat start
Step 6: Open Langflow in a Browser
Open Langflow in the browser http://localhost:7861.
Step 7: Create a blank flow
- Name: TemperatureToolFlow
- Description: Returns only temperature info for given cities. Input must be a comma-separated list of valid city names with no spaces, e.g., ‘Worms,Hamburg,Berlin’.

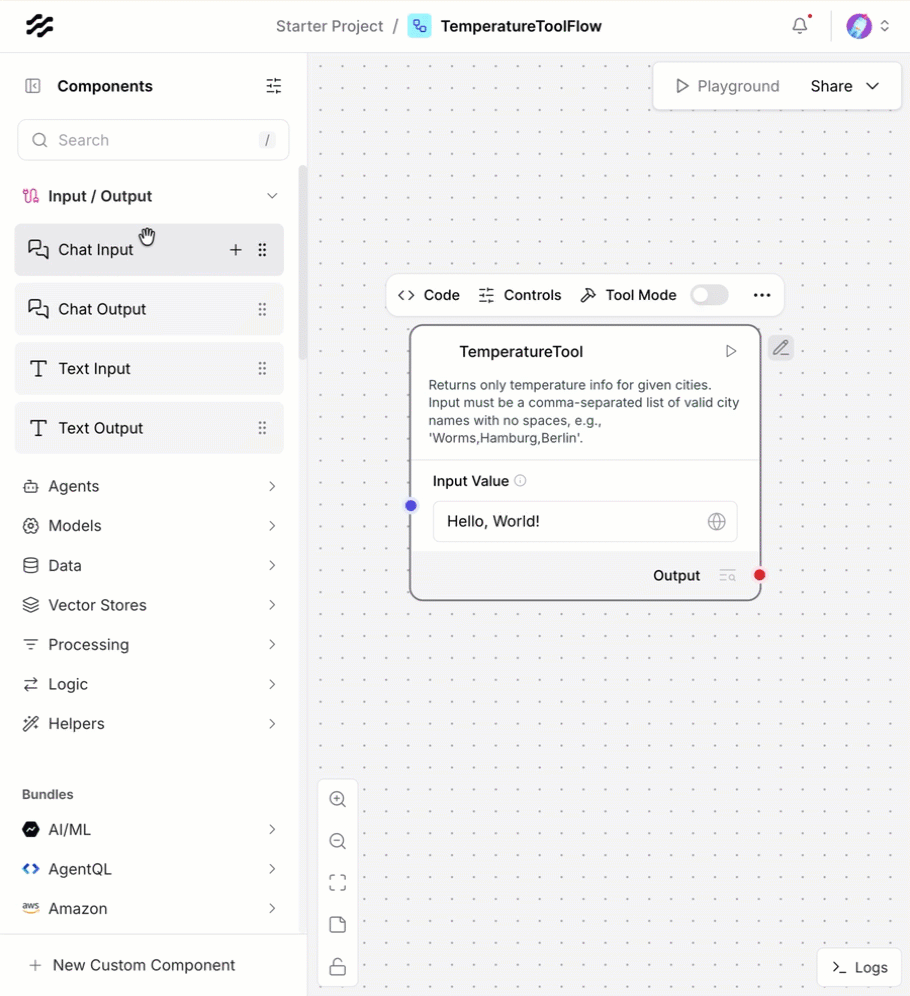
Step 8: Create a custom component
- Displayname Name: TemperatureTool
- Description: Returns only temperature info for given cities. Input must be a comma-separated list of valid city names with no spaces, e.g., ‘Worms,Hamburg,Berlin’.
Step 9: Insert code to build the weather tool
We started with the code from the custom component template in Langflow. We will stay with the flow name and class name should remain CustomComponent, as shown in the code snippet below.
Notes: This was figured out in some tests before for this example code. But when we import the flow into watsonx Orchestrate Development Edition version 1.14.1, we should stay with this configuration for now.
We can change the flow display name display_name = "TemperatureService" and the description.
class CustomComponent(Component):
 name = "CustomComponent"
The GIF below shows how to copy and past the entry:

Important Note:
We need to ensure all import statements are available in the code before we export a flow. In Langflow, for some libraries, you don’t need to list them in the import section of your code; you can use them like the “requests” library.
The code would also work in Langflow without the import statement!
But when you import the code to WatsonX Orchestrate Development Edition, not the same libraries are load by default as in Langflow. So you need an explicit import statement. You must be aware of any used libraries in your tool code of your custom component, before you import them into the watsonx Orchestrate Development Edition; these imports are not known by default. In this case, the import “requests”. That is why it also makes sense to provide the requirements.txt file even when you don’t think this is needed.
# from langflow.field_typing import Data
from langflow.custom.custom_component.component import Component
from langflow.io import MessageTextInput, Output
from langflow.schema.data import Data

import requests

class CustomComponent(Component):
    name = "CustomComponent"
    display_name = "TemperatureTool"
    description = "Returns only temperature info for given cities. Input must be a comma-separated list of valid city names with no spaces, e.g., 'Worms,Hamburg,Berlin'."
    documentation: str = "https://docs.langflow.org/components-custom-components"
    description = (
        "Returns only temperature info for given cities. "
        "Input must be a comma-separated list of valid city names with no spaces, e.g., 'Worms,Hamburg,Berlin'."
    )

    inputs = [
        MessageTextInput(
            name="input_value",
            display_name="Input Value",
            info="Comma-separated city names, e.g. 'Worms,Hamburg,Berlin' (no spaces).",
            value="Hello, World!",
            tool_mode=True,
        ),
    ]

    outputs = [
        Output(display_name="Output", name="output", method="build_output"),
    ]

    # Prepared to use global variables in the future!
    def extract_weather_url(self) -> str:
        #base_weather_url = (self.WEATHER_SERVICE_URL or "").strip()
        base_weather_url = "https://wttr.in/"
        # Ensure it ends with a slash
        if not base_weather_url.endswith("/"):
            base_weather_url += "/"
        return base_weather_url

    # Chat input
    def extract_cities(self):
        # Accept both strict (no spaces) and forgiving input; strip each token
        raw = (self.input_value or "").strip()
        if not raw:
            return []
        return [c.strip() for c in raw.split(",") if c.strip()]

    def get_cities_temperatures(self):
        cities_list = self.extract_cities()
        base_weather_url = self.extract_weather_url()
        cities_output = []

        for city in cities_list:
            # Ensure JSON output from wttr.in
            city_temp_url = f"{base_weather_url}{city}?format=j1"
            try:
                response = requests.get(city_temp_url, timeout=10)
                if response.status_code == 200:
                    content = response.json()
                    # wttr.in JSON structure: current_condition[0].temp_C
                    temperature = content["current_condition"][0]["temp_C"]
                    # convert to int if possible
                    try:
                        temperature = int(temperature)
                    except Exception:
                        pass
                    cities_output.append({"city": city, "temperature": temperature})
                else:
                    cities_output.append({"city": f"{city} ERROR", "temperature": None})
            except Exception:
                cities_output.append({"city": f"{city} ERROR", "temperature": None})

        return cities_output

    def build_output(self) -> Data:
        cities_output = self.get_cities_temperatures()


        if not cities_output:
            full_value={"text": "No valid cities provided.", "cities": "[]"}
            result_text=str(full_value)
            data = Data(value=result_text)
            self.status = data
            return data

        # Sort: hottest first; tie-breaker by city name
        sorted_by_temperature = sorted(
            cities_output,
            key=lambda x: (x["temperature"] if isinstance(x["temperature"], (int, float)) else float("-inf"), x["city"]),
            reverse=True,
        )

        # Build friendly text
        parts = []
        for i, item in enumerate(sorted_by_temperature):
            city = item["city"]
            temp = item["temperature"]
            if temp is None:
                parts.append(f"Could not get temperature for {city}.")
                continue
            if i == 0:
                parts.append(f"The hottest city is {city} with {temp}°C.")
            else:
                parts.append(f"In {city}, the temperature is {temp}°C.")

        full_text = " ".join(parts).strip()
        full_value={"text": full_text, "cities": sorted_by_temperature}
        result_text=str(full_value)
        data = Data(value=result_text)
        self.status = data
        return data
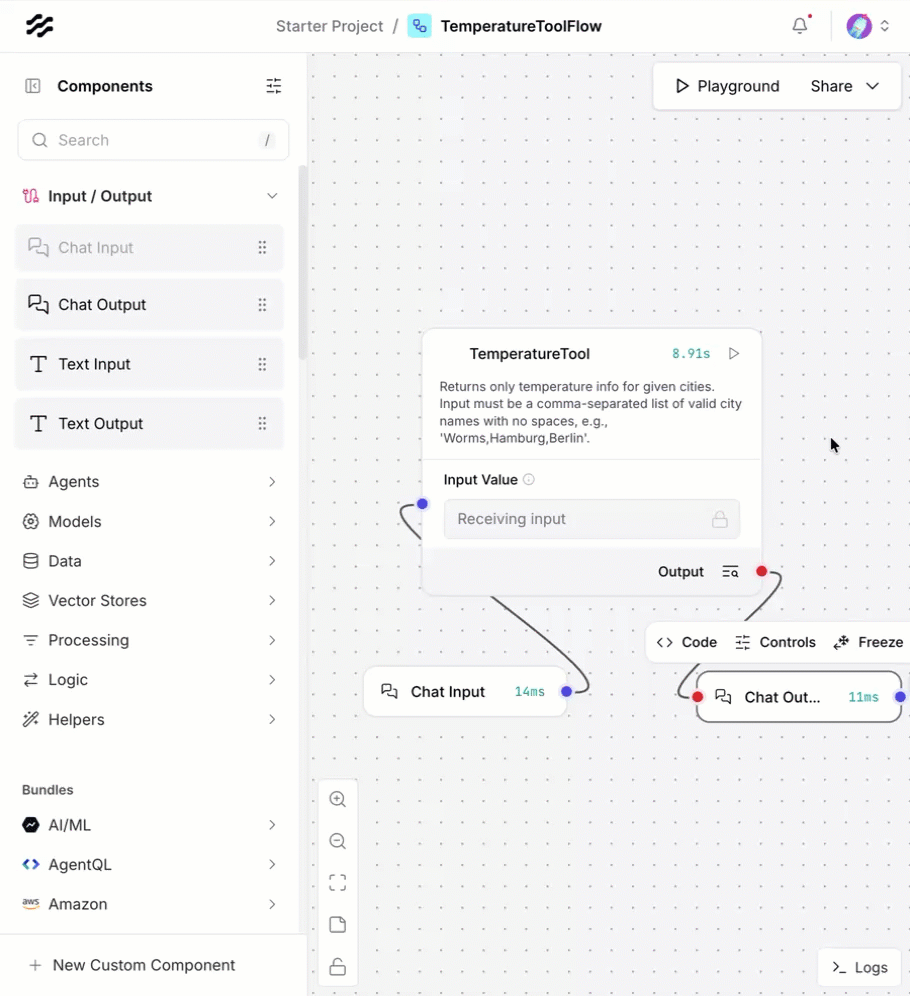
Step 10: Test the custom component in the Langflow playground chat
- Add
Chat inputandChat outputto the flow - Open playground
- Insert the following text: “Hamburg,Worms” in the chat window
The GIF below displays the steps:
Step 11: Export flow
Select the Export flow and ensure you copy the exported file into the newly created folder “watsonx-orchestrate-adk”.
The GIF below displays the steps:

Step 12: Import the Langflow tool
Execute the following commands in the created folder “watsonx-orchestrate-adk”.
- Define the location of the flow export file
- Define the tool name for the tool to be deleted before importing the new tool, to avoid an update on an existing tool.
- Import the tool
export LANGFLOW_TOOL=$(pwd)/TemperatureToolFlow.json
export TOOL_NAME="TemperatureToolFlow"
orchestrate tools remove --name ${TOOL_NAME}
orchestrate tools import -k langflow -f ${LANGFLOW_TOOL}
The GIF below shows the execution:

In our case, we don’t use any connection with authentication to external systems, so we don’t need to create connections and external global variables in Langflow.
Step 13: Start chat and verify the tool is imported
Open Lite Chat in the browser http://localhost:3000/
The GIF below shows the execution:

Step 14: Add the tool to an existing agent
You will notice there is a default agent called AskOrchestrate, we will add the imported tool to this agent.

Step 15: Verify the imported custom component works
Now we ask a question in the default agent chat:
Question: What is the temperature in Worms and Hamburg?
We notice the answer contains only the tool’s raw output; we may need to redefine the tool’s output format, or we can add instructions to the agent behavior to generate a better response in our agent dialog.
But the weather service was invoked, and the agent provided the correct parameters for the tool.

Step 16: Observe the agent in Langfuse
We started at the beginning of the example the watsonx Orchestrate Development Edition with the –with-langfuse parameter option. So we can observe the agent’s behavior and tool invocation in more detail.
The give below show the inspection in Langfuse.

4. What we can Learn Along the Way
This example showed us few key things:
- Integration feels natural — Langflow and watsonx Orchestrate complement each other well.
- Naming matters — keep CustomComponent as class and flow name when importing.
- Dependencies count — if you use libraries like requests, remember they need to be available in your watsonx environment.
- Iterate and refine — the first result may not be perfect, but it’s a valuable proof of concept.
It’s always fascinating to see how small experiments like this open the door to more complex workflows, richer agents, and deeper integrations between open-source and enterprise AI tools.
5. Summary
Overall, ADK usage is easy, and this is an initial, end-to-end example for generating a custom tool in Langflow and importing a dict into watsonx Orchestrate Development Edition on the local machine.
This small journey wasn’t about building a big production solution — it was about connecting ideas. Langflow offers a flexible playground for designing logic and flows, while watsonx Orchestrate provides a powerful framework to operationalize them.
Together, they enable a new way to build, test, and deploy AI-powered tools locally, giving developers the freedom to experiment and create.
6. References
- Langflow GitHub Repository
- watsonx Orchestrate ADK Documentation
- Create Your First AI Agent with Langflow and watsonx
- Getting Started with Local AI Agents in the watsonx Orchestrate Development Edition
I hope this was useful to you and let’s see what’s next?
Greetings,
Thomas
#ai, #agents, #Langflow, #watsonxOrchestrate, #AIIntegration, #AIAgents, #IBMDeveloper

Leave a comment