

This post introduces the use of Block Storage in Virtual Server Instances, particularly in relation to GPUs. It covers the process of mounting and configuring block storage, along with creating, formatting, and mounting the disk. It also provides steps for permanently mounting the storage and attaching existing block storage to a new virtual service instance machine.
With Block Storage, you can add additional storage to your Virtual Server Instance as local storage to persist your data like an extra hard disk for your computer. You can use Block Storage and plug it later into another Virtual Server Instance or save data in an unconnected way, as I said, just like a hard disk.
When you use Block Storage in a Virtual Server Instance with a GPU, you may want to optimize GPU cost usage and start and stop the machine frequently.
In this scenario, you need to mount the Block Storage permanently by adding the storage to the fstab.
The following is information is partly an extract from the IBM Cloud documentation. For more details please visit the IBM Cloud documentation.
Info about the IBM Cloud Block Storage: “local disk performance with SAN persistence and durability. Increase storage capacity available to your IBM Cloud Virtual Servers with a maximum of 48k IOPS. Deploy flash-backed block storage volumes from 20GB to 16TB–and customize it all with a variety of capabilities.
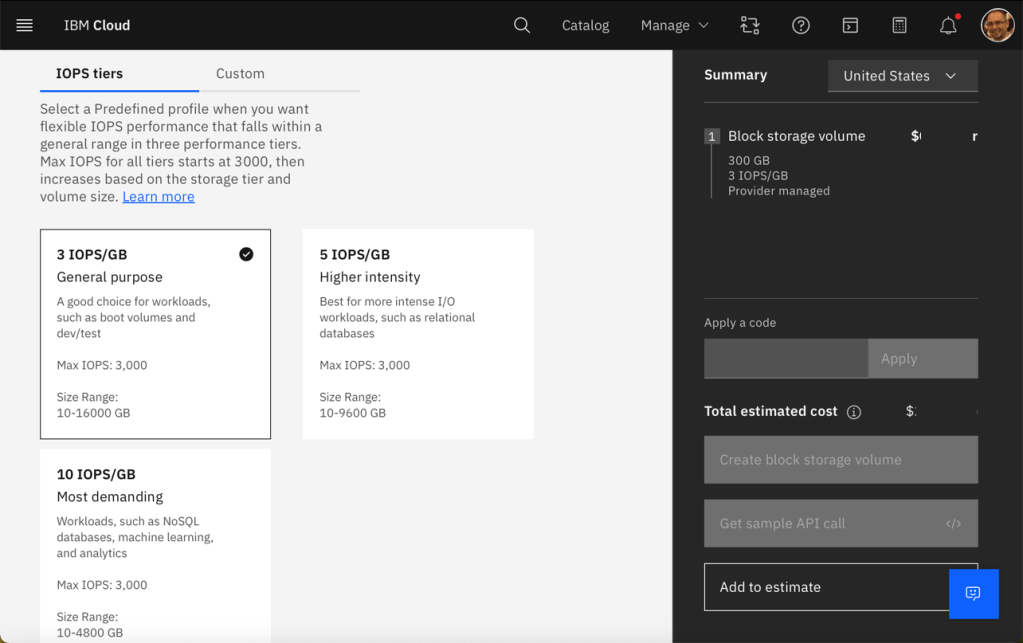
The image below shows an example of creating Block Storage on IBM Cloud.
Step 1: Find the disk
- Execute the following command.
lsblk
- Output:
In the output, you can find the volume vdb disk entry. The vdb disk entry represents your Block Storage data volume.
loop0     7:0    0  63.5M  1 loop /snap/core20/2015
loop1     7:1    0 111.9M  1 loop /snap/lxd/24322
loop2     7:2    0  40.9M  1 loop /snap/snapd/20290
vda     252:0    0   100G  0 disk
├─vda1  252:1    0  99.9G  0 part /
├─vda14 252:14   0     4M  0 part
└─vda15 252:15   0   106M  0 part /boot/efi
vdb     252:16   0   300G  0 disk
vdc     252:32   0   370K  0 disk
vdd     252:48   0    44K  0 disk
Notes:
- vd : Virtio Block Device
- b: second device with the above type
Step 2: Start the partitioning of the volume
- Execute the following command
fdisk /dev/vdb
Step 3: Configure the partion
- Insert “F”
Command (m for help): F
Unpartitioned space /dev/vdb: 300 GiB, 322121498624 bytes, 629143552 sectors
Units: sectors of 1 * 512 = 512 bytes
Sector size (logical/physical): 512 bytes / 512 bytes
Start       End   Sectors  Size
 2048 629145599 629143552  300G
- Insert “n”
Command (m for help): n
Partition type
   p   primary (0 primary, 0 extended, 4 free)
   e   extended (container for logical partitions)
- Insert “p” and use all defaults
Command (m for help): p
Partition type
   p   primary (0 primary, 0 extended, 4 free)
   e   extended (container for logical partitions)
- Insert “w” to save the configuration.
Command (m for help): w
reboot
Step 4: Update systems table
- Execute the following command
lsblk
In the new list you can see the linked partion.
vda 252:0 0 100G 0 disk
├─vda1 252:1 0 99.9G 0 part /
NAME    MAJ:MIN RM   SIZE RO TYPE MOUNTPOINTS
loop0     7:0    0  63.5M  1 loop /snap/core20/2015
loop1     7:1    0 111.9M  1 loop /snap/lxd/24322
loop2     7:2    0  40.9M  1 loop /snap/snapd/20290
vda     252:0    0   100G  0 disk
├─vda1  252:1    0  99.9G  0 part /
├─vda14 252:14   0     4M  0 part
└─vda15 252:15   0   106M  0 part /boot/efi
vdb     252:16   0   300G  0 disk
└─vdb1  252:17   0   300G  0 part
vdc     252:32   0   370K  0 disk
- Execute the mkfs command
/sbin/mkfs -t ext4 /dev/vdb1
- Output:
mke2fs 1.46.5 (30-Dec-2021)
Discarding device blocks: done
Creating filesystem with 78642944 4k blocks and 19660800 inodes
Filesystem UUID: 0600075c-6b42-4585-957f-234118e23435
Superblock backups stored on blocks:
        32768, 98304, 163840, 229376, 294912, 819200, 884736, 1605632, 2654208,
        4096000, 7962624, 11239424, 20480000, 23887872, 71663616
Allocating group tables: done
Writing inode tables: done
Creating journal (262144 blo
Step 5: Format and mount the disk to the machine
fdisk -s /dev/vdb1
mkdir my-data
mount /dev/vdb1 /my-data
Step 6: Restart the machine
Step 7: Mount permanently
When you use a GPU in your VSI you maybe don’t want to run the machine permanently and you restart the machine frequently, therefore you want to ensure that the Block Storage is mapped.
nano /etc/fstab
List the device and find the ID for the block storage.
Find the /dev/vdb1 entry in the output.
sudo blkid
/dev/vdd: LABEL="SWAP-xvdb1" UUID="4cb6a6ed-c62e-4554-b483-9e1721b505cf" TYPE="swap"
/dev/vdb1: UUID="0600075c-6b42-4585-957f-234118e23435" BLOCK_SIZE="4096" TYPE="ext4" PARTUUID="70441f4a-01"
/dev/vdc: BLOCK_SIZE="2048" UUID="2024-XX-XX-XX-XX-XX-00" LABEL="cidata" TYPE="iso9660"
/dev/vda15: LABEL_FATBOOT="UEFI" LABEL="UEFI" UUID="C748-361C" BLOCK_SIZE="512" TYPE="vfat" PARTUUID="f028671b-da2e-490a-9185-3dd559f61c5f"
/dev/vda1: LABEL="cloudimg-rootfs" UUID="c9815c1e-d437-47bc-936e-14cf0555b68e" BLOCK_SIZE="4096" TYPE="ext4" PARTUUID="a9c7a0b6-c642-4e70-b04e-b63799482e37"<br>/dev/loop1: TYPE="squashfs"
/dev/loop2: TYPE="squashfs"
/dev/loop0: TYPE="squashfs"
/dev/vda14: PARTUUID="3388c428-7a2f-4d15-8726-9dc43f52c1ae"
- Open fstab
sudo nano /etc/fstab
- Insert mount point ID to fstab
UUID=0600075c-6b42-4585-957f-234118e23435 /text-to-sql auto rw,user,auto 0 0
- Mount the storage and reboot the machine
mount /my-data
reboot
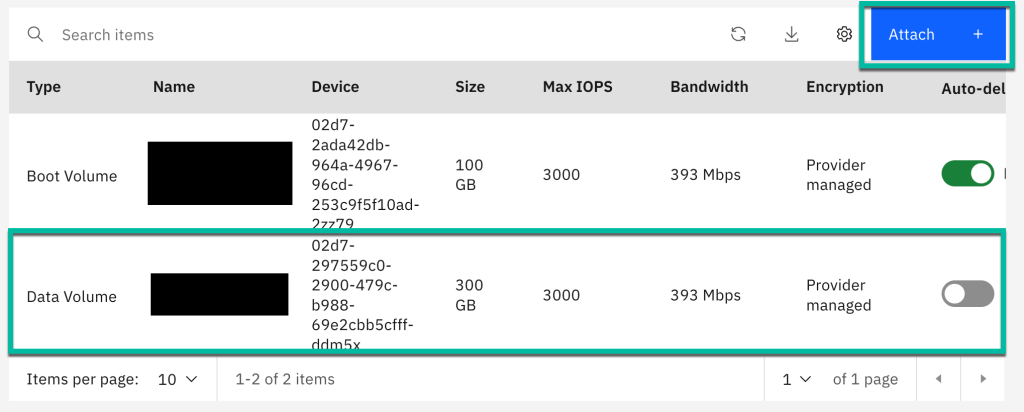
Step 8: Mount existing Block Storage
- Create a new Virtual Service Instance machine and attach your existing Block Storage
- Connect to your remote machine
export FLOATING_IP=MY_IP
export RSA_FILE=my_key
export REMOTE_USER=root
ssh -i ~/.ssh/${RSA_FILE} ${REMOTE_USER}@${FLOATING_IP}
- Execute the following command
lsblk
In the new list you can see the Virtual Disk Drive (data storage) vdd disk.
vdd 252:48 0 300G 0 disk
└─vdd1 252:49 0 300G 0 part
NAME    MAJ:MIN RM   SIZE RO TYPE MOUNTPOINTS
loop0     7:0    0  63.5M  1 loop /snap/core20/2015
loop1     7:1    0 111.9M  1 loop /snap/lxd/24322
loop2     7:2    0  40.9M  1 loop /snap/snapd/20290
vda     252:0    0   100G  0 disk
├─vda1  252:1    0  99.9G  0 part /
├─vda14 252:14   0     4M  0 part
└─vda15 252:15   0   106M  0 part /boot/efi
vdb     252:16   0   370K  0 disk
vdc     252:32   0    44K  0 disk
vdd     252:48   0   300G  0 disk
└─vdd1  252:49   0   300G  0 part
- Find the folder you want to map your disk (my-data)
cd /
ls -a
bin   dev  gpu-test  lib    lib64   lost+found  mnt  proc  run   snap  sys          tmp  var
boot  etc  home      lib32  libx32  media       opt  root  sbin  srv   my-data  usr
- Mount the existing disk to your existing folder.
mount /dev/vdd1 /my-data
- Execute following command to inspect your existing data on the disk.
ls -al /my-data
I hope this was useful to you and let’s see what’s next?
Greetings,
Thomas
#blockstorage, #ibmcloud ,#vsi, #mount, #fstab, #cheatsheet
