

This blog post guides you to an agent and tool example implementation. The source code, for this example, is available in the following Git Repository. Here is the link to the folder Bee Framework Agent example for a simple travel assistant in the repository watsonx AI demos.
The focus is on implementing the Bee custom tool and the detailed observation of the Bee agent.
The implementation of the example is based on the Bee Agent Framework Starter Template and the input for my blog post titled “An Example of How to Use the Bee Agent Framework (v0.0.33) with watsonx.ai.”.
Preview of the executions:
- Two tools in one agent

- Observe the agent

Table of contents:
- Motivation
- Architecture
- System Requirements
- The custom tool implementation for a vacation locations suggestion
- Observe the existing agent with MLFlow
- Setup
- Execution of the agent locally
- Execution of the agent locally with the external observer in MLFlow
- Additional resources
- Summary
1. Motivation
The motivation is to select a simple example use case, which everyone understands means combining vacation locations with weather is ideal, to understand how to implement and integrate tools in a Bee Agent.
This example shows how to implement a Bee Agent configuration because we will not build a new agent. We implement one custom Bee Agent tool for vacation locations and use one Out-Of-The-Box tool for the weather.
With this said the agent should be able to interact in a chat to suggest vacation offerings and tell the temperature of the proposed location. The AI agent will select these tools in the reasoning and act with them to get the correct answer.
We want to ask a question later that requires the agent to use both tools to answer, such as the following.
Question: “What is the best vacation city in Europe, and can you tell me the current temperature in this city?”
Some reasoning/thought outputs of the agent to this question.
Agent (thought) 🤖 : The user wants to know the best vacation city in Europe and the current temperature in that city. I can use the TravelAgent function to find the best vacation city and the OpenMeteo function to get the current temperature.
Agent (thought) 🤖 : Now that I have the best vacation city, I can use the OpenMeteo function to get the current temperature in Paris.
Answer: “The best vacation city in Europe is Paris, France. As of now, the current temperature in Paris is 0.5°C.”
Therefore, we need two tools to get the information we need.
- Connect to another large language model to suggest the locations for a vacation (custom tool)
- Connect to a weather server to get the actual weather information (Out-Of-The-Box tool)
2. Architecture
The diagram below shows the simplified dependencies of the implementation on two levels.
- The implementation of the agent with Out-Of-The-Box and custom tools.

- The observability of the agent with an external tool

3. The custom tool implementation for a vacation location suggestion
To implement this functionality, we don’t connect to other systems to collect information from vacation locations, hotels, or more; we use an IBM Granite model to provide us the best location for a vacation information.
So, we need to implement the connection to watsonx.ai in the tool to use this model.
Then, we must define a specific prompt to do this task and provide the result in a particular format.
The custom tool does connect to another large language model to suggest the locations for a vacation.
I know the name of our tool includes the named agent as an overlap, which can lead to misunderstanding, but that is what can happen in the real world.
Remember that the name and description of the tool are essential in how they are written because this text will be used in the agent prompt. It must clearly reflect what the tool does because when the agent works on reasoning/thinking about which tool to select for a specific task, the agent selects the right tool for the job.
name = "TravelAgent";
description = `Provides a list of vacation options to visit it answers with the reasons to travel to a city.
- Prompt to get the suggestion in a specific format.
# Role
You are a travel agent and you provide the best suggestions related to vacation trips.
# Instructions
You must answer in following a JSON list format that contains following information.
You must provide only 2 entries in the list at the moment.
[{
"rank": NUMBER
"city": TEXT
"country": TEXT
"reason_to_travel": TEXT
"main_interests_covered": TEXT
}]
Finally, my prompt was working ;-).
- This is is the source code of the tool in the repository.
import "dotenv/config";
import { BaseToolOptions,
BaseToolRunOptions,
JSONToolOutput,
Tool,
ToolInput, } from "bee-agent-framework/tools/base";
import { RunContext } from "bee-agent-framework/context";
import { WatsonXLLM } from "bee-agent-framework/adapters/watsonx/llm";
import { z } from "zod";
type ToolOptions = BaseToolOptions;
type ToolRunOptions = BaseToolRunOptions;
interface TravelAgentToolResponse {
rank: number;
city: string;
country: string;
reason_to_travel: string;
main_interests_covered: string;
}
export class TravelAgentTool extends Tool <JSONToolOutput<TravelAgentToolResponse>,ToolOptions,
ToolRunOptions>{
name = "TravelAgent";
description = `Provides a list of vacation options to visit it answers with the reasons to travel to a city.`;
inputSchema() {
return z.object({ question_input: z.string().describe("Question of the traveler.")})
}
static {
this.register();
}
protected async _run( {question_input: question, ...input}: ToolInput<this>,
_options: BaseToolRunOptions | undefined,
run: RunContext<this>,
) {
const llm_granite = new WatsonXLLM({
modelId: "ibm/granite-13b-chat-v2",
projectId: process.env.WATSONX_PROJECT_ID,
baseUrl: process.env.WATSONX_BASE_URL,
apiKey: process.env.WATSONX_API_KEY,
parameters: {
decoding_method: "greedy",
max_new_tokens: 500,
stop_sequences: ["]\n"],
repetition_penalty: 1,
},
});
let prompt = '# Role\n' +
'You are a travel agent and you provide the best suggestions related to vacation trips.\n\n' +
'# Instructions\n' +
'You must answer in a JSON list format that contains the following information.\n' +
'You must provide only two entries in the list at the moment.\n\n' +
'[{\n' +
'"rank": NUMBER\n' +
'"city": TEXT\n' +
'"country": TEXT\n' +
'"reason_to_travel": TEXT\n' +
'"main_interests_covered": TEXT\n' +
'}]\n\n' +
'Now answer the following question : {question}'
console.log("Log:\nPrompt:\n" + prompt + "\n")
let formatted_prompt = prompt.replace("{question}", question);
console.log("Log:\nFormated prompt:\n" + formatted_prompt + "\n")
try {
const result = await llm_granite.generate(formatted_prompt);
console.log(result); // Output: Async data has been fetched!
} catch (error) {
console.error("Error fetching data:", error);
}
const resp = await llm_granite.generate(formatted_prompt);
console.log("Log:\nLLM result:\n" + resp.toString())
const data: TravelAgentToolResponse = JSON.parse(resp.results[0].generated_text);
return new JSONToolOutput(data);
}
}
- Example result for this prompt with the question:
What is the best vacation city in Europe?
[
{
"rank": 1,
"city": "Paris",
"country": "France",
"reason_to_travel": "The City of Light offers a unique blend of history, culture, art, fashion, and gastronomy. From the iconic Eiffel Tower to the Louvre Museum, the Champs-Élysées, and the Seine River, there's something for everyone. Additionally, Paris is known for its charming neighborhoods, delicious French cuisine, and romantic atmosphere.",
"main_interests_covered": "Art, Architecture, History, Culture, Shopping, Cuisine, Romance"\n' +
},
{
"rank": 2,
"city": "Rome",
"country": "Italy",
"reason_to_travel": "Rome is a city steeped in history, art, and architecture. Famous for its Colosseum, Roman Forum, and Vatican City, Rome offers a unique glimpse into the past. The city's rich cultural heritage, delicious cuisine, and picturesque piazzas make it a must-visit destination. Whether you're interested in history, art, or simply soaking up the ambiance, Rome has something for everyone.",
"main_interests_covered": "History, Art, Architecture, Food, Landmarks"
}
]
- Example execution
The image below show an example execution.

4. Observe the existing agent with MLFlow
The Bee uses MLFlow to save the internal action steps.
“MLFlow is a platform to streamline machine learning development, including tracking experiments, packaging code into reproducible runs, and sharing and deploying models.” MLFlow can be used under an Apache-2.0 license.
To learn how to use MLFlow in detail, please visit the documentation in the GitHub repository.
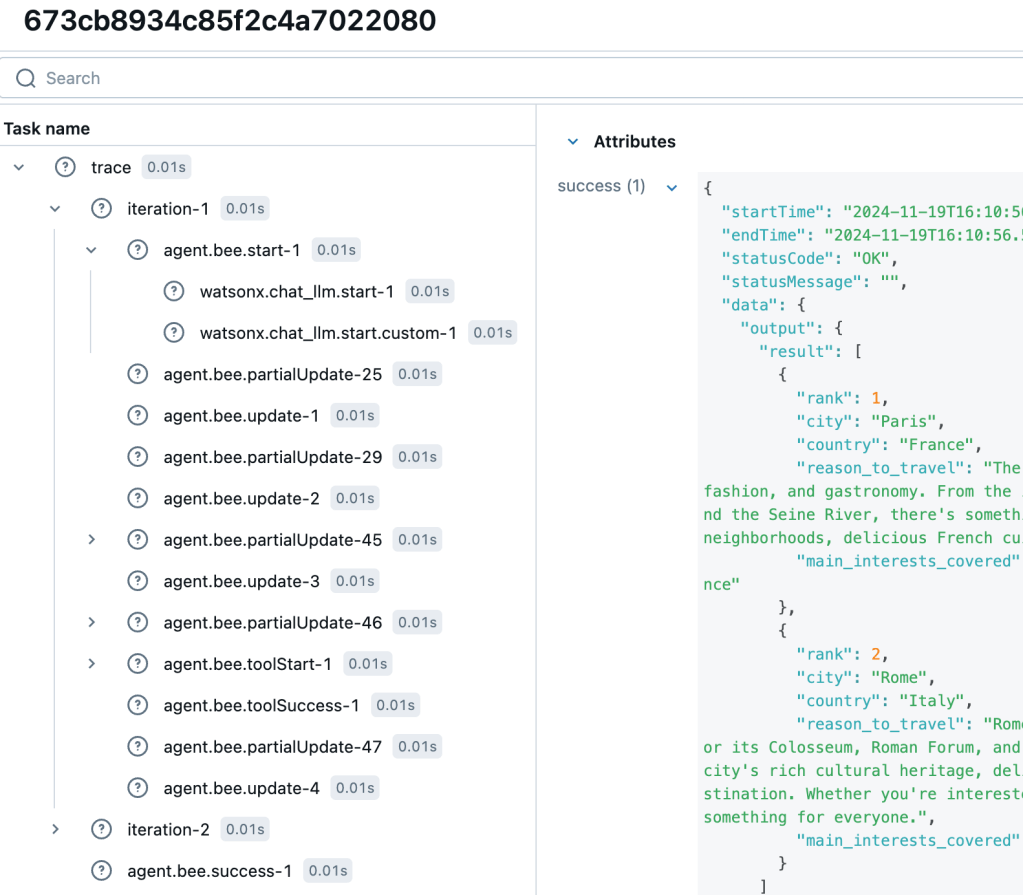
Until now, we have observed the agent’s steps in the terminal. Now, we connect to mlFlow and can navigate the various steps with concrete entries.
Now we can externally inspect a task, the detailed trace, interactions, and steps.
The image below shows an example outline.
The image below shows a simplified architecture.

Here is the relevant code to set up the connection in the agent_observe.ts implementation.
.middleware(
 createObserveConnector({
 api: {
 baseUrl: "http://127.0.0.1:4002",
 apiAuthKey: "testing-api-key",
 },
 cb: async (err, data) => {
          if (err) {
 console.error(`Agent 🤖 : `, ObserveError.ensure(err).explain());
 } else {
 console.info(`Observe 🔎`, data?.result?.response?.text || "Invalid result.");
 console.info(
              `Observe 🔎`,
              `Trace has been created and will shortly be available at http://127.0.0.1:8080/#/experiments/0`,
 );
 }
 },
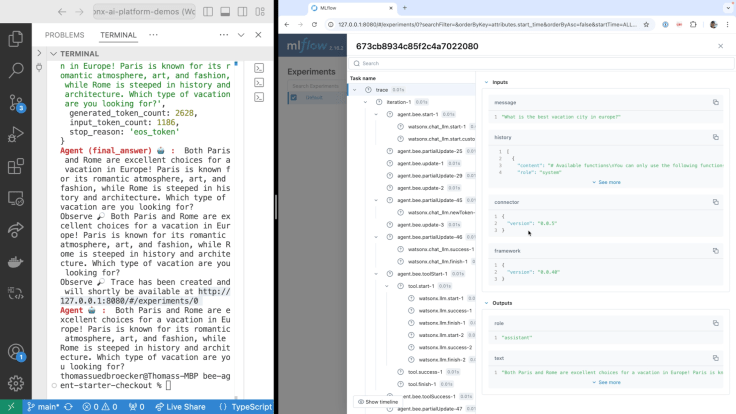
- Example execution
The image below show an example execution.
5. 📦 System Requirements
- JavaScript runtime NodeJS > 18 (ideally installed via nvm).
- Container system Podman (VM must be root full machine) Note: You can find an example configuration in this blog post CheatSheet: Essential Steps to Configure Podman Machines
- Large language model provider watsonx
6. 🛠️ Setup
6.1 Install Node.js
Step 1: Clone the repository and navigate to the code
git clone https://github.com/IBM/watsonx-ai-platform-demos
cd /agents/beeframework/watsonx-simple-travel-agent/
Step 1: Download Node.js
curl -o- https://raw.githubusercontent.com/nvm-sh/nvm/v0.40.0/install.sh | bash
- Output
cat /Users/[USER]/.zshrc
# Created by `pipx` on 2024-04-15 12:44:54
export PATH="$PATH:/Users/[USER]/.local/bin"
export PATH="/opt/homebrew/opt/libpq/bin:$PATH"
. ~/.ilab-complete.zsh
. ~/.ilab-complete.zsh
•
export NVM_DIR="$HOME/.nvm"
[ -s "$NVM_DIR/nvm.sh" ] && \. "$NVM_DIR/nvm.sh"  # This loads nvm
[ -s "$NVM_DIR/bash_completion" ] && \. "$NVM_DIR/bash_completion"  # This loads nvm bash_completion
Note: You may need to execute the following command in addition.
sudo chown -R 501:20 "/Users/[USER]/.npm"
Step 2: Node Version Manager (nvm)
The following installation ensures you install a specific version of Node Version Manager (nvm), and you can also use the nvm install.
nvm install 20
Step 3: Install TypeScript
You don’t need to install TypeScript globally, but we do it in this case.
sudo npm install typescript -g
sudo npm i tsx -g
sudo npm i typescript-rest-swagger -g
Step 4: Install dependencies
npm ci
Step 5: Set the environment variables
Configure your project by filling in missing values in the .env file
cat .env.template > .env
## WatsonX
export WATSONX_BASE_URL=https://eu-de.ml.cloud.ibm.com
export WATSONX_PROJECT_ID="XXXX"
export WATSONX_API_KEY="XXXX"
export WATSONX_MODEL="meta-llama/llama-3-1-70b-instruct"
Step 5: Verify the container Infrastructure
Ensure you have Podman installed – requires compose and rootful machine (if your current machine is rootless, please create a new one, also ensure you have enabled Docker compatibility mode).
Note: You can find an example configuration in this blog post CheatSheet: Essential Steps to Configure Podman Machines
7. 🛠️ Execution of the agent locally
To execute the agent locally, execute the following command.
npm run start src/agent.ts
Note: The npm run start invokes "start": "npm exec tsx" for the script specification in the package.json.
This command will ask the agent the following question:
"What is the best vacation city in Europe, and can you tell me the current temperature in this city?"
This question requires that the agent use both tools to answer the input, and the result will look like this answer from the agent.
According to my research, the best vacation city in Europe is Paris, France. The City of Light offers a unique blend of history, culture, art, fashion, and gastronomy. As for the current temperature, it's 2.5°C (36.5°F) in Paris right now.
8. 🔎 Execution of the agent locally with the external observer
To enable the complete visibility of the agent’s inner workings, we connect to the observability stack running in Podman compose.
- The MLFlow is used as UI for observability.
- The Bee Observe is the observability service (API) for gathering traces from the Bee Agent Framework.
- The Bee Observe Connector is the observability connector that sends traces from the Bee Agent Framework to Bee Observe.
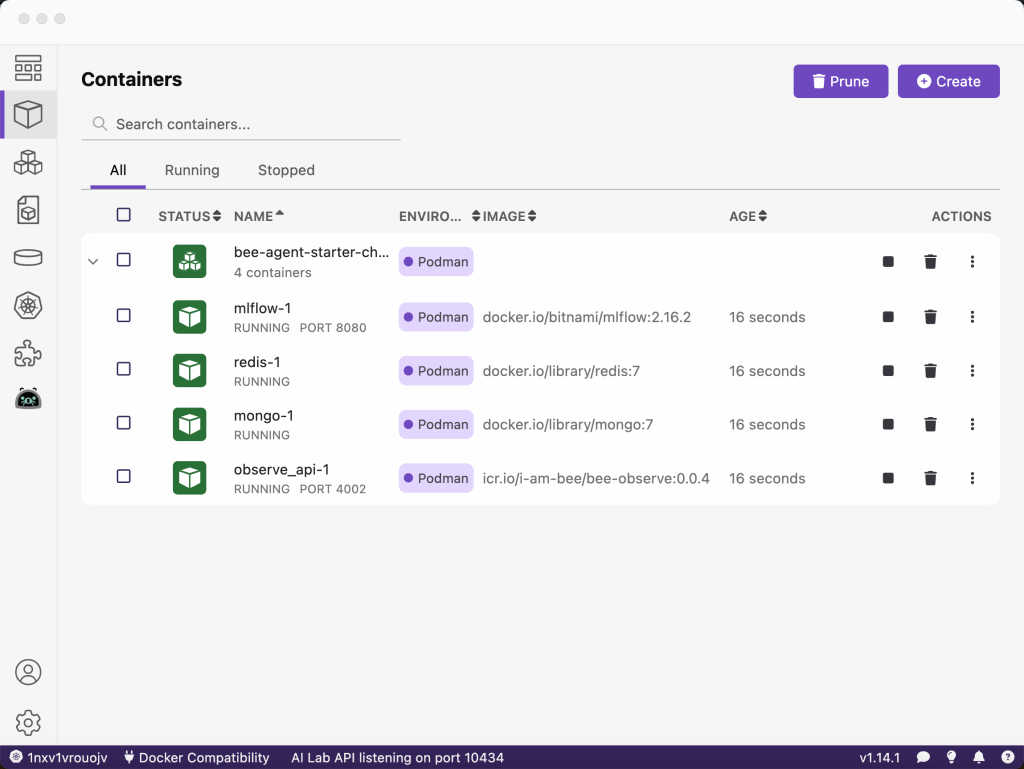
Step 1: Start all needed services with Podman compose
npm run infra:start --profile=observe
The image shows the running Podman compose on the local machine.
Note: Configuration file is infra/observe/.env.docker.
Step 2: Run the agent
npm run start src/agent_observe.ts
Step 3: Verify the visualized trace
See visualized trace in MLFlow web application http://127.0.0.1:8080/#/experiments/0
- Example to select the new entry

- Inspect the steps

9. Additional resources
- YouTube
- Bee
- watsonx
- Machine learning
10. Summary
The Bee project provides a powerful “Open-source framework for building, deploying, and serving powerful agentic workflows at scale.” As you can see, you don’t need to use all functionalities at once. You can iterate step by step to understand and take advantage of this evolving framework.
I am impressed by the transparency and observability possibilities for the tools and the agent’s implementation. This transparency and observability will help a lot when building more complex systems.
I hope this was useful to you and let’s see what’s next?
Greetings,
Thomas
#watsonx, #typescript, #ai, #ibm, #granite, #agents, #ai, #beagentframework, #beagent, #aiagents, #podman, #functioncalls #tools, #agents, #mlflow
