

The objective of this blog post is to share with you an extract of a “simple” example project on GitHub I created to get started with: How to access a Java Microservice using the Open Source Identity and Access Management with Keycloak and JavaWebToken (JWT).
In that project I want to …
-
… secure the Microservice with Authentication
-
… secure a specific REST Endpoint invocation of the Microservice Authorization
-
… test the access to the Microservice with a JUnit test.
The Microservice runs on OpenLiberty and uses MicroProfile. The example Microservice is called Authors and is from the open sourced Cloud Native Starter project. So, you can compare the implementation of the Authors Microservice in this project with the implementation in the Cloud Native Starter project. The example doesn’t use a frontend UI for the Authentication. The JUnit test will authenticate with the Keycloak REST API.
Here is a 7 min YouTube video about the setup of the example:
Architecture
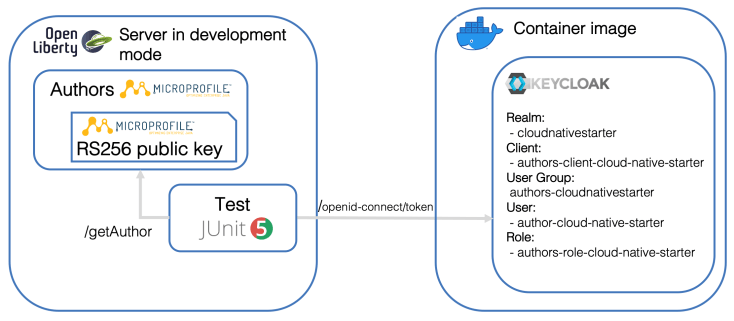
The Authors Microservice application supports a protected login with JWT and the specific REST call getAuthors is protected by a specific user role. The image below contains a simplified architecture overview of the example which runs on the local machine, here you see:
-
The
JUnittest and the Authors Microservice are running on aOpenLibertyserver -
The needed
signingKey is saved on the OpenLiberty server in the Authors Microservice using a MicroProfile configuration -
The
JUnittest requests abearer tokento access theAuthorsservice -
The major configuration information inside
Keycloak
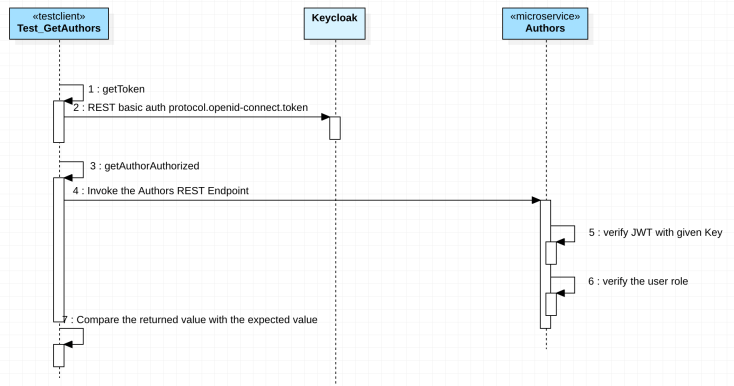
In the next image we see a very simplified overview of the test execution to access Authors Microservice using Keycloak, OpenLiberty, MicroProfile and JWT , is shown in the sequence diagram below.
-
Start the
JUnittest calledTest_GetAuthors. The test invokes the private operationgetToken. -
Request a bearer token from
Keycloakusing a REST Endpoint (http://localhost:8282/auth/realms/protocol/openid-connect/token).
The request contains the needed Keycloak data for the authorization as parameters to get thebearer token.
formData.param("username", user)
.param("password", password)
.param("realm", realm)
.param("grant_type", grant_type)
.param("client_id", client_id);
Thatbearer tokendoes contain theJavaWebToken, which is protected with theRS256 (RSA Signature with SHA-256).RS256is a JWT signing algorithm. -
Proceeding with the test by invoking the private operation
getAuthorAuthorized. -
Now the
AuthorsREST Endpoint (http://localhost:3000/api/v1/getAuthor) is invoked using the bearer token we got from Keycloak, which contains the JWT.
The JWT does contain all needed information such as user, role and soon. -
Verifying the JWT by the
AuthorsMicroservice application, that will be done automatically, by using the givenRS256 signed Keyon theOpenLibertyserver in the Authors Microservice. When the provided Key is validated, the JWT can be used to access the REST Endpoint of the Authors Microservice. -
Now the Endpoint validates, does the JavaWebToken contain the right role to access the information?
-
Then the response data will be compared with the expected value.
Configuration for the OpenLiberty server
The following two parts do contain the information for the server.xml and the microprofile-config.properties files.
The server.xml
We need to define the configuration for the JWT for the OpenLiberty server to ensure that server finds the values for the issuer, audiences, userNameAttribute of our JWT. Below is an extract to the JWT content and a table with the mapping from JWT to the OpenLiberty server.xml:
|
JWT |
OpenLiberty server.xml |
|---|---|
|
iss |
issuer |
|
aud |
audiences |
|
preferred_username |
userNameAttribute |
 "iss": "http://localhost:8282/auth/realms/cloudnativestarter", (issuer)
 "aud": "account", (audiences)
 "preferred_username": "author-cloud-native-starter" (userNameAttribute)
The issuer, audiences, userNameAttribute values must be mapped to the values in the server.xml file. Here you find the definitions which OpenLiberty expects in a JWT.
This is an extract of the server.xml for our OpenLiberty server:
<span class="prism-token token 1 tag tag punctuation "> &lt;</span><span class="prism-token token 1 tag tag ">mpJwt</span> <span class="prism-token token 1 tag attr-name ">id</span><span class="prism-token token 1 tag attr-value punctuation ">="</span><span class="prism-token token 1 tag attr-value ">myMpJwt</span><span class="prism-token token 1 tag attr-value punctuation ">"</span> <span class="prism-token token 1 tag attr-name ">jwksUri</span><span class="prism-token token 1 tag attr-value punctuation ">="</span><span class="prism-token token 1 tag attr-value ">http://localhost:8282/auth/cloudnativestarter/public/protocol/openid-connect/certs</span><span class="prism-token token 1 tag attr-value punctuation ">"</span> <span class="prism-token token 1 tag attr-name ">issuer</span><span class="prism-token token 1 tag attr-value punctuation ">="</span><span class="prism-token token 1 tag attr-value ">http://localhost:8282/cloudnativestarter/realms/public</span><span class="prism-token token 1 tag attr-value punctuation ">"</span> <span class="prism-token token 1 tag attr-name ">userNameAttribute</span><span class="prism-token token 1 tag attr-value punctuation ">="</span><span class="prism-token token 1 tag attr-value ">preferred_username</span><span class="prism-token token 1 tag attr-value punctuation ">"</span> <span class="prism-token token 1 tag attr-name ">audiences</span><span class="prism-token token 1 tag attr-value punctuation ">="</span><span class="prism-token token 1 tag attr-value ">account</span><span class="prism-token token 1 tag attr-value punctuation ">"</span><span class="prism-token token 1 tag punctuation ">&gt;</span> <span class="prism-token token 3 tag tag punctuation ">&lt;/</span><span class="prism-token token 3 tag tag ">mpJwt</span><span class="prism-token token 3 tag punctuation ">&gt;
The microprofile-config.properties
microprofile-config.properties file and is located in src/main/webapp/META-INF/microprofile-config.propertiesmp.jwt.verify.publickey.location=/META-INF/keycloak-cloudnativestarter-key.pem mp.jwt.verify.issuer=http://localhost:8282/auth/realms/cloudnativestarter
In our case, we need to insert the public RS256 signed key from Keycloak in following file src/main/webapp/META-INF/keycloak-public-key.pem. MicroProfile uses the file microprofile-config.properties to get the location of the key.
Classes for the Authors Microservice
To use the JWT in the Microservice itself we need to change following relevant classes of the Authors Microservice you can compare to the Cloud Native Starter project.
-
AuthorsApplicationclass represents our RESTful application and is configured to use login with JWT. -
GetAuthorclass represents the REST API Endpoint, which is protected with the JWT security, defined by a specific role.
The simplified classdiagram shows an overview of classes of the project for the Authors Microservice and the JUnit test. At the moment only the classes AuthorsApplication and GetAuthor are relevant.

With the import of org.eclipse.microprofile.auth.LoginConfig and the annotation @LoginConfig(authMethod = "MP-JWT") we add the JWT authentication to the RESTful AuthorsApplication class and with javax.annotation.security.DeclareRoles and annotation @DeclareRoles({“authors-role-cloud-native-starter”}) we define the roles, which can be used in the Microservice for Endpoint implementations to enable a protection.
Here you see the relevant code of the AuthorsApplication class.
import org.eclipse.microprofile.auth.LoginConfig;
import javax.annotation.security.DeclareRoles;

@LoginConfig(authMethod = "MP-JWT")
@DeclareRoles({"authors-role-cloud-native-starter"})
In the GetAuthor class we do protect the invocation of the REST Endpoint with the role @RolesAllowed({"authors-role-cloud-native-starter"}) and we show the content of the JWT content later.
import javax.annotation.security.RolesAllowed;
import org.eclipse.microprofile.jwt.JsonWebToken;
import javax.inject.Inject;
....
 @Inject private JsonWebToken tokenInformation;
 @RolesAllowed({"authors-role-cloud-native-starter"})

....

 if (tokenInformation != null){
    System.out.println("... [Author] MP JWT config message: " + message );
    System.out.println("... [Author] MP JWT getIssuedAtTime " + tokenInformation.getIssuedAtTime() );
....
For more details please visit the GitHub project with the GitBook documentation Get started with Keycloak, Microprofile and OpenLiberty
Additional Resources
Useful links to blog posts, tools and documentations.
- MicroProfile JWT Authentication with Keycloak and React (Philip Riecks)
- MicroProfile JWT with Keycloak (Hayri Cicek)
- MicroProfile Rest Client for RESTful communication (Philip Riecks)
- JAX-RS – @POST with HTML Form Example (LogicBig.com)
- Java Code Examples for javax.ws.rs.client.WebTarget (programcreek)
- Code sample form and entity (Codota)
- API login and JWT token generation using Keycloak (RedHat Developers)
- JWT Decoder (JWT.io)
- Write and execute a JUnit (Thomas Suedbroecker)
I hope this was useful for you and let’s see what’s next?
Greetings,
Thomas
#IBMDeveloper, #Java, #Docker, #JWT, #Keycloak, #OpenLiberty, #JUnit, #MicroProfile

Here is the related GitHub project https://github.com/thomassuedbroecker/get-started-with-keycloak-microprofile-openliberty
LikeLike