

This blog post outlines the development of a custom Bee Agent utilizing the Bee Agent Framework examples, focusing on creating an agent that functions independently from the Bee Stack and responds in German. The implementation includes discussions on requirements, example agents from the framework, coding techniques using TypeScript, and references to GitHub repositories to execute the examples.
Before we start doing this, we need to inspect a basic agent structure in the motivation.
I want to highlight that Tomas Dvorak did an awesome presentation about the Bee Framework. This blog post will reuse images from this presentation.
All information in this blog post is based on the status of the Bee Framework on January 14 2025.
The GIF below shows the final example result with the custom agent invocation inside the server, which answers questions in German. On the left, we see the console output, and on the right, the swagger UI of our TypeScript server.

Note: If you want to get into the topic of the Bee Agent framework, you can read my My Bee Agent Framework and watsonx.ai development Learning Journey.
- Motivation
- The Example Custom Agent
- 2.1 What are our requirements?
- Which objective do we have?
- Do we provide tools?
- Do we want to loop the tool’s output?
- Do we want to run the agent independently from the Bee Stack, which provides a custom endpoint to consume the agent functionality?
- 2.2 What is our approach to build a custom agent?
- 2.2.1 Which of the example Agent implementations are available in the Bee Framework?
- 2.3 What is our selection of one of two agent implementation examples for our custom agent implementations?
- Custom Agent
- RePlan Agent
- 2.4 How to implement the TypeScript server to run the custom agent?
- 2.5 How to execute our example implementations?
- 2.1 What are our requirements?
- Summary
The source code of the examples are on GitHub.
1. Motivation
After I did the inspection:
- How do you run a basic Bee Agent?
- How to build a TypeScript system tool for a Bee Agent?
- How do you build a simple Custom Python tool for a Bee Agent?
All of these inspections were conducted using large language models running on IBM watsonx, so the next step will follow.
The question is how to build a custom Bee Agent that can be used independently from the Bee Stack.
That means we only built the Custom Agent with the Bee Agent Framework in TypeScript, so we are starting to get more familiar with how to work with the system prompts in the context of Custom Bee Agents.
When we focus on this we need to keep in mind for large language model agents.
“An LLM agent is a program powered by an LLM and controlled by a set of constraints.”
The image below illustrates how the agent program works. We have an input and an output. In the middle, there is the combination of code, a large language model, and tools (small programs 😉 also).
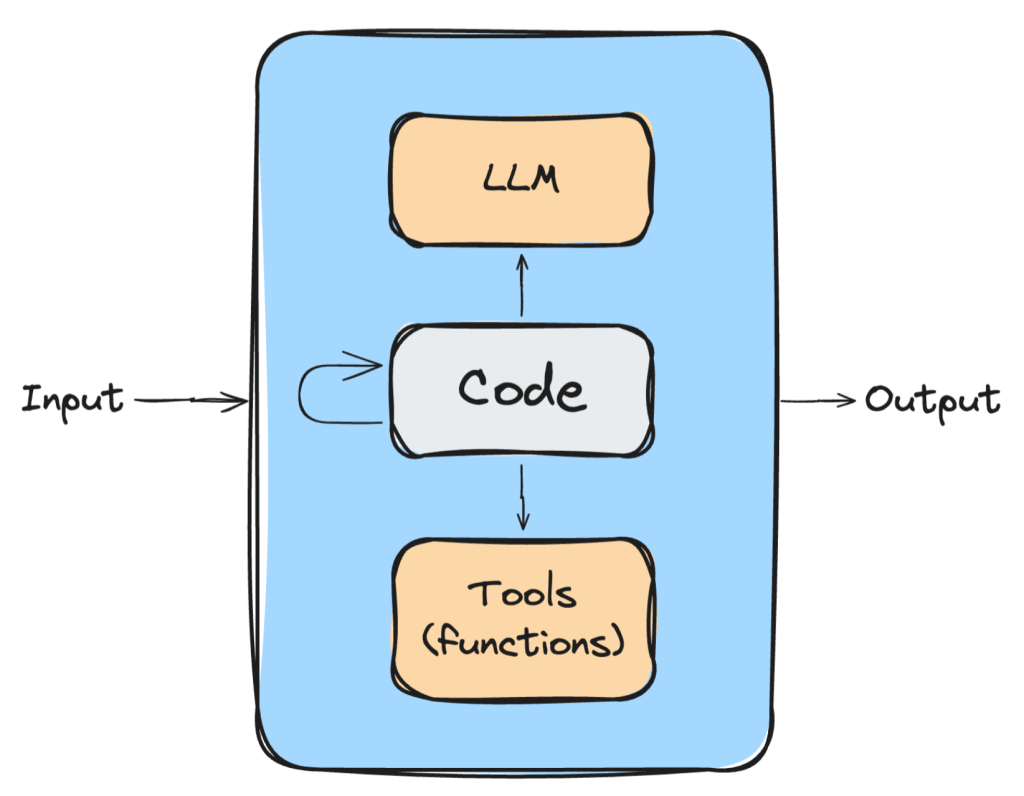
In the end, there is only the final output as text from our agent “program”.
This finding leads to the question:
How do we control this output in the program, and how does it work?
In this context, we will focus on the system prompt, which is mainly the core of an agent and by using the ReAct prompting technique it is possible to define an interaction with external systems.
Let us take a look at the image below:
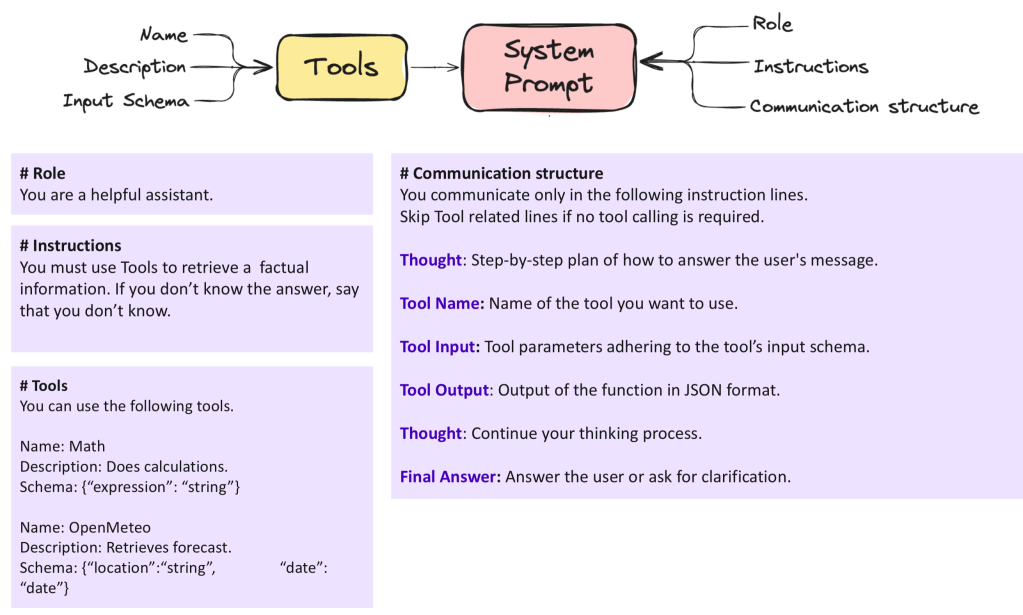
In this image, we can see important parts of a system prompt:
- Role
- Instructions
- Tools
- Communication structure
You can find more about implementing custom Bee Agent in the Bee Agent documentation.
2. The Example Custom Agent
To build the Example Custom Agent, we will cover following topics.
- What are our requirements?
- What is our approach to build a custom agent?
- What is our selection of one of two agent implementation examples for our custom agent implementations?
- How to implement the TypeScript server to run the custom agent?
- How to execute our example implementations?
2.1 What are our requirements?
2.1.1 Which objective do we have?
We will build an example for a custom agent to generate the output only in German restively.
2.1.2 Do we provide tools?
We want to provide the custom agent system tools from the framework.
2.1.3 Do we want to loop the tool’s output?
We don’t want to implement iterations/loops on the usage of given tools.
2.1.4 Do we want to run the agent independently from the Bee Stack, which provides a custom endpoint to consume the agent functionality?
Therefore, we will put the agent into a TypeScript server.
2.2 What is our approach to build a custom agent?
We will first identify which example agent implementation can fulfill our requirements directly from the start or with some changes in the code.
Then, we will implement a TypeScript server to run the agent independently from the Bee Stack.
2.2.1 Which of the example Agent implementations are available in the Bee Framework?
We will notice that the custom agent examples will not contain all the parts we have seen before for the system prompt in the motivation section.
We will implement and test two agents.
- First we will inspect the
Custom Agentfrom the agent examples.
This example does not contain any tool invocation and contains a minimal system prompt:
You are a helpful assistant that generates only valid JSON adhering to the following JSON Schema.
\`\`\`
{{schema}}
\`\`\`
IMPORTANT: Every message must be a parsable JSON string without additional output.
That prompt also doesn’t contain the full stack of the section for the system prompt definition you have seen in the image above.
- Second and we will inspect the
RePlan Agentin the Bee Agent Framework and its usage in the exampleRePlan Agent
This example does not contain any tool invocation and contains a system prompt including tools usage, but the tools usage definition is not as formal as it is in the Bee Agent definition:
The assistant is created by IBM and refers to itself as Bee. It's named after the IBM logo.
The assistant is very intelligent and helpful. It always thinks ahead, and uses smart approaches to solve the user's problems. The assistant is an expert-level user of the provided tools, and can utilize them to their maximum potential.
The assistant is forbidden from using factual information that was not provided by the user or tools in this very conversation. All information about places, people, events, etc. is unknown to the assistant, and the assistant must use tools to obtain it.
Output Schema: {{schema}}
That prompt doesn’t contain the full stack and does not following the provided structure you have seen in the image above (role, instructions and so on), that shows that we have freedom to define what we want, at the end it should work :-).
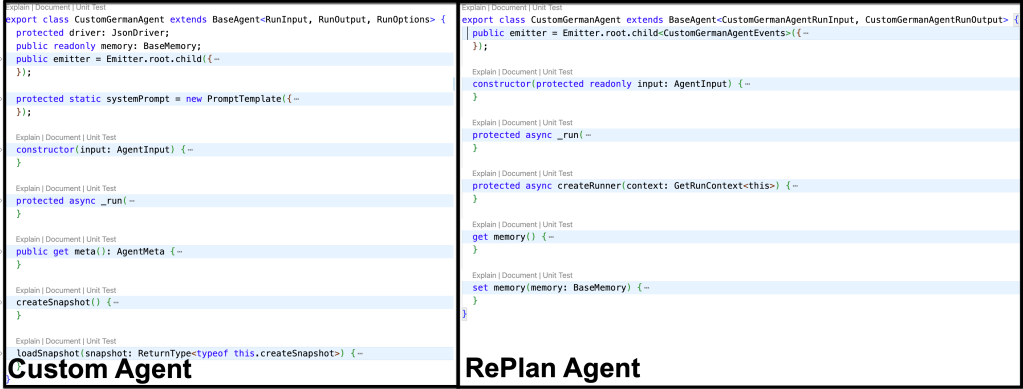
The following image contains the two CustomGermanAgent Classes we define in the example based on the Custom Agent and RePlan Agent examples. The objective is not to cover all the differences. It is only that you get the impression that you can see the common methods and variables.
The is an extraction of the image above.
- Methods:
constructor,_run - Variables: emitter (An emitter is a core functionality of the framework that allows you to see what is happening under the hood.)
2.3 What is our selection of one of two agent implementation examples for our custom agent implementations?
We don’t go into every aspect of the implementation. This will just highlight some of the change made to convert the custom agent example to the version of the CustomGermanAgent. To make this development easy, we will create a new repository based on the Bee Agent Framework Starter.
2.3.1 Custom Agent
The first change is in the system prompt for agent class.
Now it contains a section with System Instructions and the schema and the reminder always to produce JSON output are still remaining in this system prompt.
The reason for this the Agent “Programm” implementation does extract the output of the large language model with a JSON praser.
To visit the source code press on the link of the custom agent.
protected static systemPrompt = new PromptTemplate({
schema: z.object({
schema: z.string().min(1),
}),
template: `## System Instructions
You are a knowledgeable and friendly AI assistant named Thomas.
Your role is to help users by answering their questions, providing information, and offering guidance to the best of your abilities. When responding, use a warm and professional tone, and break down complex topics into easy-to-understand explanations.
If you are unsure about an answer, it's okay to say you don't know rather than guessing.
You must understand all languages but you must answer always in proper german language.
If there are terms which are technical topics in english and they are common known in english don't translate the keywords.
\`\`\`
{{schema}}
\`\`\`
IMPORTANT: Every answer must be a parsable JSON string without additional output.
`,
});
The RunInput, RunOutput, RunOptions, and AgentInput methods weren’t substantially changed.
The reminder image below helps us to compare again the methods of the two example agents.
The main changes were made related to the agent’s execution to run the agent with watsonx.
The structure of the code for the first custom agent is divided into the following sections in one single source code file:
- Agent definition
- Agent input/output definitions
- Agent Class
- Agent execution
- Chat model setup
- Define the watsonx model
- The definition of a chat prompt template for the watsonx chat model
- LLM interaction configuration for the chat mode.
- Create an agent instance with the chat model configuration
- Create a
createConsoleReader; this was part of older helpers. The reader displays all the steps the agent takes easily. Create a logger for more detailed trace information. - Execute the agent
- Chat model setup
Here is the source code extract for the custom agent implementation.
// *********************************
// Agent definition
// ******************************** */

// *********************************
// Agent input/output definitions
// ******************************** */

interface RunInput {
}

interface RunOutput {
}

interface RunOptions extends BaseAgentRunOptions {
}

interface AgentInput {
}

// *********************************
// Agent Class
// ******************************** */

export class CustomGermanAgent extends BaseAgent<RunInput, RunOutput, RunOptions> {
  protected driver: JsonDriver;
  public readonly memory: BaseMemory;
  public emitter = Emitter.root.child({
    namespace: ["agent", "custom"],
    creator: this,
  });

  protected static systemPrompt = new PromptTemplate({
    schema: z.object({
        schema: z.string().min(1),
    }),
    template: `## System Instructions

You are a knowledgeable and friendly AI assistant named Thomas.
Your role is to help users by answering their questions, providing information, and offering guidance to the best of your abilities. When responding, use a warm and professional tone, and break down complex topics into easy-to-understand explanations.
If you are unsure about an answer, it's okay to say you don't know rather than guessing.
You must understand all languages but you must answer always in proper german language.
If there are terms that are technical topics in English and they are commonly known in English, don't translate the keywords.

\`\`\`
{{schema}}
\`\`\`

IMPORTANT: Every answer must be a parsable JSON string without additional output.
`,
  });

  constructor(input: AgentInput) {
  }

  protected async _run(
    input: RunInput,
    options: RunOptions,
    run: GetRunContext<this>,
  ): Promise<RunOutput> {
  }

  public get meta(): AgentMeta {
  }

  createSnapshot() {
  }

  loadSnapshot(snapshot: ReturnType<typeof this.createSnapshot>) {
  }
}

// *********************************
// Execution
// ******************************** */

/// *******************************
/// 1. Chat model setup
/// *******************************

/// *******************************
/// 1.1 Define the watsonx model
/// *******************************
const llm_lama = new WatsonXLLM({
});

/// *******************************
/// 1.2. The definition of a chat prompt template for the watsonx chat model
/// *******************************
const template = new PromptTemplate({
});

/// *******************************
/// 1.3. LLM interaction configuration for the chat mode.
/// *******************************
const chatLLM = new WatsonXChatLLM({
});

/// *******************************
/// 2. Create an agent instance with the chat model configuration
/// *******************************
const customAgent = new CustomGermanAgent({
});


/// *******************************
/// 3. Create a `createConsoleReader`; this was part of older helpers. The reader displays all the steps the agent takes easily.Create a logger for more detailed trace information.
/// *******************************
const logger = new Logger({ name: "app", level: "trace" });
const reader = createConsoleReader();

/// *******************************
/// 4. Execute the agent
/// *******************************
try {
let message = BaseMessage.of({ role: Role.USER, text: "What is your name and why is the sky blue?" })
console.info("Message:\n" + message.text + "\n");
const response = await customAgent
.run(
  { message },
)
.observe((emitter) => {
  emitter.on("start", () => {
  });
  emitter.on("error", ({ error }) => {
  });
  emitter.on("retry", () => {
  });
  emitter.on("update", async ({ data, update, meta }) => {
  });
  emitter.match("*.*", async (data: any, event) => {
    }
  });
});
reader.write(`Agent 🤖 : `, response.message.text);
} catch (error) {
    logger.error(FrameworkError.ensure(error).dump());
} finally {
    process.exit(0);
}
The implementation of this custom agent is available in the following source code file in the GitHub repository.
The following GIF displays the execution of this custom agent.

- Conclusion for the custom agent
This agent doesn’t cover all the requirements we defined initially, but it was a good introduction to the first implementation of a custom agent. So, we will not use this agent in our TypeScript server.
2.3.2 RePlan Agent
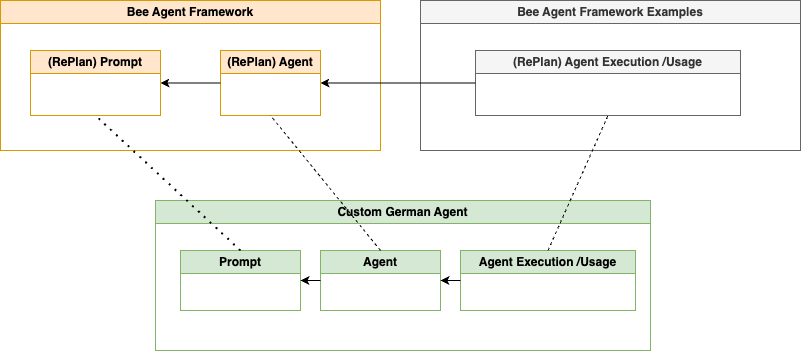
The RePlan Agent example implementation is divided into two parts.
One part is the agent definition, which is part of the experimental agents in the Bee Agent Framework itself, and then the execution, which is used as an example in the example section of the framework.
The image below displays the context simplified to display how we reuse all parts for the implementation in the context of our agent.
The table shows the changed files and the main changes inside these files to implement our custom agent, which does accept tools. When you click on the link you can navigate to the related source code in a GitHub repository.
| Source code file | Main changes |
|---|---|
| Agent definition | Naming of the class, the inputs, the outputs, and parameters and a bit of the documentation. |
| Prompt and tools usage definition | Change the prompt and the naming of the functions. |
| Agent execution | Add the same execution with the watsonx model, as in the example for the custom agent before. |
The redefined system prompt definition reflects the structure given in the Motivation section. Therefore, we also borrowed some parts of the Bee Agent system prompt. When we compare it to the system prompt in section 2.2.1, which of the example Agent implementations are available in the Bee Framework? Notice that only the output schema remains.
#Role
You are a knowledgeable and friendly AI assistant named Thomas.

# Instructions
Your role is to help users by answering their questions, providing information, and offering guidance to the best of your abilities. When responding, use a warm and professional tone, and break down complex topics into easy-to-understand explanations.
If you are unsure about an answer, it's okay to say you don't know rather than guessing.
You must understand all languages but you must answer always in proper german language.
If there are terms that are technical topics in English and they are commonly known in English, don't translate the keywords.
The AI assistant is forbidden from using factual information that was not provided by the user or tools in this very conversation. All information about places, people, events, etc. is unknown to the assistant, and the assistant must use tools to obtain it.

# Available functions
{{#tools.length}}
You can only use the following functions. Always use all required parameters.

{{#tools}}
Function Name: {{name}}
Description: {{description}}
Parameters: {{schema}}

{{/tools}}
{{/tools.length}}
{{^tools.length}}
No functions are available.

{{/tools.length}}

IMPORTANT: Every answer must be a parsable JSON string without additional output.

Output Schema: {{schema}}
The GIF below shows the execution of the agent and that the agent uses a tool to answer the question we are asking. It uses the search engine “DuckDuckGo” to answer our question.

Here is an extraction of the relevant steps in the console output.
- Question
- Selection of the tool
- Final result and showing the past execution
Message:
Why is the sky blue?
...
Lookback 💭 🤖 : User asked why the sky is blue.
Step ➡️ Research the reason for the sky's blue color
Tool 🛠️ Start DuckDuckGo with {"name":"DuckDuckGo","input":{"query":"Why is the sky blue?"}}
Tool 🛠 Success DuckDuckGo with {"results":[{"title":"Why Is the Sky Blue? | NASA Space Place - NASA Science for Kids","description":"Lea..
...
Lookback 💭 🤖 : User asked why the sky is blue. I researched the answer using a tool.
Agent 🤖 : Die Himmelsfarbe wird durch das Rayleigh-Streuung-Phänomen bestimmt, bei dem kürzere (blaue) Wellenlängen des Lichts mehr als längere (rote) Wellenlängen von den winzigen Molekülen der Gase in der Erdatmosphäre gestreut werden.
- Conclusion for the custom agent
This agent does cover all the requirements we have. So, we will use this agent in our TypeScript server.
2.4 How to implement the TypeScript server to run the custom agent?
As we said at the beginning, we want to run the Agent independently of the entire Bee Stack, knowing that we will miss many useful additional features.
For the implementation, we follow the example implementation for a Bee Agent.
The image below shows the simplified TypeScript backend server code dependencies. Here, we replace the rag_agent with the agent implementation of our custom. We will not add an additional agent tool implementation because our Agent uses the public system tool of the Bee Agent Framework. This example is a part of the GitHub repository watsonx.ai platform demos.
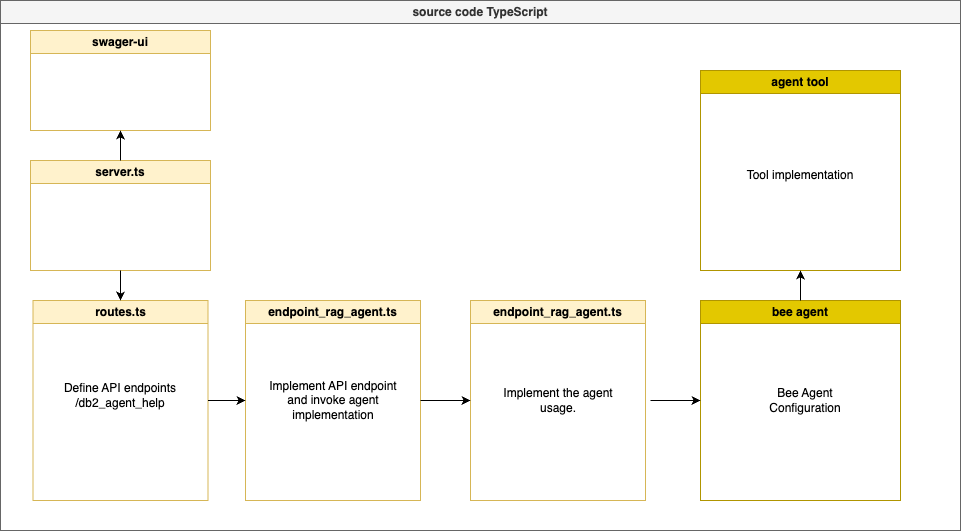
The following table contains the link to source code and a short description for the code. Select the link to open the source code and inspect the non production example.
| Mapping of the source code | Short description |
|---|---|
| server.ts / index.ts | The server implementation. |
| routes.ts | Routing of the endpoints. |
| bee agent configuration / agent | Definition of the agent. |
| bee agent configuration / prompt | Definition of the prompt and tools usage for the Agent. |
| bee agent configuration / execution | Add the same execution with the watsonx model, as in the example for the custom agent before. |
| endpoint_rag_agent / endpoint to invoke the agent | Definition of the single endpoint for the server. |
| swagger ui / swagger ui | Definition of the OpenAPI specification of the server. |
The GIF below shows the agent’s invocation inside the server. On the left hand, we see the console output, and on the right-hand side, the swagger UI of our TypeScript server.

2.5 How to execute our example implementations?
To execute the example implementations, navigate to the related repositories and follow the guide inside the repositories for the setup and the execution.
3. Summary
This example was the first step in implementing a fully custom agent with TypeScript in the Bee Agent Framework.
The objective was to become more familiar with how customization can work inside the Bee Agent Framework to build custom agents using the system prompt.
We didn’t cover how the tools’ loop implementation works or many other possibilities because the RePlan Agent example just executes one tool and does not iterate until it gets the final answer.
There are many additional tasks to do in the future to implement everything, but we get an impression of what it means to take full responsibility for implementing a full custom agent and not configuring an existing Bee Agent with tools, role definitions, or additional instructions.
By the way, finally, I noticed that the custom agent also sometimes answers in English and not in German, so I need to redefine the system prompt or try out other possibilities. Prompt engineering takes time and not just 15 mins ;-), this is the time I invested for the prompt.
However, there are many other ways to customize and achieve the objective with an agent; we can define roles only for the Bee Agent, build custom tools to do the job, and more.
One easy option is to override the system prompt template from the Bee Agent, as you can see in the code below.
const agent = new BeeAgent({
  llm: chatLLM,
  memory: new UnconstrainedMemory(),
  tools: [new DuckDuckGoSearchTool(), new OpenMeteoTool()],
  templates: {
    system: CustomGermanAgentSystemPrompt,
  }
})
I hope this was useful to you and let’s see what’s next?
Greetings,
Thomas
#watsonx, #typescript, #ai, #ibm, #agents, #ai, #beagentframework, #beeagent, #aiagents, #tools, #agents, #customagent
