

ComfyUI + Stable Diffusion + Stable Video Diffusion for Music Creators
This post documents my first complete setup of local AI image and video generation on a Mac with Apple Silicon.
Everything runs:
- offline
- without subscriptions
- without uploading private music or ideas
The goal is not Hollywood-quality movies.
The goal is ideas, visuals, and structure for music projects.
I spent more than a week setting this system up, testing different configurations, fixing broken downloads, and verifying which parts actually work in practice. The focus is on running AI fully offline, beyond just Large Language Models. The setup uses older but stable models, tested and verified in December 2025, with all downloads working at that time.
This workflow is designed for creative music use cases, such as visual moods, storyboards, and early video concepts, and reflects a hands-on learning process rather than a theoretical guide.
Below, you will find the final image and video workflows that resulted from this setup.
Image generation:
Video generation:
1. Why Local Video AI?
Using local AI gives you full control:
- No cloud
- No monthly costs
- No upload of private music or ideas
This setup is useful for:
- Music ideas and visual moods
- Storyboards for music videos
- Shot lists and scene planning
- Image and video pre-production
Integration with:
- Logic Pro
- Final Cut Pro
2. What We Build
We install and configure:
- a Python environment
- Hugging Face access (token-based)
- PyTorch with Apple MPS (GPU on Apple Silicon)
- ComfyUI (node-based UI)
- Stable Diffusion 1.5 (image base)
- Stable Video Diffusion img2vid (video generation)
- VideoHelperSuite + ffmpeg (MP4 export)
Note: This is not the newest AI stack. It is an older but stable setup, verified in December 2025 by me 😉 and this is a modular system you can extend later.
To follow all steps of the post you need more than a one hour!
!REMINDER: The in this post GIFS don’t show every step in of a section, they providing only an initial ilustration how it work in the UI.
3. Now We Set Up and Run the System
In the following steps, we set up the complete local system and verify that it works. This includes installing all required tools, downloading the models, and running the first image and video generation locally. The guide is written in a strict step-by-step order and assumes no existing setup. Each step builds on the previous one, so it is important to follow the instructions in order and not skip steps. By the end of this section, you will have a fully working offline image and video generation pipeline on your local machine.
Step 1 – System Requirements (Required)
This setup was tested on macOS with Apple Silicon. All commands are executed in the terminal.
1.1 Xcode Command Line Tools
Xcode Command Line Tools are required for:
- Python builds
- Git
- Native libraries
Install them with:
xcode-select --install
If a dialog appears, confirm the installation.
1.2 Python environment
We use a virtual environment to keep everything clean and isolated. Create and activate the environment:
python3.12 -m venv .venv
source ./.venv/bin/activate
Upgrade pip:
python3 -m pip install --upgrade pipFrom now on, always activate the virtual environment before running any commands in this guide.
1.3 Status Check
At this point:
- Xcode tools are installed -Python runs inside .venv
- pip is up to date
You are ready to install AI libraries.
Step 2 – Hugging Face Access (Required)
Stable Diffusion and Stable Video Diffusion models are hosted on Hugging Face. You need read access to download the models.
2.1. Install huggingface access
Install the Hugging Face Hub in a fixed version. This avoids breaking changes.
pip3 install --upgrade --force-reinstall huggingface-hub==0.34.0Verify the installation:
huggingface-cli version2.2 Login to Hugging Face
Login with your Hugging Face account:
huggingface-cli loginYou will be asked for an access token.
Open the token page in your browser:
2.3 Create a Read Token
https://huggingface.co/settings/tokensCreate a Read token. You do not need write access.
2.4 Store the Token in an Environment File
We store the token in an .env file so it can be reused by scripts and downloads. Create the .env file from the template:
- Generate env.
cat .env_template > .envEdit .env and add your token:
export HUGGING_FACE_TOKEN=your_token_hereLoad the environment variables:
source .envVerify the token is available:
echo ${HUGGING_FACE_TOKEN}If the token is printed, the setup works.
2.5 Status Check
At this point:
- Hugging Face CLI is installed
- You are logged in
- A read token exists
- The token is available as an environment variable
Step 3 – PyTorch for Apple Silicon (MPS)
PyTorch is the core deep-learning library used by ComfyUI and all models. On Apple Silicon, PyTorch can use MPS (Metal Performance Shaders) to run on the GPU.
3.1. Install libraries
Install PyTorch and the required libraries inside the virtual environment:
pip3 install torch torchvision torchaudioThis installation automatically includes Apple MPS support.
3.2 Verify MPS Support
Run the following test:
python3 - << EOF
import torch
print(torch.backends.mps.is_available())
EOF
Expected output:
TrueIf the result is True, GPU acceleration is available and working. If the result is False, video generation will be very slow or may not work.
3.3 Status Check
At this point:
- PyTorch is installed
- Apple GPU (MPS) is available
- The system is ready for model inference
Step 4 – Install ComfyUI (Core Component)
ComfyUI is the core system for image and video generation. It uses a node-based workflow. Nothing is hidden. Every step is explicit.
4.1 Download and Install ComfyUI
Clone the repository and install dependencies:
git clone https://github.com/comfyanonymous/ComfyUI.git
cd ComfyUI
pip3 install -r requirements.txt
This installs all required Python packages inside the virtual environment.
4.2 Start ComfyUI
Start the application:
python3 main.pyIf everything is correct, the server starts without errors.
4.3 Verify the Web Interface
Open your browser and go to:
http://127.0.0.1:8188You should see following web application:
4.4 Status Check
At this point:
- ComfyUI is installed
- The server starts without errors
- The web UI is reachable
- The system is ready to load models
Step 5 – Image Base Model (Required)
Before generating videos, we must generate images. For this setup we use Stable Diffusion 1.5 (pruned, EMA). It is stable, well supported, and works reliably with ComfyUI.
Using the SD 1.5 (pruned, EMA)Model in the first step.
5.1 Create Model Folders
Make sure you are in the ComfyUI directory. Create the required folders:
cd ComfyUI
mkdir -p ./models/checkpoints
mkdir -p ./models/svd
mkdir -p ./models/animatediff
mkdir -p ./models/clip_vision
These folders are used by ComfyUI to find different model types.
5.2 Download the Image Model
Download the Stable Diffusion 1.5 model into the checkpoints folder:
cd ./models/checkpoints
curl -L -o v1-5-pruned-emaonly.safetensors \
https://huggingface.co/runwayml/stable-diffusion-v1-5/resolve/main/v1-5-pruned-emaonly.safetensors5.3 Verify the Download
Check that the file exists and has a reasonable size:
ls -lh v1-5-pruned-emaonly.safetensorsIf the file size is around 4 GB, the download is correct.
5.4 Why This Step Matters
This image model is used to:
- generate key images
- define composition and mood
- create the base for video generation
- Bad image = bad video.
5.5 Status Check
At this point:
- Required model folders exist
- Stable Diffusion 1.5 is downloaded
- ComfyUI can load image checkpoints
Step 6 – Stable Video Diffusion (SVD) important for video
⚠️ Important: Both files in this step are required. Stable Video Diffusion (SVD) is the core video model used for image-to-video generation.
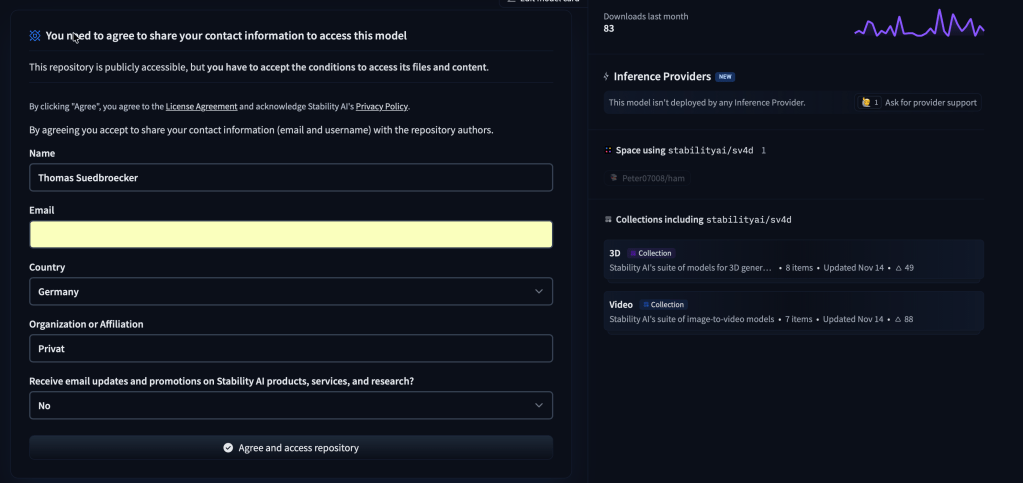
6.1 Register for Model Access
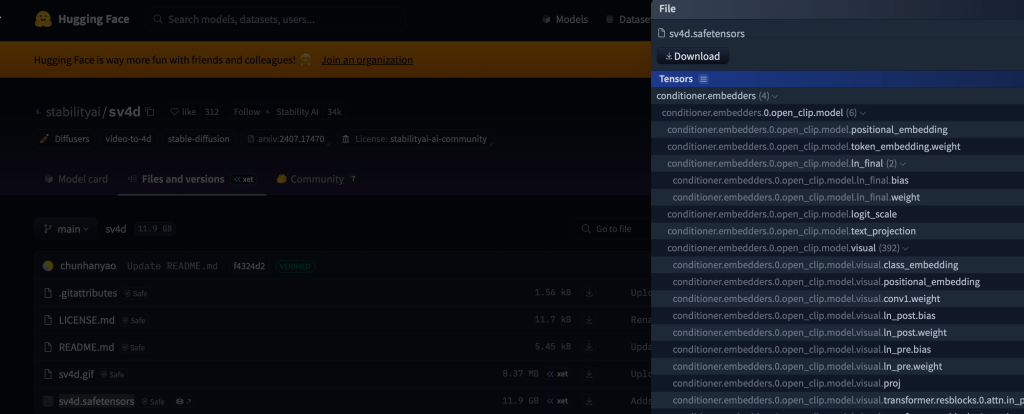
Before downloading the model, you must accept the license on Hugging Face. Open the model page in your browser and register:
- Stable Video Diffusion (img2vid)
- After registration, downloads are allowed.
6.2 Download the Main SVD Model
The download may fail without a token, even after registration. This is normal.
Go to the SVD model folder:
cd ~/ComfyUI/models/svdLoad your environment variables:
source ../../.envDownload the model using your Hugging Face token:
curl -L \
  -H "Authorization: Bearer ${HUGGING_FACE_TOKEN}" \
  -o svd.safetensors \
  https://huggingface.co/stabilityai/stable-video-diffusion-img2vid/resolve/main/svd.safetensors
If the download fails:
- Use the Hugging Face web UI
- Download the file manually
- Place it in
ComfyUI/models/svd
6.2 Decoder Model (Still Required)
Most SVD pipelines still require the image decoder model. Download it into the same folder:
curl -L \
  -H "Authorization: Bearer ${HUGGING_FACE_TOKEN}" \
  -o svd_image_decoder.safetensors \
  https://huggingface.co/stabilityai/stable-video-diffusion-img2vid/resolve/main/svd_image_decoder.safetensors
6.3 Why Two Files Are Needed
- svd.safetensors → main video diffusion model
- svd_image_decoder.safetensors → required for decoding frames
Even if ComfyUI hides this internally, both files must exist.
6.4 Status Check
At this point:
- SVD license is accepted
- Main video model is downloaded
- Decoder model is present
- Files are placed in the correct folder
Step 7 – Start UI and generate a first image
Before working with video, we must confirm that image generation works. Restart ComfyUI with the correct environment loaded.
7.1 Restart ComfyUI
From your project root, run:
source ./.env
source .venv/bin/activate
cd ComfyUI
python3 main.py
Wait until the server starts without errors.
7.2 Generate a Test Image
Open the browser again:
http://127.0.0.1:8188You will now see a basic workflow that can generate an image. Run the workflow to generate a first image locally.
The following gif shows the generation on an image on the local computer.
Now you can save the workflow
7.3 Status Check
At this point:
- ComfyUI runs without errors
- Image generation works
- A workflow is saved
- A local key image exists
Step 8 – How to Use This System
After installation, the real work starts. This system is about control and understanding, not one-click results.
8.1 Generate a Strong Key Image
Before generating video, you must generate a strong image. In ComfyUI:
- Use Stable Diffusion 1.5
Focus on:
- Composition
- Lighting
- Mood
This image is your video anchor.
- Bad image = bad video.
8.2 Start by Building a Custom Flow
This guide assumes:
- ComfyUI is installed and starts correctly
- All models are downloaded and placed correctly
- You are working offline
- You want repeatable and controllable workflows
- You do not use prebuilt JSON workflows
We build everything manually to understand how it works.
8.3 ComfyUI Fundamentals (Very Brief)
Before building workflows, understand the basics:
- Nodes = single, explicit operations
- Connections = data flow (latent → image → video)
- Execution = left-to-right dependency graph
Nothing happens automatically Key rule:
- If it is not visible as a node, it does not exist.
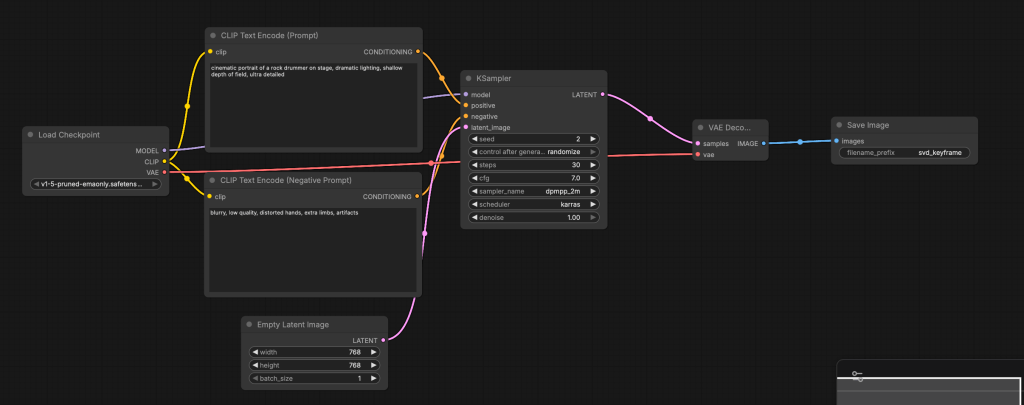
8.4: Build a Custom Image Generation Flow (Text → Image)
This is the final image workflow we build in this step.

8.5: Required Nodes (Add Manually)
Add the following nodes one by one:
- Checkpoint Loader (Simple)
- CLIP Text Encode (Prompt)
- CLIP Text Encode (Negative Prompt)
- Empty Latent Image
- KSampler
- VAE Decode
- Save Image
Make sure ComfyUI is running:
source ../.venv/bin/activate
python3 main.py
8.6 Configure Each Node
- Checkpoint Loader (Simple)
Select the SD 1.5 model.
Outputs:
- MODEL
- CLIP
- VAE
- CLIP Text Encode (Prompt)
Connect:
- CLIP ← from Checkpoint Loader
Example prompt (for a rock drummer ;-):
cinematic portrait of a rock drummer on stage, dramatic lighting, shallow depth of field, ultra detailed
- CLIP Text Encode (Negative Prompt)
Connect:
- CLIP ← from Checkpoint Loader
Negative prompt:
blurry, low quality, distorted hands, extra limbs, artifacts

- Wire the clip depencencies
- Empty Latent Image
Set:
- Width:
768 - Height:
768 - Batch size:
1

- KSampler
Connections:
- MODEL ← Checkpoint Loader
- Positive ← Prompt Encode
- Negative ← Negative Encode
- Latent ← Empty Latent Image
Settings:
- Seed:
2(or fixed for reproducibility) - Steps:
30 - Control After Generation:
random - CFG:
7.0 - Sampler:
dpmpp_2m - Scheduler:
karras - Denoise:
1.0
- VAE Decode
Connections:
- Samples ← KSampler
- VAE ← Checkpoint Loader

- Save Image
Connections:
- Images ← VAE Decode
Settings:
- Filename prefix: svd_keyframe
svd_keyframe
- Run workflow

You now have:
- A working image workflow
- A strong key image
- A reusable base for video generation
8.7 What Comes Next
The next step is Image → Video generation with Stable Video Diffusion. This requires:
- Additional nodes
- Video helper tools
- MP4 export configuration
Step 9 Prepare Image for Stable Video Diffusion
Stable Video Diffusion is very strict about input images. If the image is wrong, the video will fail or look broken.
9.1 Image Requirements for SVD
Important constraints for SVD:
- Image must be square and the recommended size:
576×576768×768
- No transparency
- Clear subject separation
- No borders or UI elements
If your image is already 768×768, no resize is required.
9.1 Build a Custom Image → Video Workflow (SVD)
Even if encoder and decoder files exist:
- ComfyUI does not expose them as separate nodes
- SVD is handled by a single monolithic node This is expected behavior.
9.1.1 Model Files Overview
| File | Location in repo | Purpose |
|---|---|---|
svd.safetensors | root | Required (main checkpoint) |
svd_image_decoder.safetensors | root | Optional / advanced |
image_encoder/model.safetensors | image_encoder/ | Optional / advanced |
Folder structure:
ComfyUI/
└─ models/
   └─ checkpoints/
      ├─ svd.safetensors
      ├─ svd_image_decoder.safetensors        (optional)
      └─ svd_image_encoder.safetensors        (optional, renamed)
9.2 For the SVD we need to install additional Nodes.
Install Required Models and Nodes (Exact Steps) All commands below are tested and verified.
- Update ComfyUI
From your ComfyUI root directory:
cd ComfyUI
git pull
cd ./models/checkpoints/- Download Download Main SVD Model
svd.safetensors
curl -L -o svd.safetensors \
https://huggingface.co/stabilityai/stable-video-diffusion-img2vid/resolve/main/svd.safetensors- Download Image Encoder (Optional but Recommended)
svd_image_encoder.safetensors
curl -L -o svd_image_encoder.safetensors \
https://huggingface.co/stabilityai/stable-video-diffusion-img2vid/resolve/main/svd_image_encoder.safetensors- Download Image Decoder (Token Required)
svd_image_decoder.safetensors
source ./../../../.env
curl -L -H "Authorization: Bearer ${HUGGING_FACE_TOKEN}" -o svd_image_decoder.safetensors https://huggingface.co/stabilityai/stable-video-diffusion-img2vid/resolve/main/svd_image_decoder.safetensors- Download Official Encoder (Reliable Source)
svd_image_encoder.safetensors
source ./../../../.env
curl -L -H "Authorization: Bearer ${HUGGING_FACE_TOKEN}" -o svd_image_encoder.safetensors https://huggingface.co/stabilityai/stable-video-diffusion-img2vid/resolve/main/image_encoder/model.safetensors- Download CLIP Vision Model Download command (official, reliable)
This model is required for SVD conditioning.
source ./../../../.env
cd ./models/clip_vision
curl -L -H "Authorization: Bearer ${HUGGING_FACE_TOKEN}" -o clip_vision_vit_h_14.bin https://huggingface.co/laion/CLIP-ViT-H-14-laion2B-s32B-b79K/resolve/main/pytorch_model.bin- Start the UI
python3 main.pyExpected output includes:
- Device: mps
- Set vram state to: SHARED
- No fatal errors
Total VRAM 36864 MB, total RAM 36864 MB
pytorch version: 2.9.1
Mac Version (26, 2)
Set vram state to: SHARED
Device: mps
Using sub quadratic optimization for attention, if you have memory or speed issues try using: --use-split-cross-attention
Python version: 3.14.2 (main, Dec 5 2025, 16:49:16) [Clang 17.0.0 (clang-1700.4.4.1)]
ComfyUI version: 0.6.0
ComfyUI frontend version: 1.35.9
[Prompt Server] web root: /.venv/lib/python3.14/site-packages/comfyui_frontend_package/static
Total VRAM 36864 MB, total RAM 36864 MB
pytorch version: 2.9.1
Mac Version (26, 2)
Set vram state to: SHARED
Device: mps
Import times for custom nodes:
0.0 seconds: /ComfyUI/custom_nodes/websocket_image_save.py
Context impl SQLiteImpl.
Will assume non-transactional DDL.
No target revision found.
Starting server
To see the GUI go to: http://127.0.0.1:8188- Install “Video Combine” properly (required for MP4 saving) – install ComfyUI-VideoHelperSuite
Without this, MP4 export does not work.
VideoHelperSuite is the source of Video Combine. It also has current releases in 2025 via the registry (so it is not abandoned).
cd ./custom_nodes/
git clone https://github.com/Kosinkadink/ComfyUI-VideoHelperSuite
pip install opencv-python-headless
pip install -U "imageio[ffmpeg]"- Install ffmpeg
brew install ffmpeg
which ffmpeg
ffmpeg -version- Start ComfyUI
python3 main.pyOutput:
Checkpoint files will always be loaded safely.
Total VRAM 36864 MB, total RAM 36864 MB
pytorch version: 2.9.1
Mac Version (26, 2)
Set vram state to: SHARED
Device: mps
Using sub quadratic optimization for attention, if you have memory or speed issues try using: --use-split-cross-attention
Python version: 3.14.2 (main, Dec 5 2025, 16:49:16) [Clang 17.0.0 (clang-1700.4.4.1)]
ComfyUI version: 0.6.0
ComfyUI frontend version: 1.35.9
[Prompt Server] web root: /.venv/lib/python3.14/site-packages/comfyui_frontend_package/static
Total VRAM 36864 MB, total RAM 36864 MB
pytorch version: 2.9.1
Mac Version (26, 2)
Set vram state to: SHARED
Device: mps
Import times for custom nodes:
0.0 seconds: /ComfyUI/custom_nodes/websocket_image_save.py
0.4 seconds: /ComfyUI/custom_nodes/ComfyUI-VideoHelperSuite
Context impl SQLiteImpl.
Will assume non-transactional DDL.
No target revision found.
Starting server
To see the GUI go to: http://127.0.0.1:8188
[DEPRECATION WARNING] Detected import of deprecated legacy API: /extensions/core/widgetInputs.js. This is likely caused by a custom node extension using outdated APIs. Please update your extensions or contact the extension author for an updated version.Now the video helper suite should be available in the nodes:
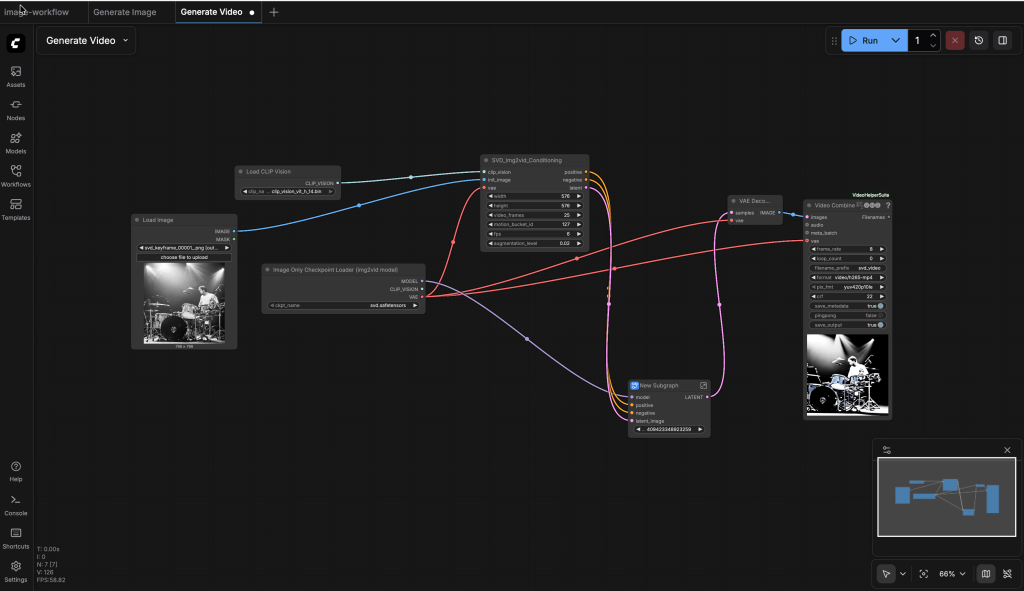
9.3 Required Nodes
What Nodes You Should See?
In the node menu, you must see:
- Load Image
- Image Only Checkpoint Loader (img2vid model)
- Load CLIP Vision
- SVD_img2vid_Conditioning
- KSampler
- VAE Decode
- VHS_VideoCombine (VideoHelperSuite)

9.4: Select the Input Image
Select the image created earlier: svd_keyframe_00001.png
9.5: Image Only Checkpoint Loader
Choose the SVD checkpoint (e.g. svd.safetensors or svd_xt.safetensors) Outputs you will use:
- MODEL
- VAE

9.6: Load CLIP Vision
Choose the CLIP-Vision weights from the dropdown (must exist in your ComfyUI models folders)
Output:
- CLIP_VISION
9.7: SVD_img2vid_Conditioning
Connect:
- clip_vision ← Load CLIP Vision.CLIP_VISION
- init_image ← Load Image.IMAGE
- vae ← Image Only Checkpoint Loader.VAE
Set baseline parameters:
- width/height: start 576 x 576 (most stable)
- fps: 6
- video_frames: 25
- motion_bucket_id: 127
- cond_aug: 0.02
9.8: KSampler
Connect:
- model ← Image Only Checkpoint Loader.MODEL
- positive ← SVD_img2vid_Conditioning (positive output)
- negative ← SVD_img2vid_Conditioning (negative output)
- latent_image ← SVD_img2vid_Conditioning (latent output)
Settings:
- steps: 25
- cfg: 3.0
- sampler: dpmpp_2m
- scheduler: karras
- seed: fixed number
9.10: VAE Decode
Connections:
- Samples ← KSampler Latent
- VAE ← Checkpoint Loader
9.11: VHS_VideoCombine
Connect:
- images ← VAE Decode.image
Set:
- frame_rate: 6
- format: mp4
- filename_prefix: svd_video
9.12: Run the generation
You now have:
- A local MP4 video
- Generated fully offline
- Based on your own image

9.13 Final Result
This completes the full local image → video pipeline.
- No cloud.
- No subscriptions.
- No uploads.
4. Summary
This was my first step into local image and video generation. There are many more areas to explore, but setting everything up from scratch helped me understand the basics: where models are placed, how settings affect the result, and how the order of the workflow matters.
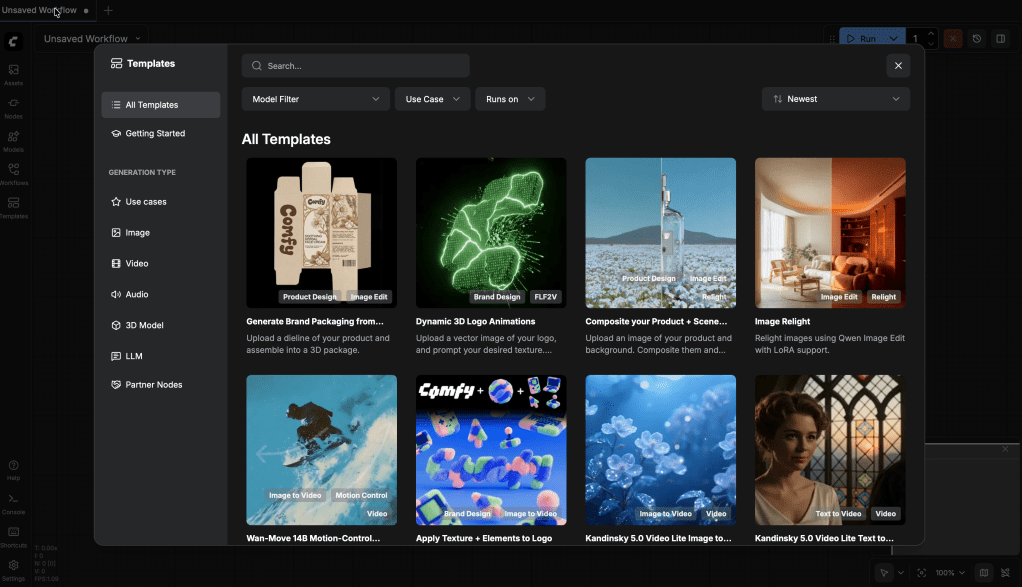
It also helped me better understand the existing templates in ComfyUI. Now it is time to focus on prompting.
Video generation takes time, and you need a clear idea of what you want to create. This process is very time-consuming, and in many cases it is still easier to create music videos manually without AI.
I did this setup on my new personal MacBook, a 2024 model, during Christmas 2025. It was a good additional experience alongside working with Langflow AI agents. I especially liked observing what happened during generation on the local server in the console.
With the many free AI tools available, this setup is not the most efficient way to be productive. However, it allowed me to combine my music hobby with my AI and IT interests, which made it a meaningful project during the Christmas holidays.
Maybe this was interesting for you as well.
5. Useful Resources
Core Tools
- ComfyUI
https://github.com/comfyanonymous/ComfyUI
Node-based UI used to build and run all image and video workflows. - PyTorch
https://pytorch.org
Core deep-learning framework with Apple Silicon (MPS) support.
Models
- Stable Diffusion 1.5 (Image Base Model)
https://huggingface.co/runwayml/stable-diffusion-v1-5
Stable and well-supported image generation model used for key images. - Stable Video Diffusion (img2vid)
https://huggingface.co/stabilityai/stable-video-diffusion-img2vid
Image-to-video model used to generate short video clips from a single image.
Model Hosting & Access
- Hugging Face
https://huggingface.co
Platform used to host and download all required models. - Hugging Face Access Tokens
https://huggingface.co/settings/tokens
Required for downloading restricted models like Stable Video Diffusion.
Video Export & Helpers
- ComfyUI VideoHelperSuite
https://github.com/Kosinkadink/ComfyUI-VideoHelperSuite
Provides video-related nodes such as Video Combine for MP4 export. - FFmpeg
https://ffmpeg.org
Required for video encoding and MP4 generation.
Creative Workflow Tools
- Logic Pro
https://www.apple.com/logic-pro/
Used for music creation and audio production. - Final Cut Pro
https://www.apple.com/final-cut-pro/
Used for editing and assembling final music videos.
I hope this was useful to you and let’s see what’s next?
Greetings,
Thomas
#LocalAI, #AIVideo, #ComfyUI, #StableDiffusion, #StableVideoDiffusion, #AppleSilicon, #macOS, #CreativeAI

Leave a comment