
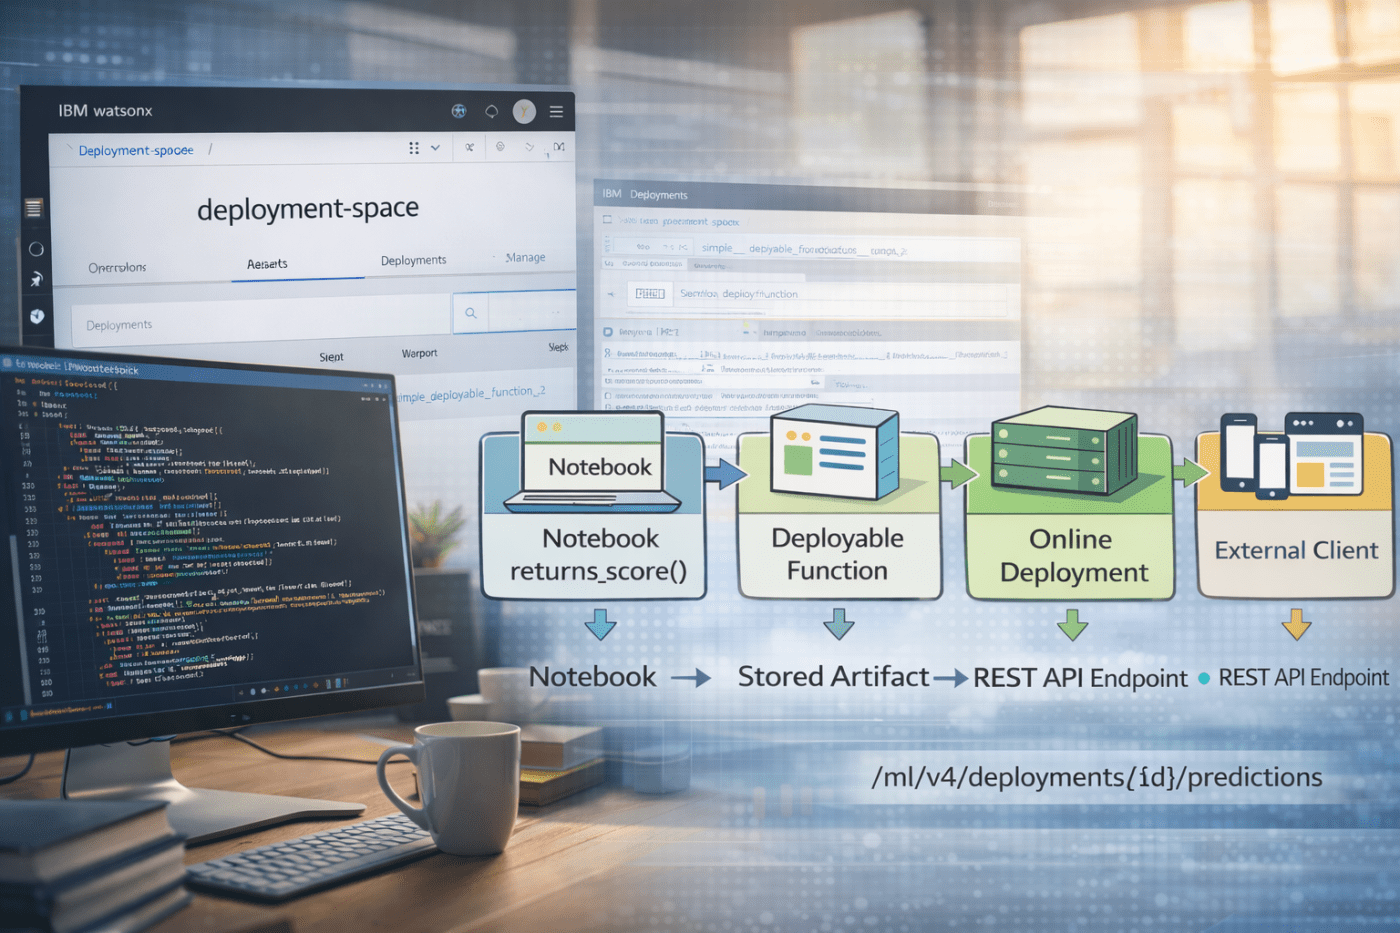
The objective is to create a deployment for a deployable function developed in a Jupyter Notebook inside watsonx.ai.
After deployment, the function can be accessed through a REST API and used in any client application.
In watsonx.ai, you use projects to develop GenAI and machine learning assets, and deployment spaces to manage their runtime.
One option is to use Jupyter Notebooks. This post is a cheat sheet showing how to develop a deployable function for AI assets and then deploy it so it can be invoked inside an application.
Note: All code snippets below belong to a single Jupyter Notebook!
Keep in mind:
Project = development (notebooks, experiments)
Deployment space = runtime (deployments, jobs, artifacts)
Restriction: A deployable function can not be async. Use
- End-to-End Architecture
- Deployable function
- Define the environment for the testing and the deployment of the function
- Test client
- Authenticate to watsonx deployment space and project
- Connect to watsonx.ai and set the default project and default deployment space
- Define an external package in addition to the existing software specification “runtime-25.1-py3.12”
- Define used software configuration
- Define the metadata information for the deployable function
- Store Function
- Create the online deployment (the endpoint)
- Get the Endpoint URL
- Use the endpoint
- Summary
- Additional Resources
1. End-to-End Architecture
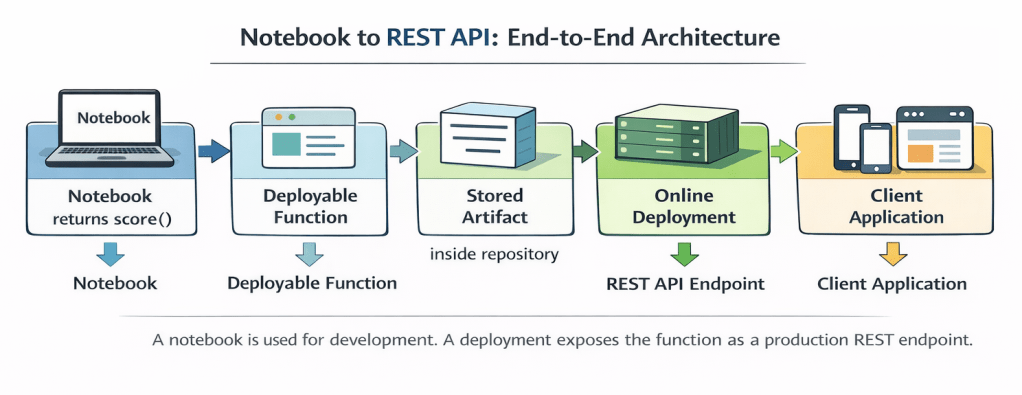
Left side: deployment space (runtime)
Right side: Jupyter Notebook in the project (development)
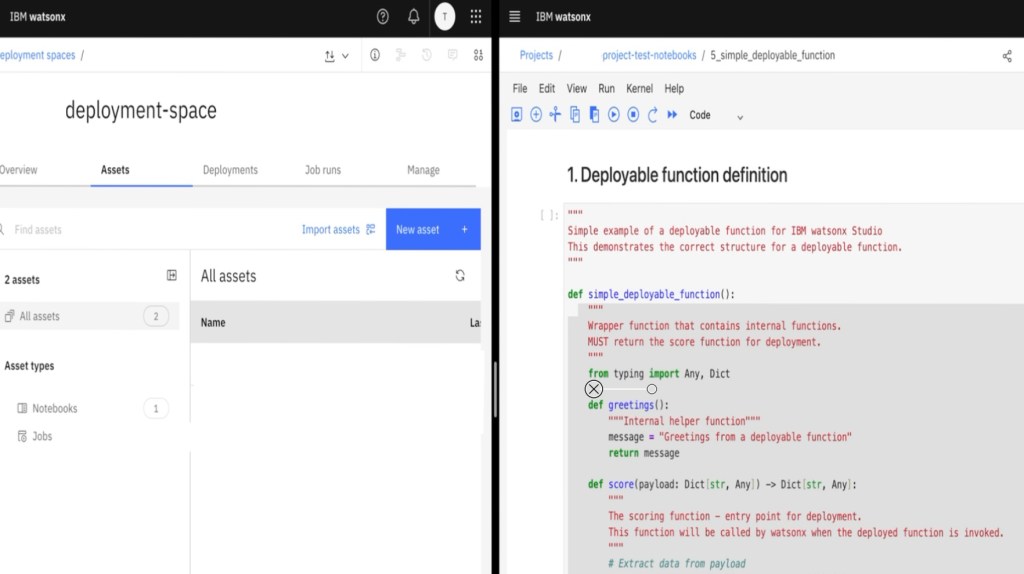
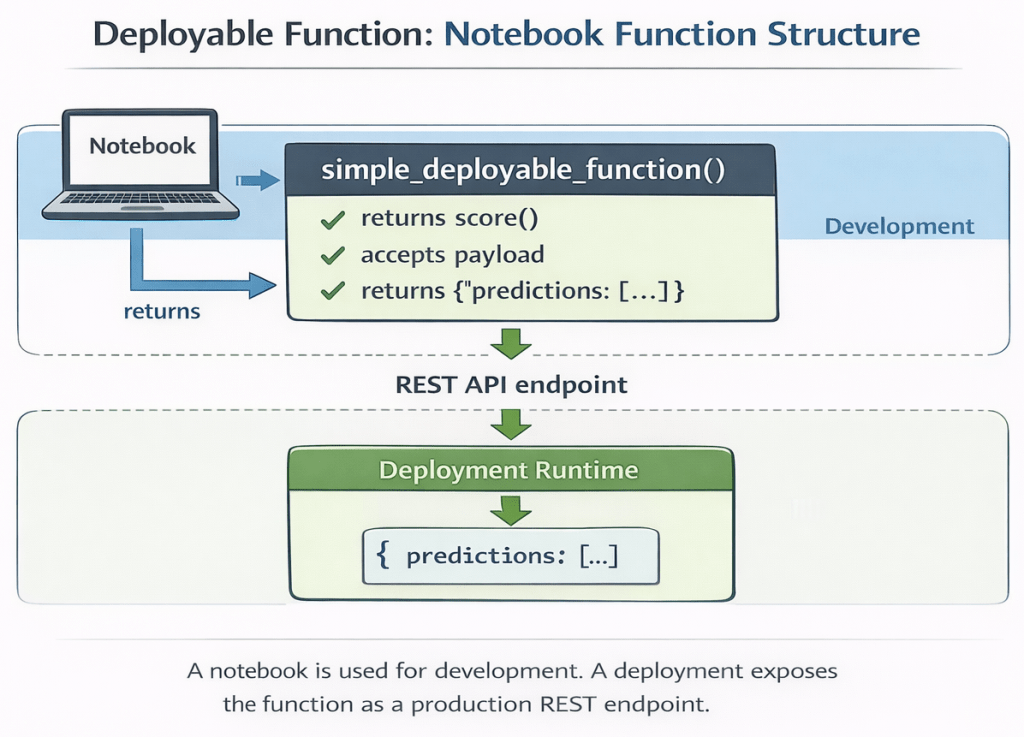
2. Deployable function
Important: A deployment is not created from the entire notebook.
The deployment runtime executes only the returned score() function.
Every request to the endpoint calls score(payload) and returns the result.
Left side: deployment space
Right side: project notebook
The wrapper function is required because the deployment system dynamically loads the function and expects a callable entry point.
"""
Simple example of a deployable function for IBM watsonx Studio
This demonstrates the correct structure for a deployable function.
"""

def simple_deployable_function():
    """
    Wrapper function that contains internal functions.
    MUST return the score function for deployment.
    """
    from typing import Any, Dict

    def greetings():
        """Internal helper function"""
        message = "Greetings from a deployable function"
        return message

    def score(payload: Dict[str, Any]) -> Dict[str, Any]:
        """
        The scoring function - entry point for deployment.
        This function will be called by watsonx when the deployed function is invoked.
        """
        # Extract data from payload
        input_data = payload.get("input_data", [{}])[0]
        values = input_data.get("values", {})
        additional_message = values.get("additional_message", "")

        # Create response
        result = {
            "message": "hello world",
            "greeting": greetings(),
            "additional": additional_message
        }

        # Return in predictions format
        prediction = {
            "predictions": [result]
        }
        return prediction

    # CRITICAL: Must return the score function
    return score
3. Define the environment for the testing and the deployment of the function
You create a .env file to separate code from credentials and configuration.
The notebook loads the environment variables before connecting to watsonx.ai.
file_name = ".env"
env_content = """
# watsonx.ai access
export WX_URL=
export WX_USER=
export WX_API_KEY=
export WX_PROJECT_ID=
export WX_DEPLOYMENT_SPACE_ID=
"""
with open(file_name , 'w') as file:
    file.write(env_content)
    file.close()
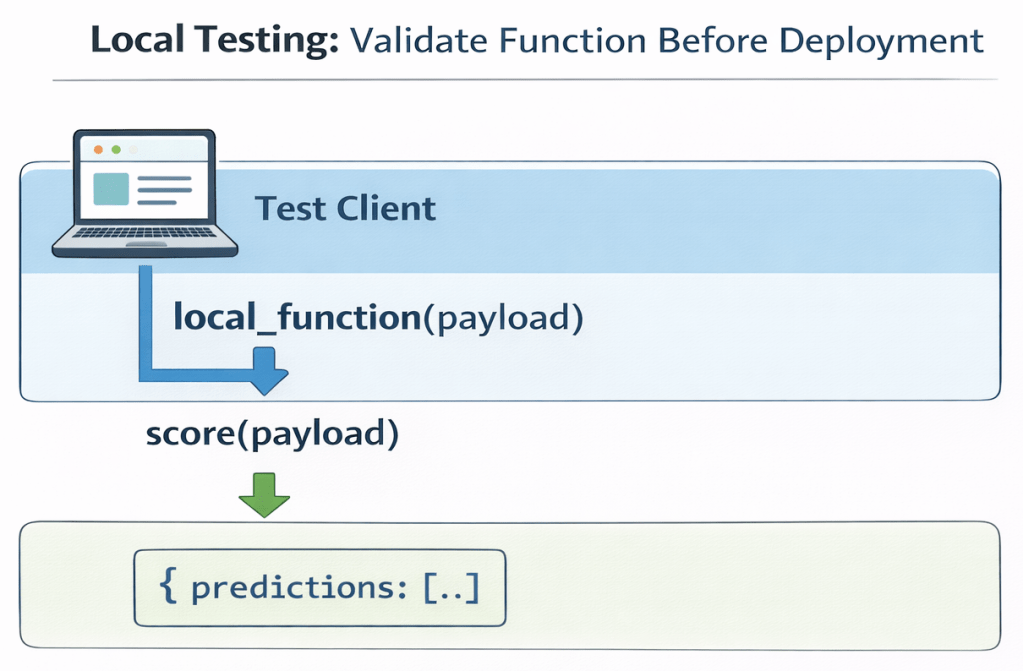
4. Test client
You test the function locally in your notebook before deploying it.
The following test validates:
- JSON payload structure
- Return format
- Internal imports
- Business logic
Payload format:
{
  "input_data": [
    {
      "values": { ... }
    }
  ]
}
!pip install -U python-dotenv
if __name__ == "__main__":
    # Example usage with environment variables
    import json
    from dotenv import load_dotenv
    load_dotenv()

    test_payload = {
        "input_data": [{
            "values": {
                "additional_message" : "hello deployment"
            }
        }]
    }
    local_function = simple_deployable_function()
    print(f"Function type: {type(local_function)}")
    result = local_function(payload=test_payload)
    print(json.dumps(result, indent=2))
5. Authenticate to watsonx deployment space and project
In this step, you authenticate from the notebook by creating Credentials and an APIClient. The client validates access and stores a token internally.
After authentication, you should explicitly set the default project and default deployment space for easier usage in the current Notebook.
Credentials(...)
APIClient(...)
print("\n1. Watsonx.ai connection...")
load_dotenv()
wx_credentials = Credentials(
    url=os.getenv('WX_URL'),
    username=os.getenv('WX_USER'),
    api_key=os.getenv('WX_API_KEY'),
    instance_id="openshift"
)
wx_client = APIClient(wx_credentials)

# Save the project id - development area
result_project_id = wx_client.set.default_project(os.getenv('WX_PROJECT_ID'))

# Save the deployment id - runtime area
result_space_id = wx_client.set.default_deployment_space("YOUR_DEPLOYMENT_SPACE_ID")
6. Connect to watsonx.ai and set the default project and default deployment space
After authentication, you set the default project and the default deployment space.
The project is used for development.
The deployment space is used for runtime artifacts such as deployments and jobs.
project → development environment (notebooks, experiments)
deployment space → runtime environment (deployments, jobs)
import os
import tempfile
from pathlib import Path
from datetime import datetime
from dotenv import load_dotenv

from ibm_watsonx_ai import APIClient, Credentials

# Watsonx.ai Client initialisieren
print("\n1. Watsonx.ai connection...")
wx_credentials = Credentials(
    url=os.getenv('WX_URL'),
    username=os.getenv('WX_USER'),
    api_key=os.getenv('WX_API_KEY'),
    instance_id="openshift"
)
wx_client = APIClient(wx_credentials)
result_project = wx_client.set.default_project(os.getenv('WX_PROJECT_ID'))
print(f"✓ watsonx.ai client project connected {result_project}")
result_deployment = wx_client.set.default_space(os.getenv('WX_DEPLOYMENT_SPACE_ID'))
print(f"✓ watsonx.ai client deployment space connected {result_deployment}")
7. Define an external package in addition to the existing software specification “runtime-25.1-py3.12”
You extend the base runtime runtime-25.1-py3.12 with a package extension.
The package extension is created from a requirements.txt file.

This step defines the execution environment of the deployed function.
requirements_txt =\
"""
# Requirements for PDF Preprocessing Deployable Function
# For IBM watsonx Studio / Cloud Pak for Data

# AWS S3 Integration
boto3>=1.42.51
botocore>=1.42.51
"""

with open("requirements.txt", "w", encoding="utf-8") as f:
    f.write(requirements_txt)

base_sw_spec_id = wx_client.software_specifications.get_id_by_name("runtime-25.1-py3.12")
print(f"All extensions: {wx_client.package_extensions}")

meta_prop_pkg_extn = {
    wx_client.package_extensions.ConfigurationMetaNames.NAME: "Extension software stack",
    wx_client.package_extensions.ConfigurationMetaNames.DESCRIPTION: "Extension software stack for runtime-25.1-py3.12",
    wx_client.package_extensions.ConfigurationMetaNames.TYPE: "requirements_txt"
}

pkg_extn_details = wx_client.package_extensions.store(meta_props=meta_prop_pkg_extn, file_path="requirements.txt")

# Get the identifications for the newly created software package
pkg_extn_id = wx_client.package_extensions.get_id(pkg_extn_details)
pkg_extn_url = wx_client.package_extensions.get_href(pkg_extn_details)
8. Define used software configuration
You create a new software specification based on the base runtime and the package extension. This software specification defines the execution environment for the deployment.
Give the software specification a clear and meaningful name, for example:
“Software stack for deployable function”
meta_prop_sw_spec = {
    wx_client.software_specifications.ConfigurationMetaNames.NAME: "Software stack for the deployable function",
    wx_client.software_specifications.ConfigurationMetaNames.DESCRIPTION: "Software stack -> including an extension",
    wx_client.software_specifications.ConfigurationMetaNames.BASE_SOFTWARE_SPECIFICATION: {"guid": base_sw_spec_id}
}

sw_spec_details = wx_client.software_specifications.store(meta_props=meta_prop_sw_spec)
sw_spec_id = wx_client.software_specifications.get_id(sw_spec_details)

wx_client.software_specifications.add_package_extension(sw_spec_id, pkg_extn_id)
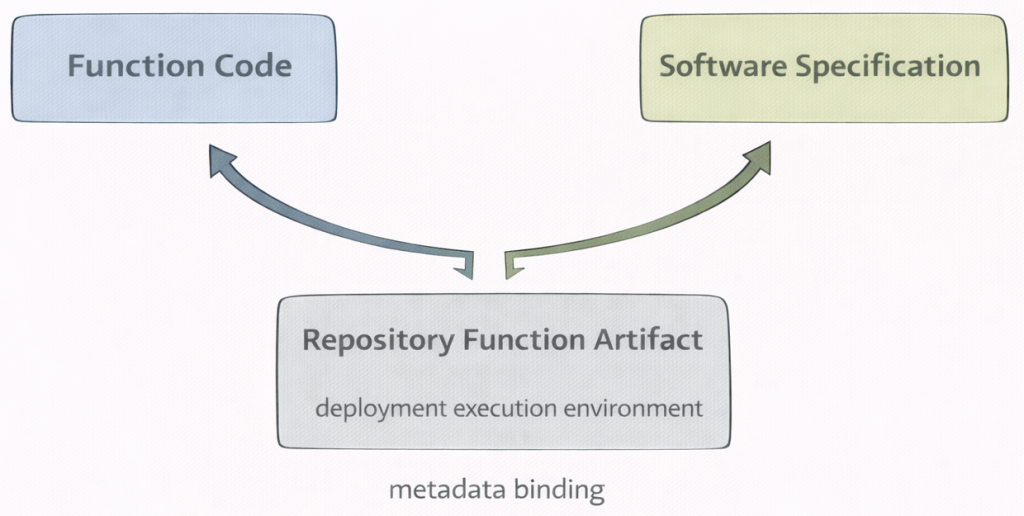
9. Define the metadata information for the deployable function
In this step, you attach the software specification to the function metadata.
The metadata defines which execution environment will be used for the deployment.
Without the software specification ID, the deployment cannot determine the runtime environment.
FunctionMetaNames.NAME → name of the stored function
FunctionMetaNames.SOFTWARE_SPEC_ID → execution environment reference
# Metadata for the function
meta_props = {
    wx_client.repository.FunctionMetaNames.NAME: "simple deployment function",
    wx_client.repository.FunctionMetaNames.SOFTWARE_SPEC_ID: sw_spec_id
}
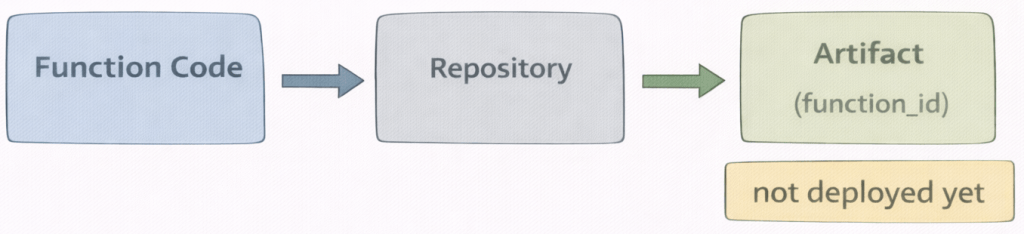
10. Store Function
In this step, you store the function in the repository. The function is not deployed yet. It is saved as a versioned artifact.The repository assigns a unique identifier (function_id). This ID is required for creating a deployment. Then you can find the function as a software asset in the deployment space.
repository.store_function(...)
# 1. Save the function
function_details = wx_client.repository.store_function(function=simple_deployable_function, meta_props=meta_props)
function_id = wx_client.repository.get_function_id(function_details)

# 2. List the existing functions
wx_client.repository.list_functions()

# 3. Get details about this deployable function
wx_client.repository.get_details(function_id)
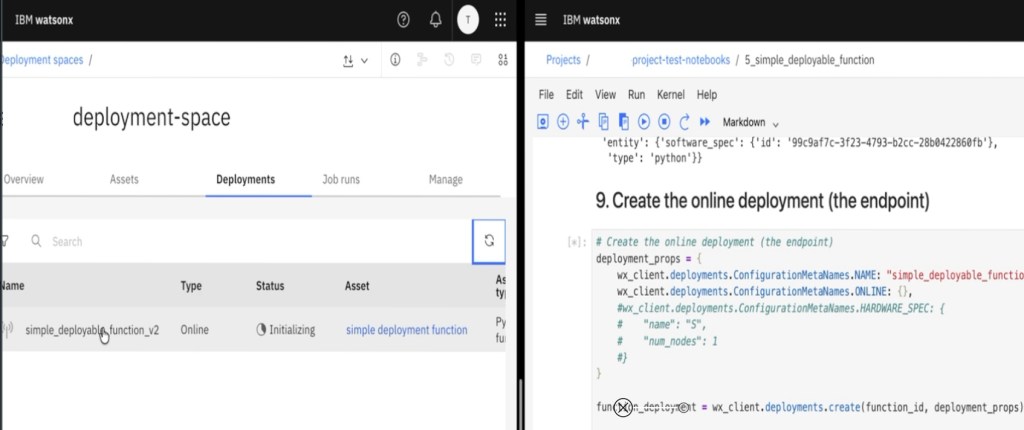
11. Create the online deployment (the endpoint)
In this step, you create an online deployment from the stored function artifact.
The deployment creates a runtime container based on the defined software specification.
The function is now exposed as a REST endpoint.
Most deployment errors occur in this step due to missing dependencies or configuration issues.
You also have the option to add hardware configuration information for the deployment see: wx_client.deployments.ConfigurationMetaNames.HARDWARE_SPEC.
# Create the online deployment (the endpoint)
deployment_props = {
    wx_client.deployments.ConfigurationMetaNames.NAME: "simple_deployable_function",
    wx_client.deployments.ConfigurationMetaNames.ONLINE: {},
    #wx_client.deployments.ConfigurationMetaNames.HARDWARE_SPEC: {
    #    "name": "S",
    #    "num_nodes": 1
    #}
}

function_deployment = wx_client.deployments.create(function_id, deployment_props)
12. Get the Endpoint URL
After the deployment is created, you retrieve the scoring endpoint URL.
This URL represents the production REST API of the deployed function. called from any external client or internally in the current notebook.
# Get the Endpoint URL
function_endpoint = wx_client.deployments.get_scoring_href(function_deployment)
print(f"Deployment endpoint: {function_endpoint}")
13. Use the endpoint
In this step, you call the deployed function using the scoring API.
The client sends the payload to the deployment endpoint.
The deployment executes score(payload) and returns a JSON response. The response format matches the structure defined in the deployable function.

deployment_id = wx_client.deployments.get_id(deployment)
print(deployment_id)

test_payload = {
    "input_data": [{
        "values": {
            "additional_message" : "hello deployment"
        }
    }]
}
predictions = wx_client.deployments.score(deployment_id, test_payload)
print(json.dumps(predictions, indent=2))
14. Summary
In this cheat sheet, we moved step by step from a local notebook function to a running REST endpoint.
The key idea is separation:
- development happens in the project
- runtime happens in the deployment space
- the software specification defines the execution environment
- the deployment exposes a production API
By following this structure, you clearly separate code, environment, artifact, and runtime.
Once you understand this flow, deploying functions becomes predictable and repeatable.
In this example, I didn’t follow the structure (fields and values). It worked in the notebook when I invoked the deployed function locally.
{
   "input_data": [
       {
          "fields": ["array_of_input_fields"],
          "values": [["array_of_values_to_be_scored"],
                     ["another_array_of_values_to_be_scored"]
                    ]
        }
   ]
}
15. Additional Resources
Related IBM Documentation:
- Deploying Python functions Link
- Use custom software spec to create statsmodels function Link
- Deploy a function Link
- IBM Notebook examples Link
I hope this was useful to you and let’s see what’s next?
Greetings,
Thomas
Note: This post reflects my own ideas and experience; AI was used only as a writing and thinking aid to help structure and clarify the arguments, not to define them.
In case of async functionalities you maybe can verify to use:
def deployable_function():

    async def generate_async() -> dict:
        import asyncio
        await asyncio.sleep(1)
        return {"body": {"Example response": 1}}

    def generate() -> dict:
        import asyncio
        return asyncio.run(generate_async())

    return generate
#ai, #genai, #python, #jupyter, #notebook, #cheatsheet, #cloud, #deployment, #restapi, #ibmcloud, #watsonx

Leave a comment