

This is my next blog post related to operators. That blog post is about adding a new API version to our existing example Multi Tenancy Frontend Operator. When we have added the new API version we will deploy the changed operator to a Kubernetes cluster using the Operator Lifecycle Manager (OLM).
We only do a small change to our operator 😉 .
The new API version is called v2alpha2.
IMPORTANT: We will not implement an automatic update for existing deployed instances of the frontend web-applications created by the older operator version
v1alpha1with an operatorwebhook.
You find the final version of the v2alpha2 API example implementation in the GitHub project of the Multi Tenancy Frontend Operator by checking out the branch update-operator.
It can also be useful for you in that context to take a look into the blog post Deploying Operators with the Operator Lifecycle Manager made by Niklas Heidloff .
That is the sequence we will follow in that blog post:
- Clone the starting project to your local machine
- Create a new API version
- Configure the new API
- Implement changes for the new API
- Create a controller-manager image
- Create a new bundle image
- Create a new catalog image
- Create a new
CatalogSourceandSubscriptionspecification - Deploy the new version to a Kubernetes cluster using OLM
- Verify the operator by creating a new frontend web-application instance
1. Clone the starting project to your local machine
git clone https://github.com/thomassuedbroecker/multi-tenancy-frontend-operator.git
Note: The final example implementation for that blog post is in the branch
update-operator.
2. Create a new API version
Step 1: Create v2alpha2 API using the Operator SDK
We started to create for that project a new operator controller with the API version v1alpha1. Here is the command we used.
operator-sdk create api --group multitenancy --version v1alpha1 --kind TenancyFrontend --resource --controller
Now we will only create a new resource with the version v2alpha2 and we will modify our existing controller to use that new API later. Therefor we use following command:
operator-sdk create api --group multitenancy --version v2alpha2 --kind TenancyFrontend --resource
- Example output:
As you see in the output, we were asked, if we want to create a new controller.
Create Controller [y/n]
n
Writing kustomize manifests for you to edit...
Writing scaffold for you to edit...
api/v2alpha2/tenancyfrontend_types.go
Update dependencies:
$ go mod tidy
Running make:
$ make generate
/Users/thomassuedbroecker/Downloads/dev/multi-tenancy-frontend-operator/frontendOperator/bin/controller-gen object:headerFile="hack/boilerplate.go.txt" paths="./..."
Next: implement your new API and generate the manifests (e.g. CRDs,CRs) with:
$ make manifests
Step 2: Verify the API changes
In the image below you see a new API version was created. Now we need to copy and past our existing specifications to the newly created files first.

Step 3: Verify the changes of the other files
The following images do show the changes of files or shows the files which were added.

Let us have a short look into the files:
main.gowas updated

PROJECTwas updated

groupversion_info.gowas addedkustomization.yamlupdated

- A new example
multitenancy_v2alpha2_tenancyfrontend.yamlwas created
3. Configure the new API
Step 1: Change the Custom Resource Definition for the new API v2alpha2
In our case we start to modify the code of the api.v2alpha2.tenancyfrontend_types.go file.
We are starting this by just copying the existing CRD definition from the api.v1alpha1.tenancyfrontend_types.go file.
type TenancyFrontendSpec struct {
    // INSERT ADDITIONAL SPEC FIELDS - desired state of cluster
    // Important: Run "make" to regenerate code after modifying this file

    // Size is an example field of TenancyFrontend. Edit tenancyfrontend_types.go to remove/update
    // Existing API 1alpha1 spec entries
    Size        int32  `json:"size"`
    DisplayName string `json:"displayname,omitempty"`
}
Then we add a validation for the minimum size of the pod replicas. We define a size limitation for the string for the displayname and the new catalogname. The we define that the displayname and size are required and catalogname as a default value if it is not defined.
We use the
+kubebuilder:storageversion markerto indicate the Groups, Versions and Kinds that should be used to store data by the API server. (source Kubebuilder documentation)
- TenancyFrontendSpec
// +kubebuilder:validation:Minimum=0// +kubebuilder:validation:MaxLength=15// +kubebuilder:validation:Required// +kubebuilder:default:=Movies
- TenancyFrontend
// +kubebuilder:storageversion
Here is the new code for the new API. (tenancyfrontend_types.go)
// +kubebuilder:storageversion=true
type TenancyFrontendSpec struct {
    // INSERT ADDITIONAL SPEC FIELDS - desired state of cluster
    // Important: Run "make" to regenerate code after modifying this file

    // Size is an example field of TenancyFrontend. Edit tenancyfrontend_types.go to remove/update
    // +kubebuilder:validation:Required
    // +kubebuilder:validation:Minimum=0
    Size        int32  `json:"size"`
    // +kubebuilder:validation:Required
    // +kubebuilder:validation:MaxLength=15
    DisplayName string `json:"displayname,omitempty"`
    // +kubebuilder:validation:MaxLength=15
    // +kubebuilder:default:=Movies
    CatalogName string `json:"catalogname,omitempty"`
}
//+kubebuilder:object:root=true
//+kubebuilder:subresource:status
//+kubebuilder:storageversion

// TenancyFrontend is the Schema for the tenancyfrontends API
type TenancyFrontend struct {
...
Step 2: Apply the changes by running make generate and make manifests
make generate
make manifests
These commands adding to the CustomResourceDefinition file (config.crd.bases.multitenancy.example.net_tenancyfrontends.yaml) the new API v2alpha2.
REMEMBER: We used the +kubebuilder:storageversion marker to indicate the Groups, Versions and Kinds that should be used to store data by the API server. (source Kubebuilder documentation)

4. Implement changes for the new API
Step 1: Change the controller to use the new API and add a new behaviour
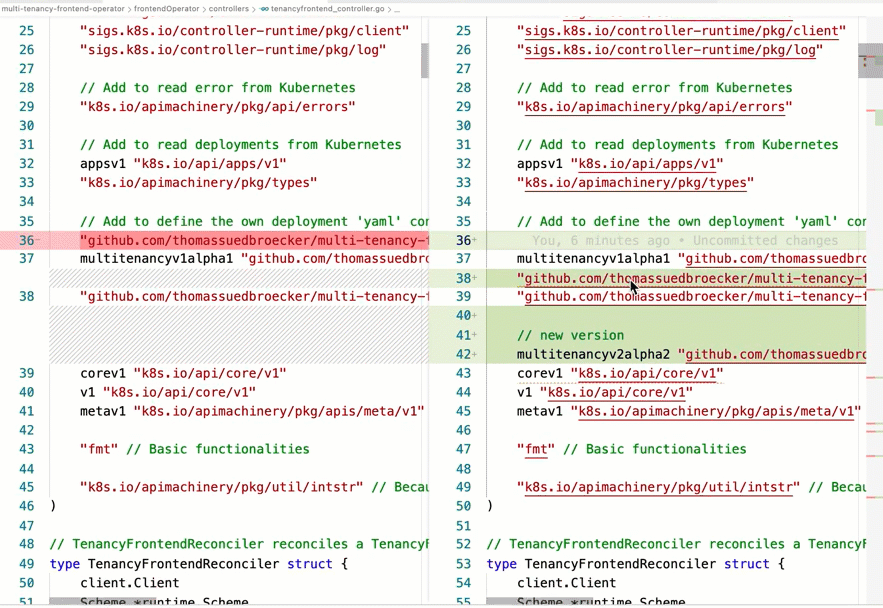
Now we need to replace all references to the old API v1alpha1 with v2alpha2, but we still keep the old v1alpha1, because we just want to inform the users in the operator log that this v1alpha1 version will not be used.
We adjust change a little bit the code to use the newly created CatalogName for our deployment of our frontend web-application for the v2alpha2 version. (controller implementation)
These are changes in the controller implementation.
- We update the import
    multitenancyv1alpha1 "github.com/thomassuedbroecker/multi-tenancy-frontend-operator/api/v1alpha1"

    // new version
    multitenancyv2alpha2 "github.com/thomassuedbroecker/multi-tenancy-frontend-operator/api/v2alpha2"
We inform in the log that a custom resource object of the older version v1alpha1 were found, but we will not update that resource or change an instance of an older deployment.
- Inside the
reconcilefunction.
tenancyfrontend_old := &multitenancyv1alpha1.TenancyFrontend{}
    err := r.Get(ctx, req.NamespacedName, tenancyfrontend_old)
    if err != nil {
        if errors.IsNotFound(err) {
            logger.Info("TenancyFrontend v1alpha1 resource not found.")
        }
        // Error reading the object - requeue the request.
        logger.Info("Failed to get TenancyFrontend v1alpha1")
    } else {
        logger.Info("Got an old TenancyFrontend v1alpha1, object this will not be used!")
    }
- Inside the
deploymentForTenancyFrontedfunction.
{Name: "VUE_APP_CATEGORY_NAME",
        Value: frontend.Spec.CatalogName,
},
5. Create and push controller-manager image to a container registry
Now we will build the image using the makefile. We use Quay.io as our container registry for the container image.
Step 1: Login to Quay.io
docker login quay.io
Step 2: Use a custom container name
export REGISTRY='quay.io'
export ORG='tsuedbroecker'
export CONTROLLER_IMAGE='frontendcontroller:v4'
Step 3: Build the container using the make file
make generate
make manifests
make docker-build IMG="$REGISTRY/$ORG/$CONTROLLER_IMAGE"
Step 4: Push the container to the container registry
docker push "$REGISTRY/$ORG/$CONTROLLER_IMAGE"
6. Create a bundle image
Step 1: Create a bundle
We define the location of the existing controller-manager image for the operator with the IMG parameter and with VERSION=0.0.2 we define an input for the makefile that going to create the second bundle.
Execute the commands:
export VERSION=0.0.2
make bundle IMG="$REGISTRY/$ORG/$CONTROLLER_IMAGE"
- Following files will be updated with that command:
frontendOperator › bundle › manifests > frontendoperator.clusterserviceversion.yaml- Extend
metadata.annotations.alm-examplesalm-examples:
- Extend
spec.customresourcedefinitions.owned:
- Change
spec.install.spec.deployments.spec.template.spec.containers.image
- Change
spec.install.spec.deployments.spec.template.spec.containers.version
frontendOperator > config > manifests › bases > frontendoperator.clusterserviceversion.yaml- Changes only owned

- Changes only owned
frontendOperator › bundle › manifests > multitenancy.example.net_tenancyfrontends.yaml
The storage version is important in that case.
Here is an extraction on the
“Set served to false for the old version in the spec.versions list. If any clients are still unexpectedly using the old version they may begin reporting errors attempting to access the custom resource objects at the old version. If this occurs, switch back to using served:true on the old version, migrate the remaining clients to the new version and repeat this step.”
Source: Kubernetes Version in CustomResourceDefinitionsmultitenancy.example.net_tenancyfrontends.yaml
        served: true
        storage: false
        subresources:
        status: {}
    - name: v2alpha2
        schema:
    ...
                - size
                type: object
            status:
                description: TenancyFrontendStatus defines the observed state of TenancyFrontend
                type: object
            type: object
        served: true
        storage: true
frontendOperator › config › manager > kustomization.yaml
Step 2: Create a bundle image
Set the custom container name (the default of the Multi Tenancy Frontend Operator don’t fit for an default usage of the make file )
export BUNDLE_IMAGE='bundlefrontendoperator:v4'
make bundle-build BUNDLE_IMG="$REGISTRY/$ORG/$BUNDLE_IMAGE"
Step 3: Push the bundle image
docker push "$REGISTRY/$ORG/$BUNDLE_IMAGE"
7. Create and push a new catalog image to a container registry
Step 1: Create a catalog image
export CATALOG_IMAGE=frontend-catalog
export CATALOG_TAG=v0.0.2
make catalog-build CATALOG_IMG="$REGISTRY/$ORG/$CATALOG_IMAGE:$CATALOG_TAG" BUNDLE_IMGS="$REGISTRY/$ORG/$BUNDLE_IMAGE"
Step 2: Push the catalog image to a container registry
docker push "$REGISTRY/$ORG/$CATALOG_IMAGE:$CATALOG_TAG"
8. Create a Catalog source and a Subscription specification
Step 1: Define the catalog source specification
Create a file called catalogsource.yaml and past the content of yaml below into that file. As we see the CatalogSource references the quay.io/tsuedbroecker/frontend-catalog:v0.0.2 image we created before.
apiVersion: operators.coreos.com/v1alpha1
kind: CatalogSource
metadata:
  name: frontend-operator-catalog
  namespace: operators
spec:
  displayName: Frontend Operator v2
  publisher: Thomas Suedbroecker
  sourceType: grpc
  image: quay.io/tsuedbroecker/frontend-catalog:v0.0.2
  updateStrategy:
    registryPoll:
      interval: 10m
- Apply that
CatalogSourceto the cluster.
kubectl apply -f catalogsource.yaml -n operators
- Verify the
CatalogSource.
kubectl get catalogsource -n operators
- Example output:
NAME                        DISPLAY             TYPE   PUBLISHER             AGE
frontend-operator-catalog   Frontend Operator   grpc   Thomas Suedbroecker   46m
Step 2: Define the subscription source
Here we need to add the installPlanApproval: Manual compared to the last blog post for the initial version we had.
apiVersion: operators.coreos.com/v1alpha1
kind: Subscription
metadata:
  name: frontendoperator-v0-0-2-sub
  namespace: operators
spec:
  channel: alpha
  name: frontendoperator
  source: frontend-operator-catalog
  sourceNamespace: operators
  installPlanApproval: Manual
- Apply the
Subscriptionto the cluster.
kubectl apply -f subscription.yaml -n operators
- Verify the
Subscription.
kubectl get subscription -n operators
- Example output:
NAME                          PACKAGE              SOURCE                        CHANNEL
frontendoperator-v0-0-2-sub   frontendoperator   frontend-operator-catalog   alpha
9. Create and verify an instance of the web application based on the new operator API version
Step 1: Create
kubectl apply -f config/samples/multitenancy_v2alpha2_tenancyfrontend.yaml -n default
REMEMBER: Here is the new format for version
v2alpha2
apiVersion: multitenancy.example.net/v2alpha2
kind: TenancyFrontend
metadata:
  name: tenancyfrontend-sample
spec:
  # TODO(user): Add fields here
  size: 1
  displayname: "Movie-Store"
  catalogname: Movies
The image below shows the Custom Resource Definition we have in place on our Kubernetes cluster.

Step 2: Verify
kubectl get customresourcedefinition -n default | grep "frontend"
kubectl get tenancyfrontend -n default | grep "frontend"
kubectl get deployment -n default | grep "frontend"
kubectl get service -n default | grep "frontend"
kubectl get pod -n default | grep "frontend"
- Example output:
tenancyfrontends.multitenancy.example.net             2022-03-24
tenancyfrontend-sample   42s
tenancyfrontend-sample   1/1     1            1           42s
tenancyfrontend-sample            NodePort    172.21.17.232   <none>        8080:30640/TCP   43s
tenancyfrontend-sampleclusterip   ClusterIP   172.21.95.161   <none>        80/TCP           43s
tenancyfrontend-sample-5858f8d9f6-nzzgs   1/1     Running   0          44s
The gif below shows the finial status of the operator.

Summary
We added a new API version and worked technically without any impact or an upgrade for an existing instances created by an older operator version, but that is another story about operator webhooks.
I hope this was useful to you and let’s see what’s next?
Greetings,
Thomas
#olm, #operatorsdk, #kubernetes, #bundle, #operator, #golong, #opm, #docker, #makefile, #operatorlearningjourney
