
In that blog post we get started with the IasCable framework. The IasCable framework is a part of the Cloud Native Toolkit project with the objective to build an installable component infrastructure based on components from a catalog of available modules.
The IasCable framework uses mainly Terraform to automate the infrastructure creation.
The source code related to that blog post is also available on GitHub.
The blog post is structured in following sections:
- Bill of Material and Modules (from the Software Everywhere project)
- Pre-requisites for the example
- Step by step example setup (9 steps)
- Summary
Bill of Material and Modules
The IasCable uses a Bill of Material specification that contains links to Modules (from the Software Everywhere project), which you need to understand. These two parts are the heart of the framework we could say to realize the objective to build an installable component infrastructure based on components from a catalog of available modules.
Please visit the linked resources for more details.
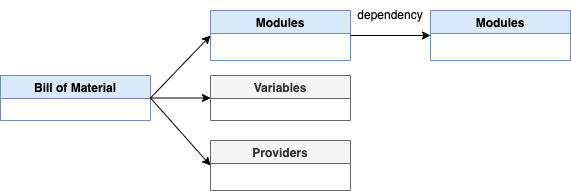
Simplified we can say a BOM is specified by modules it uses. In addition you have the option to use variables and providers definitions related to a BOM specification. It is good to know that Modules can have dependencies to other modules, if this is the case the related modules will be included by the framework, as far as I understand.
Here is a simplified overview diagram:
Here is a simplified activity diagram that shows the activities carried out by the user and the IasCable framework.

Realize Software Everywhere with Bill of Material and Modules
Simplified we can say, we have two basic roles in that context:
Creators(Architect, Developer or Operator) defining Bill of Materials to create Terraform automation for creating specific infrastructure based on reusing existing Terraform modules.Consumerswho using the created Terraform automation based on theBOMdefinition.
And we have two major elements to define and create the needed Terraform automation.
- The
BOMconfiguresIasCableto point to right Terraform modules in a module catalog to create the Terraform automation code. IasCableis uses Terraform modules to create a Terraform automation which will be consumed.
The following diagram shows some high level dependencies.

Pre-requisites for the example
The following tools need to be installed on your local computer to follow the step by step instructions.
That is the cloud environment we will use.
Step by step example setup
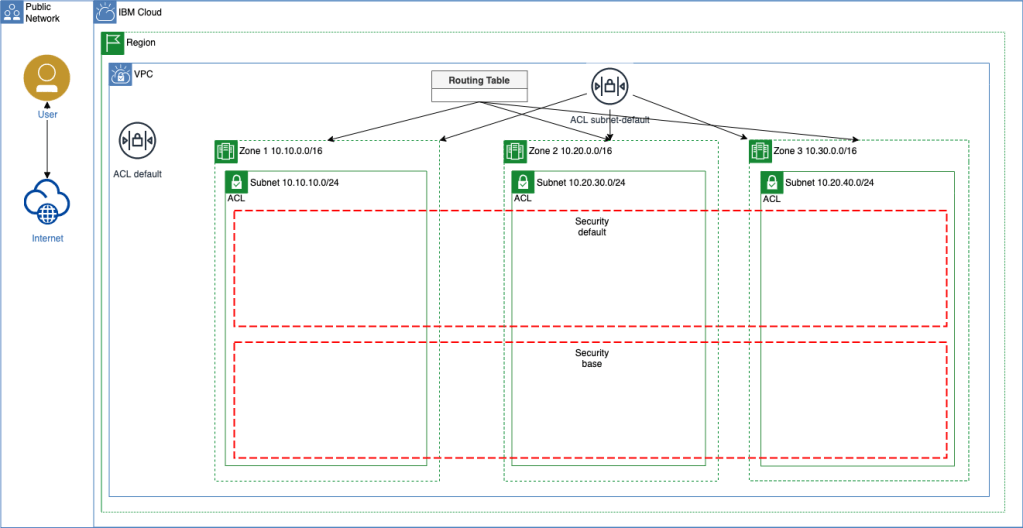
This is a step by step example setup to create a Virtual Private Cloud with three Subnets on IBM Cloud.
- 1 x
Virtual Private Cloud - 3 x
Subnets - 2 x
Access Control Lists - 1 x
Routing Table - 2 x
Security Groups
The following image shows a simplified architecture overview:
Step 1: Install CLI
curl -sL https://raw.githubusercontent.com/cloud-native-toolkit/iascable/main/install.sh | sh
Step 2: Verify the installation
iascable build --help
- Example output:
Configure (and optionally deploy) the iteration zero assets

Options:
      --version                   Show version number   [boolean]
      --help                      Show help             [boolean]
  -u, --catalogUrl                The url of the module catalog.
                                  Can be https:// or file:/
                                  protocol.
   [default: "https://modules.cloudnativetoolkit.dev/index.yaml"]
  -i, --input                     The path to the bill of
                                  materials to use as input
                                                          [array]
  -r, --reference                 The reference BOM to use for
                                  the build               [array]
  -o, --outDir                    The base directory where the
                                  command output will be written
                                            [default: "./output"]
      --platform                  Filter for the platform
                                  (kubernetes or ocp4)
      --provider                  Filter for the provider (ibm or
                                  k8s)
      --tileLabel                 The label for the tile.
                                  Required if you want to
                                  generate the tile metadata.
      --name                      The name used to override the
                                  module name in the bill of
                                  material.               [array]
      --tileDescription           The description of the tile.
      --flattenOutput, --flatten  Flatten the generated output
                                  into a single directory (i.e.
                                  remove the terraform folder).
                                                        [boolean]
      --debug                     Flag to turn on more detailed
                                  output message        [boolean]
Step 3: Create a Bill of Materials(BOM) file
nano firstbom.yaml
Copy following content into the new file:
apiVersion: cloudnativetoolkit.dev/v1alpha1
kind: BillOfMaterial
metadata:
  name: ibm-vpc
spec:
  modules:
    - name: ibm-vpc
    - name: ibm-vpc-subnets
Step 4: Execute following command
iascable build -i firstbom.yaml
Step 5: Verify the created content
Now let us have a closer look at the created folders and files by IasCable framework.
tree
├── firstbom.yaml
└── output
    ├── ibm-vpc
    │   ├── apply.sh
    │   ├── bom.yaml
    │   ├── dependencies.dot
    │   ├── destroy.sh
    │   └── terraform
    │       ├── docs
    │       │   ├── ibm-resource-group.md
    │       │   ├── ibm-vpc-subnets.md
    │       │   └── ibm-vpc.md
    │       ├── ibm-vpc.auto.tfvars
    │       ├── main.tf
    │       ├── providers.tf
    │       ├── variables.tf
    │       └── version.tf
    └── launch.sh
outputfolder
The folder output contains all the content created by the iascable build command
output/ibm-vpcfolder
The folder ibm-vpc is the name we used in ower own BOM file. Let us call that folder a “project folder” for now. The name was defined in meta data of our BOM file.
metadata:
  name: ibm-vpc
output/ibm-vpc/terraformfolder
This is table contains the list of files in the terraform folder.
| Filename | Content |
|---|---|
output/ibm-vpc/terraform/main.tf | Here you see a number of modules defined including the defined ibm-vpc and ibm-vpc-subnets from the BOM file. |
output/ibm-vpc/terraform/providers.tf | Simply contains the needed cloud provider information. In that case what we need to specify for IBM Cloud. |
output/ibm-vpc/terraform/variables.ft | Contains the specification for the used variable in the main.tf or other Terrafrom files. |
output/ibm-vpc/terraform/version.ft | Contains the specification for the used Terrafrom provider sources and versions. In that case only IBM is listed. |
output/ibm-vpc/terraform/ibm-vpc.auto.tfvars | That file can be used to configure the variable values. (maybe add to .gitignore) During the execution of terraform plan and terraform apply you will be ask for input, if you didn’t specify that values. |
- The
output/launch.shfile
That script downloads and starts a container on your local machine. The objective is to ensure that the right environment is used for applying the Terraform configuration.
It attaches the local path to the container as a volume.
Note: You need to ensure you have a container engine on your machine. Best Docker! Because by default the file uses Docker. Attach doesn’t work for
podmanon macOS. The recommended tool is colima, because it uses only the Docker CLI.
- The
output/ibm-vpc/apply.shfile
That file converts an existing variable.yaml file or variables in the BOM file to a variables.tf file and then it executes the terraform init and terraform apply commands.
- The
output/ibm-vpc/destroy.shfile
That file simply executes the terraform init and terraform destroy -auto-approve commands.
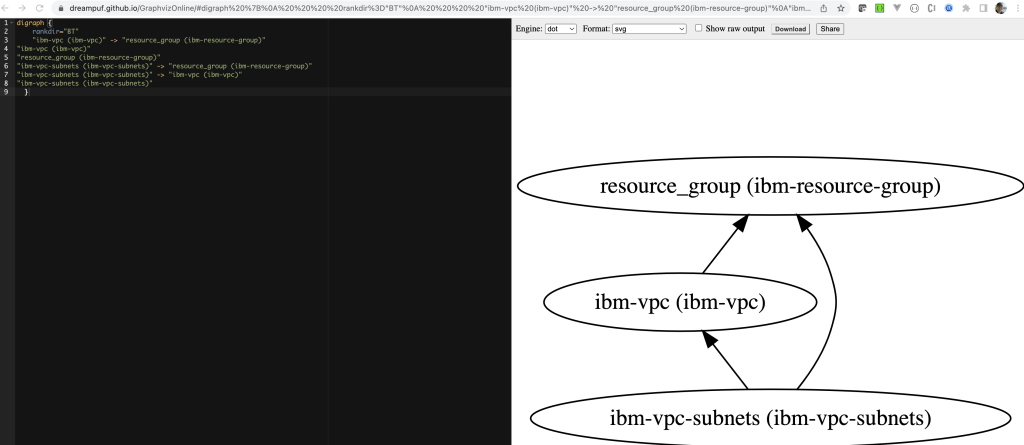
- The
output/ibm-vpc/dependencies.dotfile
That file contains the dependencies which can be visualized for example with Graphviz Online.
Example:
- The
output/ibm-vpc/bom.yamlfile
That file was created by our own BOM file. That file now contains all needed variables. These variables are also reflected in the output/ibm-vpc/terraform/variables.ft file.
Here is the content of the newly created bom.yaml file.
apiVersion: cloudnativetoolkit.dev/v1alpha1
kind: BillOfMaterial
metadata:
  name: ibm-vpc
spec:
  modules:
    - name: ibm-vpc
      alias: ibm-vpc
      version: v1.16.0
    - name: ibm-vpc-subnets
      alias: ibm-vpc-subnets
      version: v1.13.2
    - name: ibm-resource-group
      alias: resource_group
      version: v3.2.16
  variables:
    - name: region
      type: string
      description: The IBM Cloud region where the cluster will be/has been installed.
    - name: ibmcloud_api_key
      type: string
    - name: ibm-vpc-subnets__count
      type: number
      description: The number of subnets that should be provisioned
      defaultValue: 3
    - name: resource_group_name
      type: string
      description: The name of the resource group
Step 6: Execute the terraform init command
Navigate to the output/ibm-vpc/terraform folder and execute the terraform init command.
cd output/ibm-vpc/terraform
terraform init
Step 7: Execute the terraform plan command
Execute the terraform plan command.
terraform plan
Here you can see the interaction:
var.ibmcloud_api_key
  the value of ibmcloud_api_key

  Enter a value:
Note: You can create an
IBM Cloud API Keywith following command:ibmcloud iam api-key-create iascable-example.
Step 8: Execute the terraform apply
Execute the terraform apply command.
terraform apply -auto-approve
- Input of your variables:
var.ibmcloud_api_key
  the value of ibmcloud_api_key

  Enter a value: xxx
var.region
  The IBM Cloud region where the cluster will be/has been installed.

  Enter a value: us-south
var.resource_group_name
  The name of the resource group

  Enter a value: default
- Output overview of the resources which will be created or configured: (more detail view in the GitHub Repo)
Terraform used the selected providers to generate the following
execution plan. Resource actions are indicated with the
following symbols:

  + create
 <= read (data resources)

Terraform will perform the following actions:
...
  # module.ibm-vpc.data.ibm_is_security_group.base will be read during apply
  # module.ibm-vpc.data.ibm_is_vpc.vpc will be read during apply
  # module.ibm-vpc.data.ibm_resource_group.resource_group will be read during apply
  # module.ibm-vpc.ibm_is_network_acl_rule.allow_internal_egress[0] will be created
  # module.ibm-vpc.ibm_is_network_acl_rule.allow_internal_ingress[0] will be created
  # module.ibm-vpc.ibm_is_network_acl_rule.deny_external_ingress[0] will be created
  # module.ibm-vpc.ibm_is_network_acl_rule.deny_external_rdp[0] will be created
  # module.ibm-vpc.ibm_is_network_acl_rule.deny_external_ssh[0] will be created
  # module.ibm-vpc.ibm_is_security_group.base[0] will be created
  # module.ibm-vpc.ibm_is_security_group_rule.cse_dns_1[0] will be created
  # module.ibm-vpc.ibm_is_security_group_rule.cse_dns_1[1] will be created
  # module.ibm-vpc.ibm_is_security_group_rule.cse_dns_2[0] will be created
  # module.ibm-vpc.ibm_is_security_group_rule.cse_dns_2[1] will be created
  # module.ibm-vpc.ibm_is_security_group_rule.default_inbound_http[0] will be created
  # module.ibm-vpc.ibm_is_security_group_rule.default_inbound_ping[0] will be created
  # module.ibm-vpc.ibm_is_security_group_rule.private_dns_1[0] will be created
  # module.ibm-vpc.ibm_is_security_group_rule.private_dns_1[1] will be created
  # module.ibm-vpc.ibm_is_security_group_rule.private_dns_2[0] will be created
  # module.ibm-vpc.ibm_is_security_group_rule.private_dns_2[1] will be created
  # module.ibm-vpc.ibm_is_vpc.vpc[0] will be created
  # module.ibm-vpc.ibm_resource_tag.nacl-tag[0] will be created
  # module.ibm-vpc.ibm_resource_tag.sg-tag[0] will be created
  # module.ibm-vpc.null_resource.print_names will be created
  # module.ibm-vpc-subnets.data.ibm_is_vpc.vpc will be read during apply
  # module.ibm-vpc-subnets.data.ibm_resource_group.resource_group will be read during apply
  # module.ibm-vpc-subnets.ibm_is_network_acl.subnet_acl[0] will be created
  # module.ibm-vpc-subnets.ibm_is_network_acl_rule.acl_rule[0] will be created
  # module.ibm-vpc-subnets.ibm_is_network_acl_rule.acl_rule[1] will be created
  # module.ibm-vpc-subnets.ibm_is_network_acl_rule.acl_rule[2] will be created
  # module.ibm-vpc-subnets.ibm_is_network_acl_rule.acl_rule[3] will be created
  # module.ibm-vpc-subnets.ibm_is_network_acl_rule.acl_rule[4] will be created
  # module.ibm-vpc-subnets.ibm_is_network_acl_rule.acl_rule[5] will be created
  # module.ibm-vpc-subnets.ibm_is_subnet.vpc_subnets[0] will be created
  # module.ibm-vpc-subnets.ibm_is_subnet.vpc_subnets[1] will be created
  # module.ibm-vpc-subnets.ibm_is_subnet.vpc_subnets[2] will be created
  # module.ibm-vpc-subnets.null_resource.print_names will be created
  # module.resource_group.data.ibm_resource_group.resource_group will be read during apply
  # module.resource_group.data.ibm_resource_tag.resource_group_tags will be read during apply
  # module.resource_group.null_resource.resource_group will be created
  # module.resource_group.null_resource.wait_for_sync will be created
  # module.resource_group.random_uuid.tag will be created
  # module.resource_group.module.clis.data.external.setup-binaries will be read during apply
  # module.resource_group.module.clis.null_resource.print will be created
  # module.resource_group.module.clis.random_string.uuid will be created
...

Plan: 36 to add, 0 to change, 0 to destroy.
╷
│ Warning: Experimental feature "module_variable_optional_attrs" is active
│
│   on .terraform/modules/ibm-vpc-subnets/version.tf line 10, in terraform:
│   10:   experiments = [module_variable_optional_attrs]
│
│ Experimental features are subject to breaking changes in
│ future minor or patch releases, based on feedback.
│
│ If you have feedback on the design of this feature, please
│ open a GitHub issue to discuss it.
╵
╷
│ Warning: Argument is deprecated
│
│   with module.resource_group.module.clis.random_string.uuid,
│   on .terraform/modules/resource_group.clis/main.tf line 15, in resource "random_string" "uuid":
│   15:   number  = false
│
│ Use numeric instead.
│
│ (and one more similar warning elsewhere)
Do you want to perform these actions?
  Terraform will perform the actions described above.
  Only 'yes' will be accepted to approve.

  Enter a value: yes
- Final output result of the creation
Apply complete! Resources: 36 added, 0 changed, 0 destroyed.
Step 9: Execute the terraform destroy command
Note: Ensure you didn’t delete the
terraform.tfstateand the.terraform.lock.hclfiles before.
To destroy the provisioned resources, run the following:
terraform destroy -auto-approve
You need to ensure to provide the IBM Cloud API Key, the region and the resource group name.
var.ibmcloud_api_key
  the value of ibmcloud_api_key

  Enter a value: xxxx

var.region
  The IBM Cloud region where the cluster will be/has been installed.

  Enter a value: us-south

var.resource_group_name
  The name of the resource group

  Enter a value: default
- Output overview:
╷
│ Warning: Experimental feature "module_variable_optional_attrs" is active
│
│   on .terraform/modules/ibm-vpc-subnets/version.tf line 10, in terraform:
│   10:   experiments = [module_variable_optional_attrs]
│
│ Experimental features are subject to breaking changes in
│ future minor or patch releases, based on feedback.
│
│ If you have feedback on the design of this feature, please
│ open a GitHub issue to discuss it.
╵
╷
│ Warning: Argument is deprecated
│
│   with module.resource_group.module.clis.random_string.uuid,
│   on .terraform/modules/resource_group.clis/main.tf line 15, in resource "random_string" "uuid":
│   15:   number  = false
│
│ Use numeric instead.
│
│ (and one more similar warning elsewhere)
╵

Destroy complete! Resources: 36 destroyed.
Summary
The IasCable and the Modules (from the Software Everywhere project) which are all from the Cloud Native Toolkit providing a good concept for a framework to provide reusable components to install and configure cloud infrastructure. This was just a getting started. There is more to learn.
I hope this was useful to you and let’s see what’s next?
Greetings,
Thomas
#ibmcloud, #vpc, #terraform, #cloudnativetoolkit, #softwareeverywhere, #iascable
