

This longer blog post is about an example of a “Functional Performance Test Plan” in the JMeter test tool. The example contains configuration of the Test Plan and the execution from the UI and the command line using a simple Node.js application as System Under Test. I would say the content is from the beginner to intermediate level.
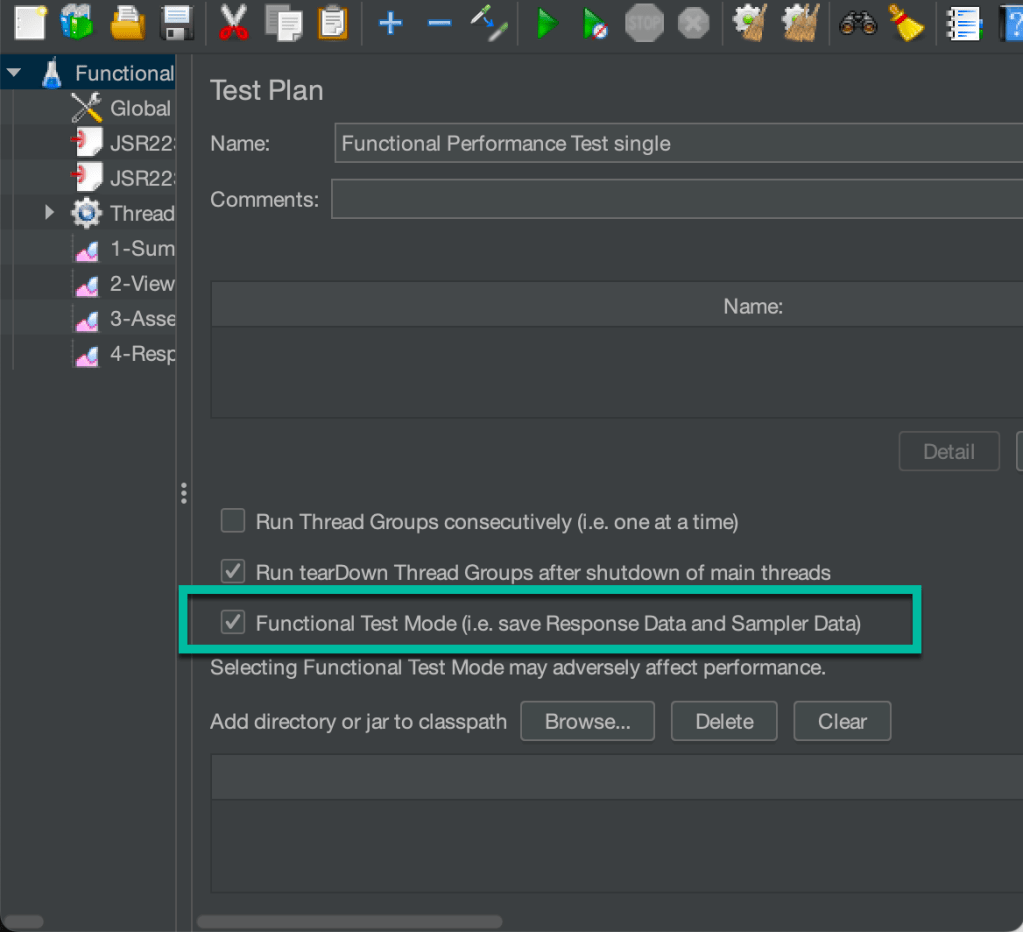
The reason to call this example a Functional Performance Test Plan is that we are not verifying the performance of a working System Under Test with a focus on the response times only. We also demonstrate that the System Under Test works functionally and delivers the correct response content values. Therefore, we also enable Functional Test Mode (i.e. save Response Data and Sampler Data) for the Test Plan.
This GitHub project contains the example code and the JMeter Test Plan:
https://github.com/thomassuedbroecker/example-jmeter-functional-performance-test
The example contains many potentials for optimization, so feel free to optimize it to your needs and use it as a starting point. Below is the high-level table of contents overview in this section. (element overview)
- Test Objectives
- The System Under Test
- The JMeter Test Plan
- Outline of the Test Plan
- Basic configuration
- Application access configuration
- Provide the data to loop the REST endpoint invocation and save the results
- Pre and post-processing code
- Sampler code
- Assertion
- Test Execution
I recorded a live stream on YouTube, and you can navigate to the sections using the video’s description.
1. Test Objectives
We want to measure the response time for a REST Endpoint invocation for one User and verify and log the response value content in a JSON format. We are saving additional logging of the response information in an additional CSV file.
We invoke one REST endpoint for the test, protected with base authentication.
Currently, concurrent users aren’t in focus, and the System Under Test (SUT) the JMeter performance test tool is running on the same local machine.
2. The System Under Test
The System Under Test is based on the example you can find in the blog post Open the door wide open for Watson Assistant with "custom extensions" – an awesome progression and the application can also run on IBM Cloud Code Engine.
To run the example application locally, follow these steps:
- Clone the project to your local computer
git clone https://github.com/thomassuedbroecker/extension-apis.git
- Follow the steps in this Run the Node.js application locally.
The gif below shows a Postman invocation of the endpoint we will invoke from our HTTP Sampler in the JMeter Test Plan.

3. The JMeter Test Plan
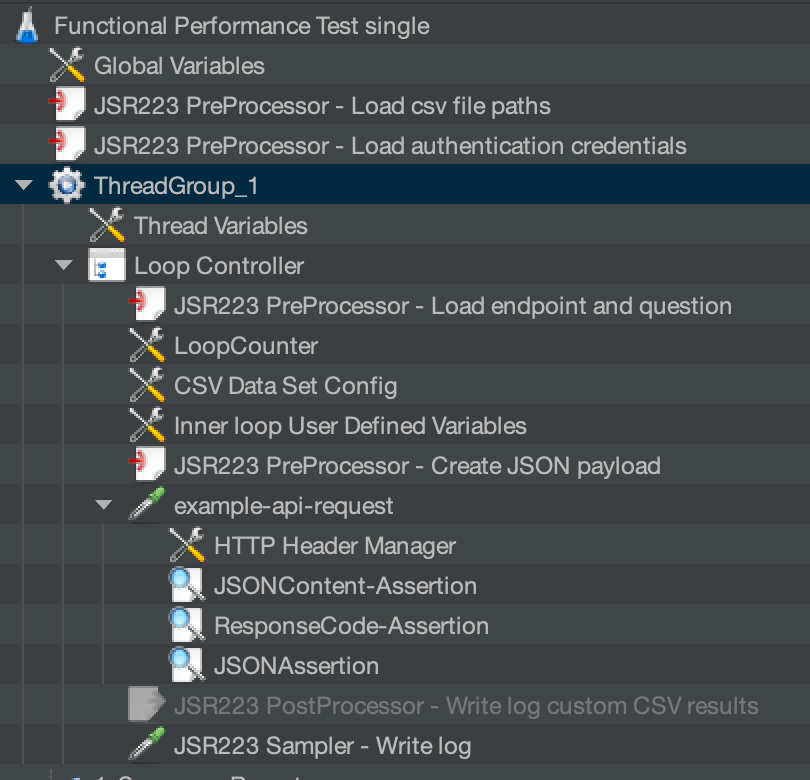
3.1 Outline of the Test Plan
The following image contains the outline of the Test Plan.
3.2 Basic configuration
The following bullet points show the basic configuration for the Test Plan of our “Example Functional Performance Test“:
- 1
Thread Group - 1
User - 1
HTTP Request

3.3 Application access configuration
We will load the credentials to access the application with the Basic Authentication from environment variables. We also load the endpoint and the API path we need later for our REST Endpoint invocation.
export _USERNAME="admin"
export _PASSWORD="admin"
export _ENDPOINT=localhost
export _API_PATH=/v1/query
export _PROTOCOL=http
export _PORT=3000
export _QUESTIONS_CSV_PATH=$(pwd)/question_list.csv
3.4 Provide the data to loop the REST endpoint invocation and save the results
We will load all questions for an User to send in the request based on the CSV file content, and then we create a log file in a CSV format that contains the following information:
- CSV input format for the questions:
question
Can you help me?
- CSV log format:
- Loop count
- Status
- Question
- Answer
"1","200","success","Can you help me?","Yes, I can help you."
To use the CSV input, we must ensure that we configure the CSV file input in the JMeter UI. The following GIF shows how this works.
3.5 Pre and post-processing code
We use the Groovy programming language to implement the custom pre and post-processing in the example Test Plan. Groovy is a JSR223 Scripting compliant language. JSR223 Scripting is the standard scripting API for Java Virtual Machine (JVM).
In many situations of the pre or post-processing, I save values in custom variables and as properties to make them available in the entire Test Plan. Keeping the values in both is redundant and unnecessary, so feel free to optimize this ;-).
3.5.1 Load endpoint configuration (pre-processing)
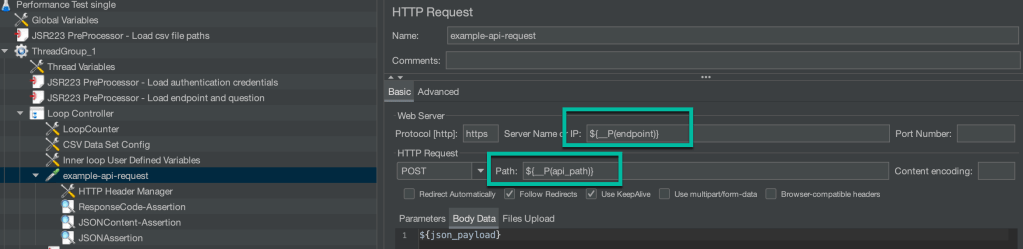
The following code shows how we load the endpoint and API path in our HTTP Request. Later, we will save these values in custom thread variables and save them as properties to make them available in the entire Test Plan.
Using the properties:
- Endpoint:
${__P(endpoint)} - API path:
${__P(api_path) - Port:
${__P(port)} - Protocol:
${__P(protocol)
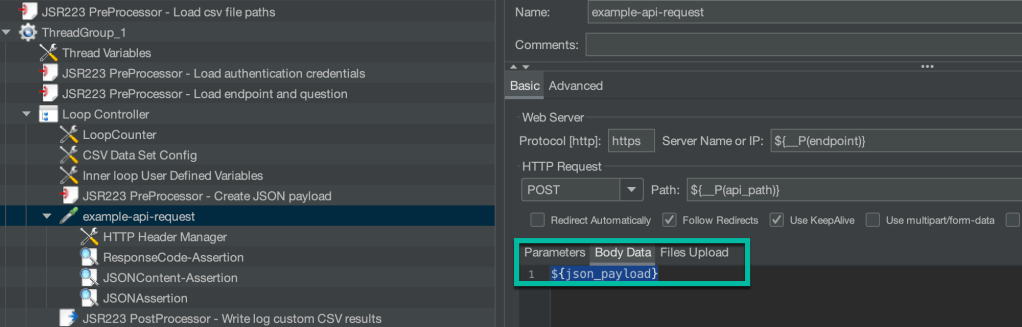
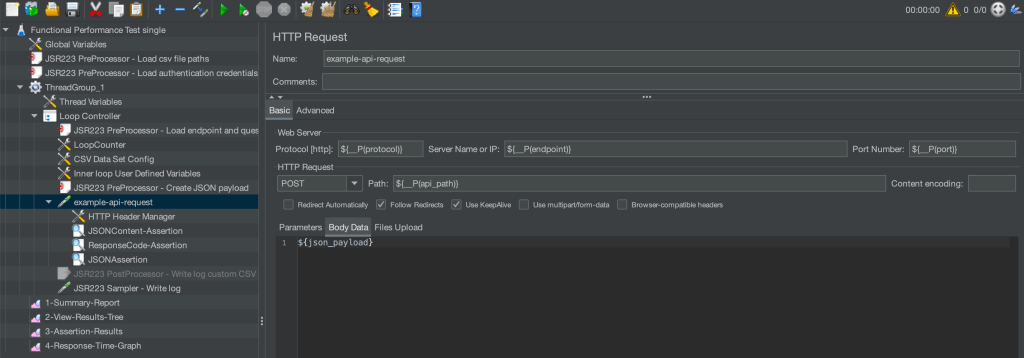
The image below shows where the variables are used in the HTTP Sampler.
- The following code is in the
JSR223 PreProcessor - Load endpoint and question:
log.info("******************************************")
log.info("** 3.Load environment configuration ******")
log.info("******************************************")

String endpoint_env = System.getenv("_ENDPOINT");
String api_path_env = System.getenv("_API_PATH");
String port_env = System.getenv("_PORT");
String protocol_env = System.getenv("_PROTOCOL");

vars.put("endpoint", endpoint_env );
vars.put("api_path", api_path_env );
props.put("endpoint",endpoint_env);
props.put("api_path",api_path_env);
vars.put("port", port_env );
props.put("port", port_env);
vars.put("protocol", protocol_env );
props.put("protocol", protocol_env);

String endpoint= vars.get('endpoint')
String api_path= vars.get('api_path')
String port= vars.get('port')
String protocol= vars.get('protocol')

log.info("*** Show local variables values")
log.info(endpoint)
log.info(api_path)
log.info(port)
log.info(protocol)
3.5.2 Create JSON payload (pre-processing)
The following code shows how to create the JSON payload for the HTTP request using the values from the CSV file, and we save it in the inner-loop Uer Defined Variables to make so it is only available in in the inner-loop.
Using the variable:
- JSON payload:
${json_payload}
The image below show how to use the variable in the HTTP Request.
- Code of the
JSR223 PreProcessor - Create JSON payload
log.info("*******************************************")
log.info("***** 4. Create payload for the request ***")
log.info("*******************************************")
String question = vars.get('question')
props.put('question: ',question)
log.info("Question" + question)

String json_payload = "{\"query\":\"text:" + question + "\"}";
vars.put("json_payload",json_payload);
log.info("*** json payload ******")
log.info(json_payload)
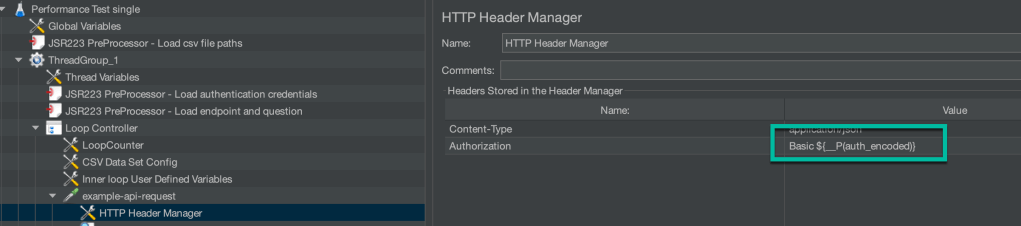
3.5.3 Load authentication information (pre-processing)
This code shows how we will load the information from the environment variables, save the values in custom in thread variables, and save them as properties to make them available in the entire Test Plan.
We also do the base64 encoding for USER:PASSWORD to provide this to the basic authentication in the HTTP Header Manager.
Using the property: Basic ${__P(auth_encoded)}
- Code in the
JSR223 PreProcessor - Load endpoint and question.
log.info("*******************************************")
log.info("*** 2. Load environment configuration ******")
log.info("*******************************************")

String username_env = System.getenv("_USERNAME")
String password_env = System.getenv("_PASSWORD")

log.info("*** Set JMeter variables")
vars.put("username", username_env )
vars.put("password", password_env)

String username = vars.get('username')
String password = vars.get('password')
log.info("*** Show local variables values")
log.info(username)
log.info(password)

log.info("*** Create base64 encoding")
def auth = username + ":" + password
auth_encoded = auth.bytes.encodeBase64().toString()
vars.put("auth_encoded",auth_encoded);
props.put("auth_encoded",auth_encoded);
log.info("*** Show encoding result")
log.info(auth)
log.info(auth_encoded)
3.6 Sampler code
We use the JSR223 sampler code with Groovy.
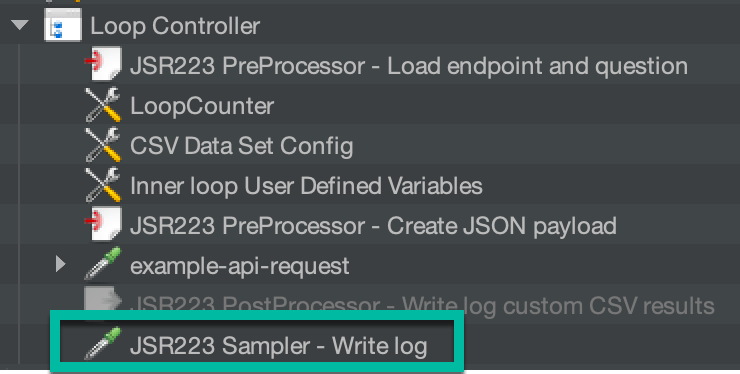
3.6.1 Using a JSR223 sampler to create a custom log file in a CSV format
We save the CSV custom log file in the last element of our loop controller. The following images show the JSR223 sampler.
We create a custom log file in a CSV format in the following source code.
"2","200","success","Can you help me?","Yes, I can help you."
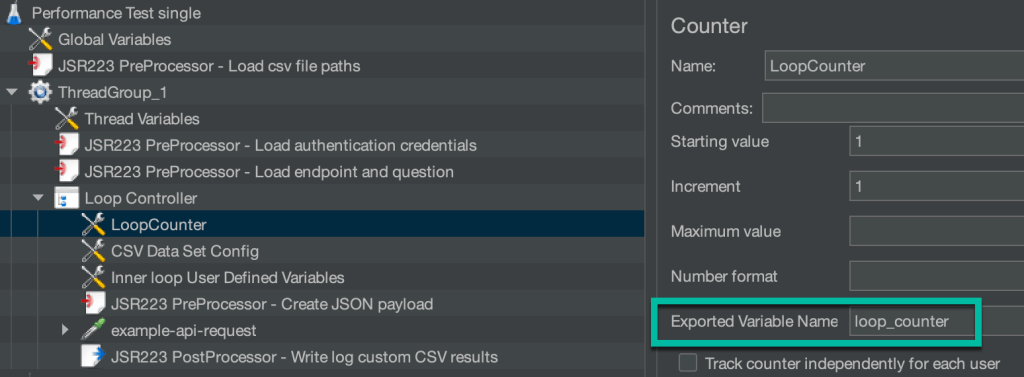
Therefore, we get the loop counter information, the exported variable name, to get the actual loop count.
- Loop count variable:
loop_counter
import groovy.json.*;
import groovy.csv.*;
import java.nio.file.Files;
import java.nio.file.Paths;

log.info("*************************************")
log.info("***** 7. Write custom CSV file ******")
log.info("*************************************")

// Don't include sampler result
SampleResult.setIgnore();

// values properies
String loop_counter = vars.get('loop_counter')
String question = vars.get('question')
String answer = ""
String response_type = ""
String responsecode = prev.getResponseCode();
String results_csv_path = props.get('results_csv_path');
String message = "";

if (responsecode == "200") {
	def response = prev.getResponseDataAsString();
	def json_response = new JsonSlurper().parseText(response);
     String document_retrieval_strategy = json_response.retrievalDetails.document_retrieval_strategy;

	if (document_retrieval_strategy.equals("llm")) {
		  answer = json_response.results[0].text[0];
	} else {
	       message = "responsecode:\n" + responsecode + "\nquestion:\n" + question + "\nfull json response: \n" + json_response
	       answer = message;
	}
} else {
	message = "responsecode:\n" + responsecode + "\nquestion:\n" + question + "\n doesn't work";
	answer = message;
	log.info("error")
}

log.info(results_csv_path)
log.info(loop_counter)
log.info(question)
log.info(answer)
log.info(responsecode)

answer = answer.replaceAll("\"","'");
question = question.replaceAll("\"","'");

FileWriter fstream = new FileWriter(results_csv_path ,true);
BufferedWriter out = new BufferedWriter(fstream);

String w_question = '"' + question + '"'
String w_answer = '"' + answer + '"'
String w_loop_counter = '"' + loop_counter + '"'
String w_responsecode = '"' + responsecode + '"'

out.write(w_loop_counter);
out.write(",");
out.write(w_responsecode);
out.write(",");
out.write(w_question);
out.write(",");
out.write(w_answer);
out.newLine();
out.flush();

// Set SampleResult
SampleResult.setResponseData("Logfile creation in sampler: Values are written to CSV file: " + results_csv_path);
SampleResult.sampleEnd();
SampleResult.setResponseCode("200");
3.7 Assertion
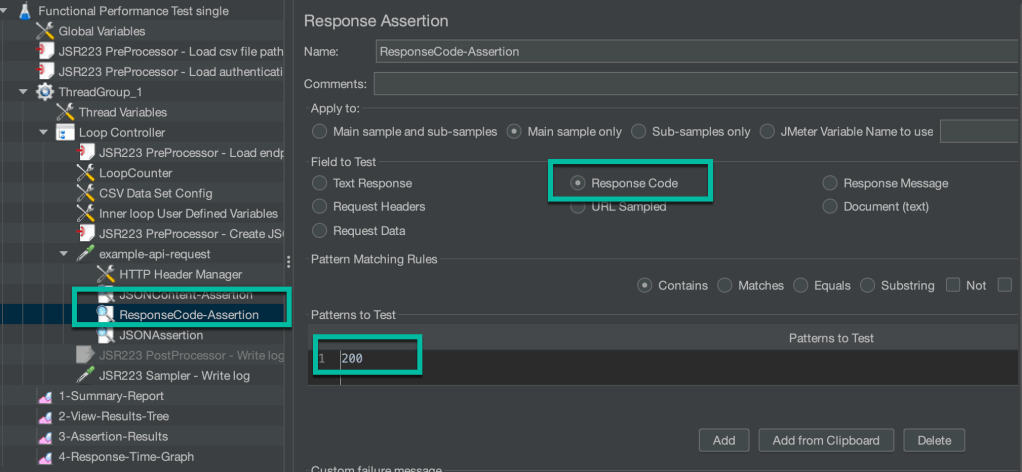
3.7.1 Response Assertion
In the Response Assertion, we verify the response code. The following image shows the configuration.
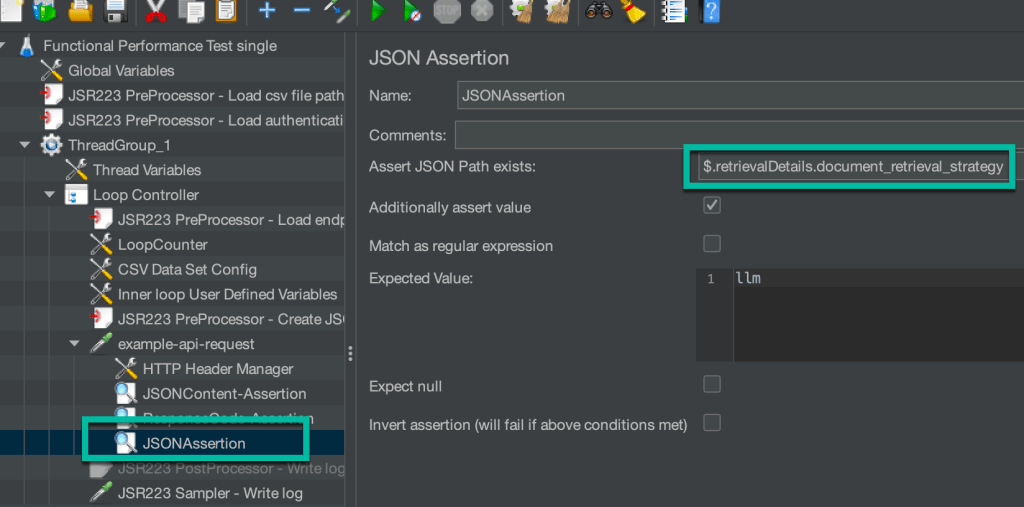
3.7.2 JSON Assertion
In the JSON Assertion, we verify the JSON Content automatically. The following image shows the configuration.
$.retrievalDetails.document_retrieval_strategy
3.7.3 JSON Content Assertion
We use the following code to extract information from the given JSON response format, and verify it manually.
- JSON format
{
    "matching_results": 1,
    "retrievalDetails": {
      "document_retrieval_strategy": "llm"
    },
    "results": [
      {
        "document_id": "XYZ",
        "title": "Answer",
        "text": [
          "IBM has acquired Red Hat for $34 billion in October 2018."
        ],
        "link": null,
        "document_passages": null
      },
      {
        "document_id": "XYZ",
        "title": "IBM acquires Red Hat",
        "text": [
          "It's official - IBM has acquired Red Hat! The deal was announced in October 2018. IBM Closes Landmark Acquisition of Red Hat."
        ],
        "link": "https://www.ibm.com/support/pages/ibm-acquires-red-hat",
        "document_passages": [
          {
            "passage_text": "<em>IBM</em> <em>acquires</em> <em>Red</em> <em>Hat</em>",
            "passageAnswers": [
              {
                "answer_text": "IBM acquires Red Hat",
                "confidence": 0.07588528
              }
            ]
          }
        ]
      }
    ]
  }
- Source code
import groovy.json.*;

log.info("**********************************")
log.info("***** 5. JSONContent-Assertion ***")
log.info("**********************************")

String responsecode = prev.getResponseCode();
props.put('responsecode',responsecode)

def response = prev.getResponseDataAsString();
def json_response = new JsonSlurper().parseText(response);
String document_retrieval_strategy = json_response.retrievalDetails.document_retrieval_strategy;
String assertion_name = "document_retrieval_strategy";
String message = "";
boolean verfication = false;

if (document_retrieval_strategy.equals("llm") && (responsecode == "200")){
	verfication = false;
	AssertionResult.setError(verfication);
	AssertionResult.setFailure(verfication);
	log.info("success")
	String answer = json_response.results[0].text[0];
     props.put('answer',answer)
     props.put('status','success')
} else {
	verfication = true;
	String question = vars.get('question')
	message = "responsecode:\n" + responsecode + "\nquestion:\n" + question + "\nfull json response: \n" + json_response;
	AssertionResult.setFailureMessage(message);
	AssertionResult.setFailure(verfication);
	AssertionResult.setError(verfication)
	log.info("error")
	String answer = message;
  props.put('answer',answer)
  props.put('status','failed')
}
4. Test Execution
Step 1: Verify the JMeter installation
jmeter --version
Configure properties:export VERSION=5.6.2 cd /usr/local/Cellar/jmeter/${VERSION}/libexec/bin/ ls
- Open the properties file and inspect the file.
nano user.properties
Step 2: Define the bash automation configuration with environment variables
Create an environment variable file.cat env_template > .env
Format:
export _USERNAME="admin"
export _PASSWORD="admin"
export _ENDPOINT=localhost
export _API_PATH=/v1/query
export _PROTOCOL=http
export _PORT=3000
export _QUESTIONS_CSV_PATH=$(pwd)/question_list.csv
Step 3: Start JMeter to edit the performance test
source .env jmeter
- Output:
WARNING: package sun.awt.X11 not in java.desktop
...
================================================================================
Don't use GUI mode for load testing !, only for Test creation and Test debugging.
For load testing, use CLI Mode (was NON GUI):
   jmeter -n -t [jmx file] -l [results file] -e -o [Path to web report folder]
& increase Java Heap to meet your test requirements:
   Modify current env variable HEAP="-Xms1g -Xmx1g -XX:MaxMetaspaceSize=256m" in the jmeter batch file
Check : https://jmeter.apache.org/usermanual/best-practices.html
================================================================================
- Open the Test Plan
performance-single.jmxfile and inspect thetest plan
Step 5: Start the JMeter performance test from the command line
It is usual to integrate test automation in many scenarios and this is the reason why I also create a bash auto action example that can be integrated in many scenarios.
This bash automation does the following tasks:
- It replaces the
user.propertiesconfiguration for naming the HTML report. - It creates a folder with the
current timestamp prefixand saves the HTML report in this folder. - It defines the name for the test result file using the same
current timestamp prefix. - It defines the name for the custom CSV log file using the same
current timestamp prefix. - It starts JMeter in the command line mode
- Command to start:
sh start_performance_test.sh
- Example output:
************************************
         JMeter performance test
************************************
JMeter: Change configuration

JMeter: Start test
WARNING: package sun.awt.X11 not in java.desktop
...
Creating summariser <summary>
Created the tree successfully using performance-single.jmx
Starting standalone test @ 2023 Oct 21 16:35:30 CEST (1697898930577)
Waiting for possible Shutdown/StopTestNow/HeapDump/ThreadDump message on port 4445
summary +      1 in 00:00:01 =    1.0/s Avg:    26 Min:    26 Max:    26 Err:     0 (0.00%) Active: 1 Started: 1 Finished: 0
summary +      1 in 00:00:00 =    9.1/s Avg:     2 Min:     2 Max:     2 Err:     0 (0.00%) Active: 0 Started: 1 Finished: 1
summary =      2 in 00:00:01 =    1.8/s Avg:    14 Min:     2 Max:    26 Err:     0 (0.00%)
Tidying up ...    @ 2023 Oct 21 16:35:32 CEST (1697898932001)
... end of run
JMeter: open results
- The results in the
HTML report

- The following GIF show the created folders and test result files.

- Source code of the bash automation:
#!/bin/bash

source ./.env

export TESTPLAN="performance-single.jmx"
export TEST_DATE="$(date +'%F_%H_%M_%S')"
export TEST_RESULTS="${TEST_DATE}_test_results.csv"

export RESULTS_HOME="./results"
export _RESULTS_CSV_PATH="$(pwd)/results/${PATH_TO_HTML_RESULTS}/${TEST_DATE}_custom_test_results.csv"

export PATH_TO_HTML_RESULTS="${TEST_DATE}_html_results_performace_test"
export JMETER_PROPERTIES_BACKUP="./user_backup.properties"
export JMETER_CUSTOM_PROPERTIES="./example-user-properties-file-jmeter.properties"
export JMETER_PROPERTIES="/usr/local/Cellar/jmeter/5.6.2/libexec/bin/user.properties"

mkdir ${RESULTS_HOME}/${PATH_TO_HTML_RESULTS}

echo "************************************"
echo "         JMeter performance test"
echo "************************************"

echo "JMeter: Change configuration"
cat ${JMETER_PROPERTIES} > ${JMETER_PROPERTIES_BACKUP}
cat ${JMETER_CUSTOM_PROPERTIES} > ${JMETER_PROPERTIES}
#cat  ${JMETER_PROPERTIES}
echo ""
echo "JMeter: Start test"
jmeter -n -t ${TESTPLAN} -l ${RESULTS_HOME}/${TEST_RESULTS} -e -o ${RESULTS_HOME}/${PATH_TO_HTML_RESULTS}
echo "JMeter: open results"
open ${RESULTS_HOME}/${PATH_TO_HTML_RESULTS}/index.html
I hope this was useful for you and let’s see what’s next?
Greetings,
Thomas
#jmeter, #performancetest, #functionaltest, #bash, #nodejs, #groovy
