

This blog post discusses deploying a fine-tuned model to IBM watsonx on IBM Cloud. It highlights the advantages of using IBM watsonx for inference, emphasizing ease of access, enterprise security, and scalability. The post outlines the necessary steps for configuring services in IBM Cloud and IBM watsonx.
In the last two blog posts, we created a fine-tuned model for a Musician example.
Now, after we have created the custom fine-tuned model with InstructLab , we may ask ourselves which inference runtime we should use to run the model. One option is IBM watsonx, which is the topic of this blog post.
This blog post will deploy this fine-tuned model to IBM watsonx as Software as a Service (SaaS) on IBM Cloud. The advantage of running the inference on IBM Cloud is that it gives you an excellent option to make your model directly accessible without managing any infrastructure. Your inference runtime is connected directly with enterprise security; you can easily access the runtime out of the box, calculate your cost estimations, and scale up and down.
These are the last two blog posts in which we created a fine-tuned model with InstructLab by fine-tuning an open source Granite model.
- How to Install and Configure InstructLab in January 2025 – are there any changes?
- InstructLab Fine-Tuning Guide: Updates and Insights for the Musician Example
The input for the current blog post is based mainly on the following resources on IBM Developer and in the IBM watsonx documentation.
- IBM Developer
Deploying custom foundation model in watsonx.ai on IBM Cloud - IBM watsonx documentation
Deploying custom foundation models
The key difference is we will configure everything in the IBM Cloud UI and the IBM watsonx UI.
Table of content
- Simplified architecture
- Example deployment of fine-tuned model on IBM watsonx
- IBM Cloud Services configuration
- Ensure you have these three services created
- Configure Cloud Object Storage
- Create a Bucket
- Upload fine-tuned model
- Create Service Credentials
- IBM watsonx Configuration
- Access the IBM watsonx environment
- Initial configuration of the deployment space
- Configure the IBM watsonx account access rights for connections
- Create a data connection in the deployment space
- Create a custom foundation model
- Create a deployment from the model
- IBM Cloud Services configuration
- Summary
1. Simplified architecture
The image below displays the simplified architecture to import the fine-tuned model to a deployment space and run it as a deployment.

These are the high level steps we will follow during the setup of the IBM Cloud Services and IBM watsonx structure.
- We need to ensure that the IBM Cloud Services are available in the
us-south region(this is required in February 2025) to run the fine-tuned model. The object storage can be in the global-region with a specific location inusif we want to. - We will upload the fine-tuned model to
IBM Cloud Object Storagefrom our local machine. - We will access
IBM watsonxin theus-south regionand create a deployment space. - In the deployment space we create two assets, one for
the connection to the object storageand one as acustom foundation modelfor our fine-tuned model. - Then we deploy our model as a deployment.
- When the model runs as a deployment, we can access the model on a IBM watsonx inference running.
Credential related steps:
- We need to ensure we set the proper credentials for object storage in IBM Cloud by creating service credentials for a manager role.
- We need to enable in IBM watsonx that the
IBM watsonx Accountcan use credentials for access connections. - We need to create an API in IBM watsonx to deploy the fine-tuned model as a deployment.
Note: The IBM Guardrails (Al) functionality, which enables you to identify potentially harmful input and output text, such as hate speech, abuse, or profanity when you invoke the inference endpoint, is unavailable in February 2025 for the bring-your-own model (BYOM).
2. Example deployment of fine-tuned model on IBM watsonx
The following steps are only examples; for actual instructions, please follow the actual IBM watsonx documentation for Deploying custom foundation models.
2.1. IBM Cloud Services configuration
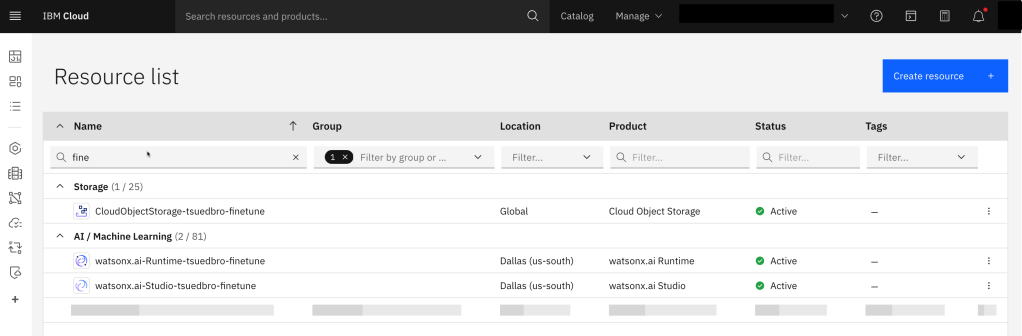
2.1.1 Ensure you have these three services created
Ensure you create all services in the correct location.
- watsonx Runtime (standard plan minimum) (region us-south)
- watsonx Studio (lite plan is minimum) (region us-south)
- cloud object storage (standard plan minimum) (region global)
2.1.2. Configure the Cloud Object Storage
An essential step is to upload the model resources to a Cloud Object Store.

2.1.2.1 Create a Bucket
Step 1: Select Create

Step 2: Select Create Custom Bucket

Step 3: Configure Bucket
- Name:
fine-tuned-models-global-us - Resiliency:
Cross Region - Storage Class:
Standard - Location:
USgeo

2.1.2.2 Upload fine-tuned model
Step 1: Select the model folder
Upload the not-converted trained model from the InstructLab output. Ensure you have selected enable large files for the upload.

Step 2: Upload folder

2.1.2.3 Create Service Credentials
When we later want to access with a data connection the content of the Object Storage from a IBM watsonx deployment space we need to define credentials with, the role manager and include HMAC credentials.
Step 1: Select the tab service credentials
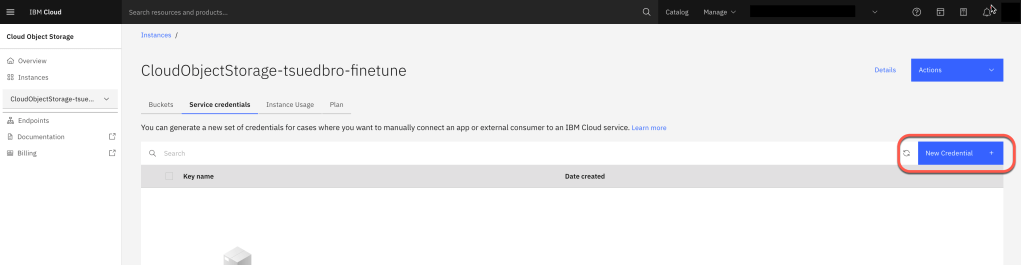
Step 2: Create service credentials
- Role: Manager
- Create a custom name for your service ID.
- Select
include HMACcredentials

Step 3: Verify your created credentials
We need later use this to define the data connection in the IBM watsonx deployment space.

Step 4: Under endpoints we can find the relevant endpoint for the data connection later in IBM watsonx
URL: https://s3.us.cloud-object-storage.appdomain.cloud

2.2. IBM watsonx Configuration
Now we will access the uploaded model from IBM watsonx.
https://dataplatform.cloud.ibm.com/wx/home
2.2.1 Access the IBM watsonx environment
Ensure you are in the correct region. In this case, us-south.

2.2.2 Initial configuration of the deployment space
Now we create a deployment space. The image below displays the focus in this step.

Step 1: Access the deployments area

Step 2: Create a deployment space and bind the IBM Cloud services runtime and object storage to your space
The image below displays the focus in this step.


2.2.3. Configure the IBM watsonx account access rights for connections
Step 1: Open Account under Administration

Step 2: Ensure the account connections are enabled

2.2.4. Create a data connection in the deployment space
The image below displays the focus in this step.

Step 1: Select Import

Step 2: Select data access

Step 3: Select object storage

Step 4: Configure the data connection
- Connection overview

- Connection credentials

2.2.5. Create a custom foundation model
Now we create a custom foundation model based on our fine-tuned model saved in the object storage. The image below displays the focus in this step.

Step 1: Select Import assets again

Step 2: Follow the import wizard of a foundation model
- At the beginning of the wizard, we can select the fine-tuned model in the Object Storage.
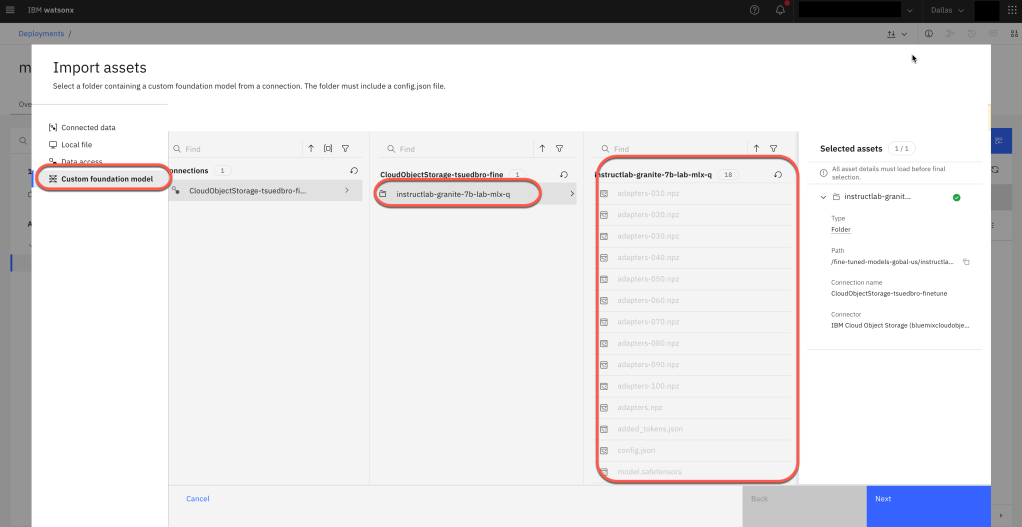
- Now we configure the model deployment parameters and the software that is used to serve the model and we can import the model.

Note: The following information is an extract from the Red Hat blog post Fine-tuning and serving an open source foundation model with Red Hat OpenShift AI
Caikit: AI toolkit/runtime that handles the lifecycle of the TGIS process, provides inference endpoints and modules that handle different model types.
2.2.6. Create a deployment from the model
Now we create a deployment. The image below displays the focus in this step.

Step 1: Select the model asset and use the option deploy to start the deployment wizard

Step 2: When we start this option, we may will be routed to create an API KEY to give access to use the IBM watsonx Runtime service in IBM Cloud.
IMPORTANT: These credentials are Task credentials and will be automatically created in IBM Cloud. It is essential to highlight that these credentials will not be visible to you as account owner / user, the key is only for ML tasks.
- Create an API Key in watsonx

- Optional verify that the API Key is also save in IBM Cloud.

Step 3: Configure the deployment and press create

Step 4: When the deployment is available

3. Summary
Overall, this deployment is well documented in the resources I also shared with you. The blog post gives a more easy-to-follow flow on the UI, I would say.
The advantage of running the inference on IBM Cloud is that it gives you an awesome option to make your model directly accessible without managing any infrastructure. Your inference runtime is connected directly with enterprise security; you can access the runtime out of the box, calculate your cost estimations, and scale up and down easily.
In the end, it depends on what is important to you from the legal, business, and cost perspectives, where you run your models fine-tuned with InstuctLab.
With watsonx-Runtimes, you can dig into common information about IBM Deployments. You can also inspect the IBM Documentation Deploying and managing AI assets.
I hope this was useful to you and let’s see what’s next?
Greetings,
Thomas
#llm, #instructlab, #ai, #watsonx, #deployment, #objectstorage, #ibm, #redhat, #foundationmodel, #inference, #watsonx, #ibmcloud

Leave a comment