
This post is about using the Web Channel functionality for Agents in watsonx Orchestrate for web applications.
To minimize the effort to integrate conversational AI interaction in a chat format with agents in a custom web application, the watsonx Orchestrate ADK offers a functionality called web channel.
The following GIF displays the result after completing the integration example in this blog post. We can directly invoke the chat on the web page.

With this functionality, we can integrate the existing chat functionality of watsonx Orchestrate into our web application.
If you are familiar with watsonx Assistant web channel integration, this is very similar. Here is a blog post about the older integration: Create a Full‑Screen Web‑Chat with watsonx Assistant, IBM Cloud Code Engine and watsonx.ai.
The primary difference lies in the setup and the emphasis on direct agent interaction within a web UI.
The content of this blog post refers mainly to information inside the IBM watsonx Orchestrate Agent Development Kit (ADK) documentation.
Table of content
- Architecture
- The Example to Follow
- Summary
- Additional Resources
1. Architecture
In this blog post, we will set up the integration for a simple HTML page running on a local web server and an Agent deployed into the live environment in watsonx Orchestrate.
We need to have the ADK installed, but we don’t need to run the local WatsonX Orchestrate Development server to set up the web channel integration.
These are the steps we need to follow in this case:
- Set up a remote environment for the ADK to connect to our watsonx Orchestrate instance on IBM Cloud
- Ensure the agent we want to use in the web chat is deployed to a live environment
- Use the ADK CLI to generate the source code to embed in our web application
- Generate a local HTML page and insert the generated code
- Run a web server and open the HTML page
- Invoke the agent in our web application
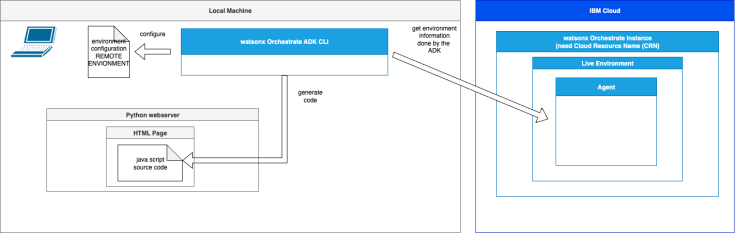
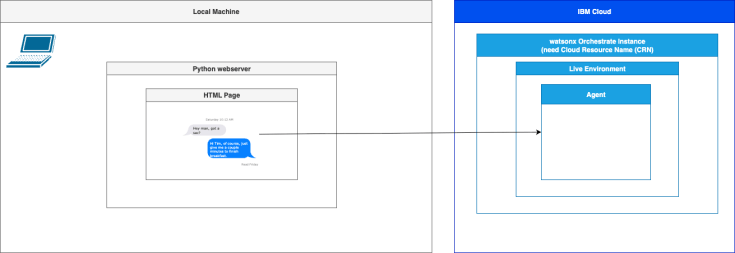
The following two diagrams display the simplified dependencies for the steps above.
1.1. Setup
The image below shows the simplified dependencies on the local machine, where we see the ADK, the environment file configuration, the generated code, and the remote connection, which is saved in the environment file configuration.
1.2. Execution
The image below shows the simplified dependencies on the local machine, how to access agent in the chat from our web application.
2. The Example to Follow
First, we need to navigate to the folder where you have installed the ADK. If we need to install the ADK first, we can follow, for example, my blog post Getting Started with Local AI Agents in the watsonx Orchestrate Developer Edition
Step 1: Set up a remote environment
We need to set up a remote environment for the ADK to connect to our watsonx Orchestrate instance on IBM Cloud.
- Orchestrate Service instance URL
- Name for your environment
- IBM Cloud API key
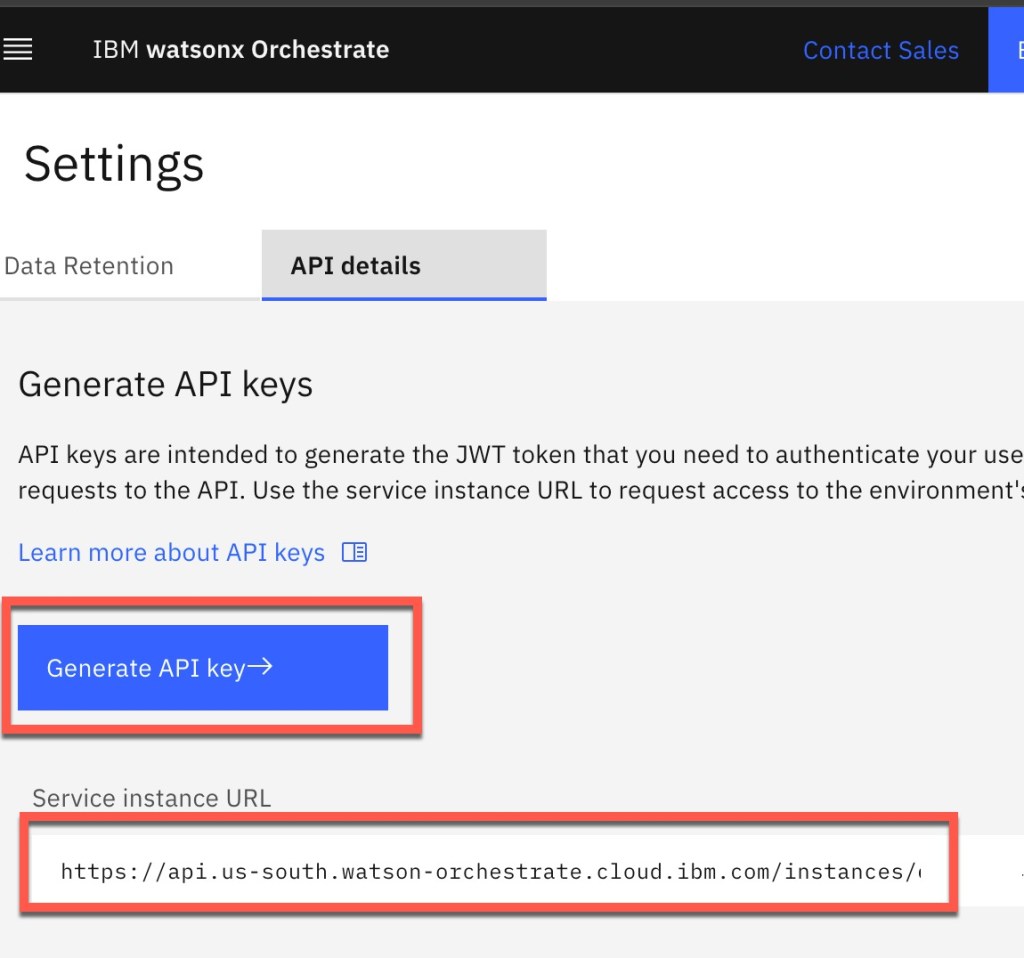
You get the Orchestrate Service instance URL and the IBM Cloud API key in “Profile/Settings” information of the watsonx Orchestrate instance on IBM Cloud:
Step 1.1:Insert the values abd execute following command
source ./.venv/bin/activate
export ORCHESTRATE_SERVICE_INSTANCE=https://api.us-south.watson-orchestrate.cloud.ibm.com/instances/90
export NAME=my-watsonx_orchestrate_remote-access
orchestrate env add -n ${NAME} -u ${ORCHESTRATE_SERVICE_INSTANCE} --type ibm_iam --activate
- Insert the API key
[INFO] - Environment 'my-watsonx_orchestrate_remote-access' has been created
Please enter WXO API key:
Step 2: Verify the environment is available
orchestrate env list
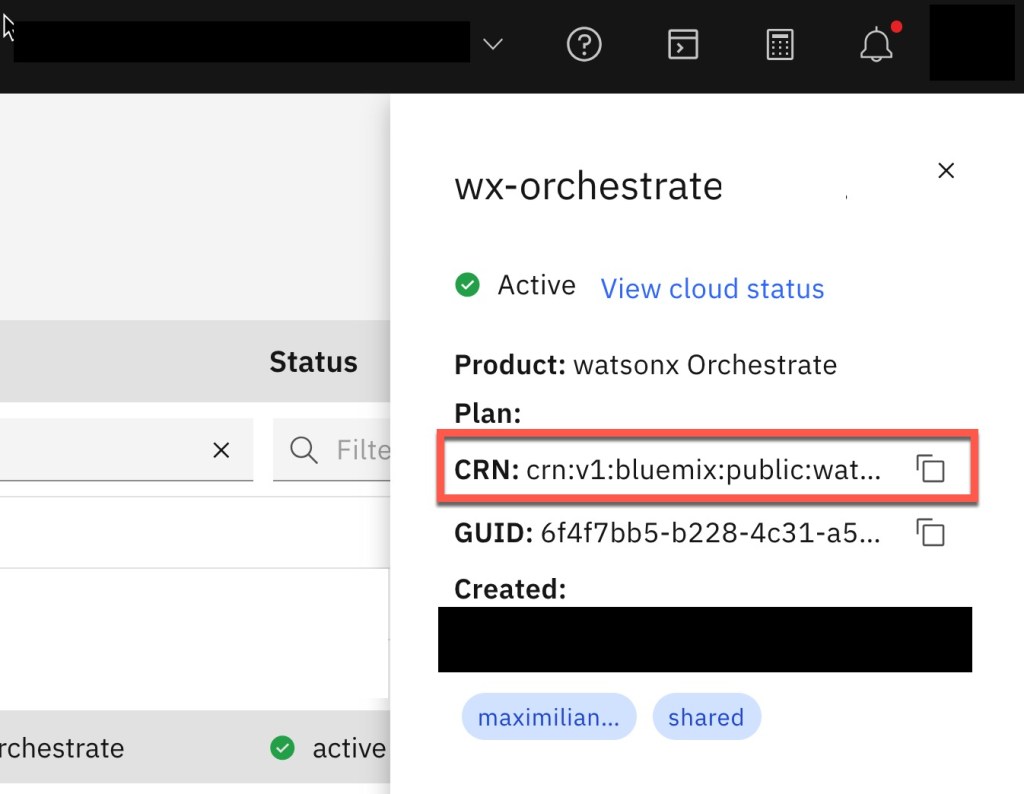
Step 3: Get the Cloud Resource Name (CRN)
To get the CRN we can use the IBM Cloud CLI or IBM Cloud UI.
- IBM Cloud CLI
ibmcloud resource service-instance <instance_name> --id
- IBM Cloud UI
In the IBM Cloud UI, open the resource list and select your instance.
Step 4: List the agents with the CLI and get the name of the agent
Execute the following command.
orchestrate agents list
- Example output:
Agents
┏━━━━━━━━━━━━━━━━━━━━━┳━━━━━━━━━━━━━━┳━━━━━━━━━━━━━━━━━━━━━━━━━━━━━━━━━━━━━━━━━━━━━━━━━┳━━━━━━━━━┳━━━━━━━━━━━━━━━┳━━━━━━━┳━━━━━━━━━━━━━━━━┳━━━━━━━━━━━━━━━━━━━━━━━━━━━━━━━━━━━━━━┓
┃ Name                ┃ Description  ┃ LLM                                             ┃ Style   ┃ Collaborators ┃ Tools ┃ Knowledge Base ┃ ID                                   ┃
┡━━━━━━━━━━━━━━━━━━━━━╇━━━━━━━━━━━━━━╇━━━━━━━━━━━━━━━━━━━━━━━━━━━━━━━━━━━━━━━━━━━━━━━━━╇━━━━━━━━━╇━━━━━━━━━━━━━━━╇━━━━━━━╇━━━━━━━━━━━━━━━━╇━━━━━━━━━━━━━━━━━━━━━━━━━━━━━━━━━━━━━━┩
│ Temp_Integration_   │ Temp_Integra │ watsonx/meta-llama/llama-3-2-90b-vision-instruc │ default │               │       │                │ 42db7f18-XXXXXXXX │
│ Agent_1075hu        │ tion_Agent   │                                                 │         │               │       │                │                                      │
└─────────────────────┴──────────────┴─────────────────────────────────────────────────┴─────────┴───────────────┴───────┴────────────────┴──────────────────────────────────────┘
Step 5: Generate the code to embedd the web chat in the web application
Now we can create the needed code. Therefore, we need:
- Agent name
- Environment information
- Cloud Resource Name
- Ensure our remote watsonx Orchestration is still active
export AGENT_NAME=Temp_Integration_Agent_1075hu
export ENVIRONMENT=live
orchestrate channels webchat embed --agent-name=${AGENT_NAME} --env=${ENVIRONMENT}
Please enter your CRN which can be retrieved from the IBM Cloud UI:
- Output of this generation:
 window.wxOConfiguration = {
 orchestrationID: "cf4d3293cXXXX",
 hostURL: "https://REGION.watson-orchestrate.cloud.ibm.com",
 rootElementID: "root",
 showLauncher: true,
 crn: "crn:XXX",
 deploymentPlatform: "ibmcloud",
 chatOptions: {
 agentId: "2b7599a7XXXX",
 agentEnvironmentId: "d754a48c-XXXXX"
 }
 };

 setTimeout(function () {
 const script = document.createElement('script');
 script.src = `${window.wxOConfiguration.hostURL}/wxochat/wxoLoader.js?embed=true`;
 script.addEventListener('load', function () {
 wxoLoader.init();
 });
 document.head.appendChild(script);
 }, 0);
 </script>
Step 6: Generate a simple web page and the code
Create an example HTML index.html and add the generated source code in the folder you have installed the ADK.
<h1>This is a Heading</h1>
<p>This is a paragraph.</p>


</body>
  <script>
 window.wxOConfiguration = {
 orchestrationID: "cf4d3293cXXXX",
 hostURL: "https://REGION.watson-orchestrate.cloud.ibm.com",
 rootElementID: "root",
 showLauncher: true,
 crn: "crn:XXX",
 deploymentPlatform: "ibmcloud",
 chatOptions: {
 agentId: "2b7599a7-XXXX",
 agentEnvironmentId: "d754a48c-XXXX"
 }
 };

 setTimeout(function () {
        const script = document.createElement('script');
 script.src = `${window.wxOConfiguration.hostURL}/wxochat/wxoLoader.js?embed=true`;
 script.addEventListener('load', function () {
 wxoLoader.init();
 });
 document.head.appendChild(script);
 }, 0);
   </script>
</html>
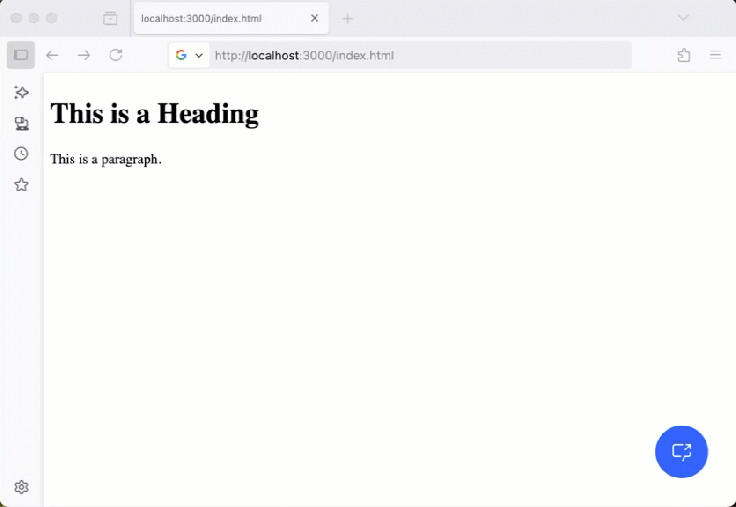
Step 7: Run a web server and invoke the web page
With this, you can invoke all static files in your folder.
source ./.venv/bin/activate
python -m http.server 3000
- Console
Serving HTTP on :: port 3000 (http://[::]:3000/)
- Invoke the HTML page
http://localhost:3000/index.html
- Example usage
3. Summary
Overall, it is great to have such easy integration to access an Agent running in watsonx Orchestrator within our custom web application.
We can avoid extra effects by using the existing chats and not building our own.
For more customization options of the chat, we need to examine the documentation in the ADK documentation. In the documentation, we can find topics such as layout, security, and others.
The 45 min YouTube video below shows the setup for a locally running web application,
4. Additional resources
You can follow this alongside my previous blog post related to watsonx Orchestrate Developer Edition:
- Getting Started with Local AI Agents in the watsonx Orchestrate Developer Edition (Jun 25, 2025)
- Supercharge Your Support: Example Build & Orchestrate AI Agents with watsonx.ai and watsonx Orchestrate (May 15, 2025)
- Watch the Unlock the New Flow Builder in IBM watsonx Orchestrate – Visualize, Debug & Deploy Tool Flows video on YouTube. 🚀 (July 02, 2025)
- Build, Export & Import a watsonx Orchestrate Agent with the Agent Developer Kit (ADK) (July 08, 2025)
- REST API Usage with the watsonx Orchestrate Developer Edition locally: An Example (July 10, 2025)
I hope this was useful to you and let’s see what’s next?
Greetings,
Thomas
#watsonx, #watsonxOrchestrate, #IBMCloud, #AIAgents, #AgentDevelopmentKit, #watsonxADK, #ConversationalAI, #WebChatIntegration, #Chatbot, #JavaScript, #HTML

Note: In case you use the compose environment in the video (https://youtu.be/dqoRJAZIZ-E) with the actual watsonx Orchestrate ADK version 1.13 you need to add in the index.html following code:
“`html
<head> <base href=”http://localhost:3000/” /> </head>
“`
LikeLike
Any feedback on including the security measure described in https://developer.watson-orchestrate.ibm.com/manage/channels#embedded-chat-security for this use case ?
Trying to do similar stuff but the authentication always return a code 403 for a reason I cannot understand …
LikeLike
The following is all I can comment on this:
This sounds that here is a miss configuration, because “403 Forbidden” error is an HTTP status code that means the server understood your request but is refusing to grant access to the requested resource.
Some questions I would ask:
– Do you ask for the current example of the blog post or an other application?
– Which kind of network? ( in the example Compose and Local Network)
– Which type of authentication?
– Which instance type: watsonx Orchestrate Development Edition or watsonx Orchestrate on IBM Cloud, Azure, on Premise?
I haven’t configured security for example Galaxium application in post.
At the moment in 1.13.0 are some problems related to the connection to compose network. I created a support case for this.
I hope this helps a bit.
Thomas
LikeLike