

In this blog post, we explore how to develop a customizable AI ReAct Agent using the LangGraph framework on a local machine and deploy it to watsonx.ai. We walk through the entire process—from initial development to real-world deployment—providing insights into motivation, architecture, and enhancements.
IBM has introduced Agent Lab in watsonx.ai as a Beta feature, providing new possibilities for AI Agent deployment. IBM also provides template examples to build custom Agent deployments on the Watson Developer Hub (Discord), which we utilize in this blog post.
Key Topics Covered:
- Building a Custom ReAct Agent using LangGraph on a local machine
- Enhancing the Agent by adding new tools, such as weather queries
- Executing and Testing Locally with pytest
- Deploying the Agent on watsonx.ai using example scripts
- Integrating the Deployed Agent into applications, including a Streamlit UI
This post also details the dependencies required for deployment and offers a developer-centric view of the process. Whether you’re a developer looking to expand an AI agent’s capabilities or interested in deploying AI solutions at scale, this guide provides a hands-on approach to achieving your goals.
Here is the example source code: https://github.com/thomassuedbroecker/watsonx-agent-langgraph-deployment-example
The three following GIFs showing various execution scenarios.
- watsonx deployment UI


- Simple local CLI application

Table of content
- Motivation
- Simplified architecture
- Source code of the additional tool
- Run the example locally
- Test the tools locally with pytest
- Deploy the example source code to watsonx as a deployment
- Test the Agent in the deployment
- Run the deployed Agent in a Streamlit UI locally
- Summary
- Additional resources
1. Motivation
I recently came across the excellent blog post Build and Deploy Agents to Watsonx.ai from Your IDE and wanted to test its example by adding a small but meaningful modification—introducing a custom tool.
Here’s what I set out to do:
- Extend the Agent by adding a custom tool.
- Test the modified Agent locally to ensure it functions as expected.
- Deploy the Agent to Watsonx, ensuring the custom tool is included.
- Verify the deployment by invoking the Agent in Watson.
- Build a Streamlit application that interacts with the deployed Agent using the Watsonx Machine Learning REST API and the watsonx.ai Python SDK.
The Approach
This experiment builds upon the example code from the original blog post and the watsonx developer hub, specifically in the agents/langgraph-arxiv-research/ (using Commits on Feb 17, 2025) folder. The key difference? I’ve made slight modifications to integrate a custom tool.
The tool I added was originally developed for my blog post Implementing LangChain AI Agent with WatsonxLLM for a Weather Queries Application. Additionally, the Streamlit UI follows the approach from another of my posts: Simplified Example to Build a Web Chat App with Watsonx and Streamlit.
By combining these elements, I aimed to create a more versatile and interactive Agent experience. Stay tuned as I walk through the implementation details in the next section Weather Queries application.
Related video on YouTube
In this video:
- A step-by-step setup on IBM Cloud
- How to create and deploy your first ReAct agent in watsonx with the Agent Lab (beta)
- Local development using LangGraph ReAct agent template for watsonx
- How to integrate tools and test your agent seamlessly
2. Simplified architecture
Understanding the Key Components of the Deployment
The diagram below provides a brief overview of some important components involved in deploying an AI service. Here’s what each entry represents:
- Local machine
- Schema – Defines the request and response schemas for AI service endpoint queries. (Open API specification)
- AI Service – The core function to be deployed as an AI service. It encapsulates the application’s logic and is accessible via the defined schema in the deployment.
- ZIP (pip-zip) – A package that extends the selected default software specification. It includes the Agent and Tools source code and additional libraries required to execute the Agent. The
ai_servicefunction invokes the Agent from this package. - Software Specification – Lists all libraries necessary to run the customized Agent, including extensions provided in the ZIP (pip-zip) package.
- watsonx
- Source Code – Contains all necessary information to be deployed as a function in the watsonx runtime. This function leverages the extended software specification to execute the LangGraph agent.
- Software Environment (sw-environment) – Defined by the combination of the ZIP (pip-zip) package and the software specification, ensuring a complete execution environment.
- IBM Cloud
- IBM Cloud ObjectStoarge to save the assets inside the deployment space.
- IBM watsonx Runtime to run the deployments and access the models in watsonx.
This structured approach ensures seamless deployment and execution of the AI service while maintaining flexibility for customization.

Below is the diagram above animated as a GIF.

- The detailed
source codeasset is deployed asonline_ai_serviceand contains the reference to the extendedsoftware specification.

- Here you can see a
online_ai_servicecontains thefunctionin thecode,schema, anddeployment.

- The detailed content of the
source codein theextended software specification.

- The image below shows our custom software specification,
langgraph_react_agent-sw-agent, which includes 641 default packages.

- The image below highlights the extended package included in the software specification, as defined in our source code for the Agent and its tools.

The image below shows the local machine where we will invoke the Agent deployment. Here, we’ll use the deployment via the REST API or the SDK in our locally running applications.

3. Source code of the additional tool
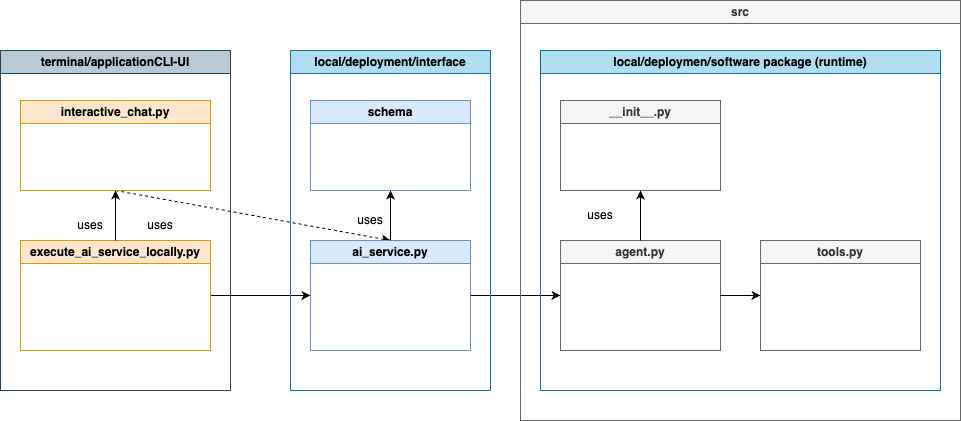
Before deploying to watsonx, we’ll first run the example on a local machine. The image below highlights the simplified the key dependencies in the source code required to run the Agent:
- The following code will be a part of the ZIP (pip-zip) package in the first diagram for the deployment.
agent– The LangGraph Agent implementation.tools– Includes the simple weather service, web search, and arXiv paper extractor.
ai-service– Contains the logic for invoking the Agent and defines how it can be accessed from an external endpoint.schema– An OpenAPI specification outlining how to interact with the REST endpoints.
This setup ensures that all necessary components are in place before deploying the Agent.

In addition, a more detailed simplified diagram of the code dependencies, including the command-line CLI UI Python application, is included.
This is the source code of the additional tool added to the /agents/langgraph-arxiv-research/src/langgraph_react_agent/tools.py file and the /agents/langgraph-arxiv-research/src/langgraph_react_agent/__init__.py file. (Additional details Implementing LangChain AI Agent with WatsonxLLM for a Weather Queries application )
@tool(parse_docstring=True)
def weather_service(cities: List[str]) -> str:
"""
This is a weather service that provides all information related the current weather. The REST API is open and doesn't require additional licenses, it serves weather temperature information.
Args:
cities: The parameter cities is a list of city names e.g. [ LA, NY].
Returns:
A string that contains a sentence what the hottest city is.
"""
base_weather_url="https://wttr.in/"
cities_input = cities
cities = []
for city in cities_input:
# Ensure to get the JSON format: '?format=j1'
city_temp_url = base_weather_url + city + "?format=j1"
response = requests.get(city_temp_url)
if (response.status_code == 200):
# convert from byte to text
byte_content = response.content
text_content = byte_content.decode("utf-8")
# load json
content = json.loads(text_content)
# extract temperature
temperature = content['current_condition'][0]['temp_C']
cities.append({"city": city, "temperature":temperature})
else:
cities.append({"city": f"{city} ERROR", "temperature":0})
full_text = ""
sorted_by_temperature = sorted(cities, key=lambda x: (x['temperature'], x['city']), reverse=True)
print(f"{sorted_by_temperature}")
i = 0
for city in sorted_by_temperature:
if (i == 0):
response_text = f"The hottest city is {city['city']} with a temperature of {city['temperature']} degrees Celsius."
else:
response_text = f"In the city {city['city']} the temperature is {city['temperature']} degrees Celsius."
i = i + 1
full_text = full_text + ' ' + response_text
The code below contains the specification for the agent tool specification later.
@from .tools import (
    web_search,
    get_arxiv_contents,
    weather_service
)

TOOLS = [
    web_search,
    get_arxiv_contents,
    weather_service
]
The code below displays the specifications for creating the react agent using the defined tools.
def get_graph(system_prompt=default_system_prompt) -> CompiledGraph:
        """Get compiled graph with overwritten system prompt, if provided"""

        # Create instance of compiled graph
        return create_react_agent(
            chat, tools=TOOLS, checkpointer=memory, state_modifier=system_prompt
        )
The code below displays where the ai_service does invoke the implemented agent in the source code.
def deployable_ai_service(context, **custom):
    from langgraph_react_agent.agent import get_graph_closure
    ...
    # Invoke agent
    generated_response = agent.invoke({"messages": messages}, config)
    ...
4. Run the example locally
Running the Example Locally Before Deployment
4.1 Prerequisites to Run the Example
Before getting started, ensure you have the following:
- IBM Cloud and watsonx.ai access
- Python 3.12 installed on your local machine
Note: This example uses Poetry instead of Pip for package management. If you’re new to Poetry, you may find this blog post helpful: Managing Python Dependencies: The Battle Between Pip and Poetry.
4.2 Directory Structure & File Descriptions
To proceed, clone the following repository to your local machine.
git clone https://github.com/thomassuedbroecker/watsonx-agent-langgraph-deployment-example.git
4.3 Repository Structure Overview
The high-level structure of the repository is as follows:
├── agents
│   └── langgraph-arxiv-research
│       ├── examples
│       ├── schema
│       ├── scripts
│       ├── src
│       ├── tests
└── ui
 └── code
Folder Breakdown
langgraph_react_agent– Contains auxiliary files used by the deployed function, offering framework-specific definitions and extensions. This folder is packaged and sent to IBM Cloud during deployment as part of the package extension.schema– Includes the request and response schemas for the /ai_service endpoint queries.examples– Provides examples of invoking the Agent both locally and with a Python command-line application, including scenarios with and without deployment.scripts– Contains automation scripts for creating a deployment on Watson.tests– Includes pytest files for testing the tools used by the Agent.ui– Houses the source code for running Streamlit applications that interact with the deployed Agent using the REST API and SDK on watsonx.
This structure helps organize and streamline the deployment and usage of the LangGraph Agent across different environments.
Step 1: Navigate to the related folder
cd ./agents/langgraph-arxiv-research
Step 2: Generate the virtual environment
python3.12 -m venv .venv
source ./.venv/bin/activate
python3 -m pip install --upgrade pip
python3 -m pip install poetry
Step 3: Install the dependencies with poetry
When you only execute poetry install after you clone the project from GitHub, you should be fine with all libraries installed because this is the content on my poetry.lock.
In my case, I needed to install the listed libraries and run the example when I followed the steps of the initial source code from the watsonx developer hub.
Executing these updates or installations for the libraries later can break the compatibility of the various libraries used in this project.
poetry install
#poetry update
#poetry add --no-cache langchain_community
# Tools
#poetry add --no-cache duckduckgo-search
#poetry add --no-cache tqdm
#poetry add --no-cache markdownify
# UI
#poetry add --no-cache streamlit
#poetry add --no-cache watchdog
#poetry update package
#poetry lock
Step 4: Export the PYTHONPATH
Adding working directory to PYTHONPATH is necessary for the next steps. In your terminal execute:
export PYTHONPATH=$(pwd):${PYTHONPATH}
echo ${PYTHONPATH}
Step 5: Set the environment variables
Generate a config.toml file should be filled in before either deploying the template on IBM Cloud or executing it locally.
The deployment_id = “YOUR_DEPLOYMENT_ID” was inserted by me and when you first run you agent locally you don’t need to set this variable.
We also need the watsonx_apikey and space_id when we run the agent locally, because we need to connect to model running on watsonx.ai.
cat ./config.toml_template > ./config.toml
Extract of the config.toml file.
[deployment]
watsonx_apikey = "PLACEHOLDER FOR YOUR APIKEY"
watsonx_url = "" # should follow the format: `https://{REGION}.ml.cloud.ibm.com`
space_id = "PLACEHOLDER FOR YOUR SPACE ID"
deployment_id = "YOUR_DEPLOYMENT_ID"
[deployment.custom]
# during creation of deployment additional parameters can be provided inside `CUSTOM` object for further referencing
# please refer to the API docs: https://cloud.ibm.com/apidocs/machine-learning-cp#deployments-create
model_id = "mistralai/mistral-large" # underlying model of WatsonxChat
thread_id = "thread-1" # More info here: https://langchain-ai.github.io/langgraph/how-tos/persistence/
sw_runtime_spec = "runtime-24.1-py3.11"
Go to the Developer Access page to find your environment variables.
- Select your deployment space
https://dataplatform.cloud.ibm.com/developer-access

Step 6: Execute the local agent with a tool
The execute_ai_service_locally.py implements the usage of Agents locally without any deployment.
source ./.venv/bin/activate
poetry run python examples/execute_ai_service_locally.py
- Interaction output
Insert following sentence: What is the current weather in worms?
USER_AGENT environment variable not set, consider setting it to identify your requests.
The following commands are supported:
--> help | h : prints this help message
--> quit | q : exits the prompt and ends the program
--> list_questions : prints a list of available questions
You can ask a follow up questions and have the agent generate a summary for research papers on arXiv.
Questions:
1) Find a list of papers on Granite models on arXiv
2) Return an overview of arXiv papers on AI Engineering from 2024
3) Summarize the arXiv research paper 2407.01502
4) NEW: What is the temperature in NY?
Choose a question or ask one of your own.
--> What is the temperature in NY?
***Log ai_service 'generate' message:
[HumanMessage(content='What is the temperature in NY?', additional_kwargs={}, response_metadata={})]
[{'city': 'NY', 'temperature': '1'}]
***Log ai_service 'agent response' generated_response:
{'messages': [HumanMessage(content='What is the temperature in NY?', additional_kwargs={}, response_metadata={}, id='b2e459d8-e35f-4174-8207-c4decd9f72e4'), AIMessage(content='', additional_kwargs={'tool_calls': [{'id': 'Glf1HjVRX', 'type': 'function', 'function': {'name': 'weather_service', 'arguments': '{"cities": ["NY"]}'}}]}, response_metadata={'token_usage': {'completion_tokens': 24, 'prompt_tokens': 418, 'total_tokens': 442}, 'model_name': 'mistralai/mistral-large', 'system_fingerprint': '', 'finish_reason': 'tool_calls'}, id='chatcmpl-8658bec1b969378ecea0c3556f7b5e92', tool_calls=[{'name': 'weather_service', 'args': {'cities': ['NY']}, 'id': 'Glf1HjVRX', 'type': 'tool_call'}], usage_metadata={'input_tokens': 418, 'output_tokens': 24, 'total_tokens': 442}), ToolMessage(content=' The hottest city is NY with a temperature of 1 degrees Celsius.', name='weather_service', id='f9e09699-10df-4294-82ae-afa602b455f2', tool_call_id='Glf1HjVRX'), AIMessage(content=' The hottest city is NY with a temperature of 1 degrees Celsius.', additional_kwargs={}, response_metadata={'token_usage': {'completion_tokens': 19, 'prompt_tokens': 414, 'total_tokens': 433}, 'model_name': 'mistralai/mistral-large', 'system_fingerprint': '', 'finish_reason': 'stop'}, id='chatcmpl-377bd1e08481942fec774579fb0960ee', usage_metadata={'input_tokens': 414, 'output_tokens': 19, 'total_tokens': 433})]}
============================== Assistant Message ===============================
{'role': 'assistant', 'tool_calls': [{'id': 'Glf1HjVRX', 'type': 'function', 'function': {'name': 'weather_service', 'arguments': '{"cities": ["NY"]}'}}]}
================================= Tool Message =================================
The hottest city is NY with a temperature of 1 degrees Celsius.
============================== Assistant Message ===============================
The hottest city is NY with a temperature of 1 degrees Celsius.
Choose a question or ask one of your own.
5. Test the tools locally with pytest
These are some example tests we can execute to verify the tools working locally.
Step 1: Run all pytests for the given tools
The next command runs all pytest in the folder tests and with option -rA the pytest displays the asserts results.
source ./.venv/bin/activate
poetry run pytest -rA tests/
- Output:
====================================================================== test session starts =======================================================================
platform darwin -- Python 3.11.9, pytest-8.3.4, pluggy-1.5.0
rootdir: /Users/thomassuedbroecker/Documents/tsuedbro/dev/learning-2024/agents-watsonx-langgraph/agents/langgraph-arxiv-research
configfile: pyproject.toml
plugins: langsmith-0.3.8, anyio-4.8.0
collected 5 items
tests/test_tool_arxiv.py ... [ 60%]
tests/test_tool_weather.py .. [100%]
======================================================================== warnings summary ========================================================================
tests/test_tool_arxiv.py::TestTools::test_get_arxiv_contents[https://arxiv.org/html/2501.12948v1-<html>Content here</html>-Transformed content from the HTML]
/Users/thomassuedbroecker/Documents/tsuedbro/dev/learning-2024/agents-watsonx-langgraph/agents/langgraph-arxiv-research/tests/test_tool_arxiv.py:42: LangChainDeprecationWarning: The method `BaseTool.__call__` was deprecated in langchain-core 0.1.47 and will be removed in 1.0. Use :meth:`~invoke` instead.
result = get_arxiv_contents(url)
-- Docs: https://docs.pytest.org/en/stable/how-to/capture-warnings.html
============================================================================= PASSES =============================================================================
_______________ TestTools.test_get_arxiv_contents[https://arxiv.org/html/2501.12948v1-<html>Content here</html>-Transformed content from the HTML] _______________
---------------------------------------------------------------------- Captured stdout call ----------------------------------------------------------------------
**Test Case 'arxiv' result: Transformed content from the HTML
_______________________________ TestTools.test_get_arxiv_contents[https://arxiv.org/html/2501.12948v1-None-Content not available] ________________________________
---------------------------------------------------------------------- Captured stdout call ----------------------------------------------------------------------
**Test Case 'arxiv' result: Content not available
__ TestTools.test_get_arxiv_contents[https://arxiv.org/other/1234--The URL to an arXiv research paper, must be in format 'https://arxiv.org/html/2501.12948v1'] __
---------------------------------------------------------------------- Captured stdout call ----------------------------------------------------------------------
**Test Case 'arxiv' result: The URL to an arXiv research paper, must be in format 'https://arxiv.org/html/2501.12948v1'
____________________________________________________________ TestTools.test_weather_service[cities0] _____________________________________________________________
---------------------------------------------------------------------- Captured stdout call ----------------------------------------------------------------------
**Test input type: <class 'dict'>
**Test input value: {'cities': ['Worms', 'Mannheim']}
[{'city': 'Worms', 'temperature': '7'}, {'city': 'Mannheim', 'temperature': '10'}]
**Test Case 'weather' result: The hottest city is Worms with a temperature of 7 degrees Celsius. In the city Mannheim the temperature is 10 degrees Celsius.
____________________________________________________________ TestTools.test_weather_service[cities1] _____________________________________________________________
---------------------------------------------------------------------- Captured stdout call ----------------------------------------------------------------------
**Test input type: <class 'dict'>
**Test input value: {'cities': ['NY', 'LA']}
[{'city': 'LA', 'temperature': '23'}, {'city': 'NY', 'temperature': '-2'}]
**Test Case 'weather' result: The hottest city is LA with a temperature of 23 degrees Celsius. In the city NY the temperature is -2 degrees Celsius.
==================================================================== short test summary info =====================================================================
PASSED tests/test_tool_arxiv.py::TestTools::test_get_arxiv_contents[https://arxiv.org/html/2501.12948v1-<html>Content here</html>-Transformed content from the HTML]
PASSED tests/test_tool_arxiv.py::TestTools::test_get_arxiv_contents[https://arxiv.org/html/2501.12948v1-None-Content not available]
PASSED tests/test_tool_arxiv.py::TestTools::test_get_arxiv_contents[https://arxiv.org/other/1234--The URL to an arXiv research paper, must be in format 'https://arxiv.org/html/2501.12948v1']
PASSED tests/test_tool_weather.py::TestTools::test_weather_service[cities0]
PASSED tests/test_tool_weather.py::TestTools::test_weather_service[cities1]
================================================================== 5 passed, 1 warning in 1.09s ==================================================================
6. Deploying the Example Source Code to watsonx
In this section, we’ll deploy the example source code to watsonx using a Python command-line application.
Step 1: Run the Deployment Script
The deployment script will execute the following steps:
- Get the deployment space information
- Create a package extension
- Provide the necessary metadata
- Generate a zip file for distribution to the deployment space (using the
build packagescript) - Select the base software specification to extend. In this case, we’ll use runtime-24.1-py3.11.(we use Python 3.12 but this works in this runtime)
- Define a new software specification based on the selected base, incorporating the custom library that contains the Agent implementation.
- Store the new software specification in the deployment space
- Retrieve the ID of the newly created asset
- Define the schema for the REST API
- Wait for the deployment creation to complete
- Once the deployment is successfully created, save the deployment ID in a file
This streamlined process allows us to quickly deploy the Agent to watsonx and make it accessible through the REST API.
/agents/langgraph-arxiv-research/config.tomlfile for later usage of the Python command line applications to test the agent./ui/code/.envfile for later usage of the Python Streamlint applications to test the agent.
- Execute the following command to start the deployment (deploy.py):
source ./.venv/bin/activate
poetry run python scripts/deploy.py
- Output:
***Log: 1. Get the deployment space information
***Log load_config -> all: {'deployment': {'watsonx_apikey': 'yyaaojXXX', 'watsonx_url': 'https://us-south.ml.cloud.ibm.com', 'space_id': 'b61b5ee1-b1a1-XXXX', 'custom': {'model_id': 'mistralai/mistral-large', 'thread_id': 'thread-1'}}}
***Log build: Parse pyproject.toml to get the package name and version.
***Log: 2. Create package extension
***Log: - Save the source code in the `dist` directory and build a package (/Users/thomassuedbroecker/Documents/tsuedbro/dev/learning-2024/agents-watsonx-langgraph-deployments/agents/langgraph-arxiv-research/dist/langgraph_react_agent-0.1.4.zip)
WARNING:__main__:package extension was not built as path: '/Users/thomassuedbroecker/Documents/tsuedbro/dev/learning-2024/agents-watsonx-langgraph-deployments/agents/langgraph-arxiv-research/dist/langgraph_react_agent-0.1.4.zip' is not empty. Using the already existing path for deployment. In case of any problems you might want to delete it and rerun the `deploy.py` script
Creating package extensions
SUCCESS
***Log: 4. Define new software specification based on base one and custom library (langgraph_react_agent-sw-spec)
***Log: 5. Delete if sw_spec already exists
WARNING:__main__:Deleting previously created sw_spec: langgraph_react_agent-sw-spec
***Log: 6. Store the software spec
***Log: 7. Get the id of the new asset (9cd73724-227d-48ee-925b-2422c2a77d0c)
***Log: 8. Define the schema for the REST API
######################################################################################
Synchronous deployment creation for id: '8d229456-2eb6-42cc-810e-09d289cbec34' started
######################################################################################
initializing
Note: online_url and serving_urls are deprecated and will be removed in a future release. Use inference instead.
.............
ready
-----------------------------------------------------------------------------------------------
Successfully finished deployment creation, deployment_id='5a8f9036-9fe8-4bae-8cc8-02baaa5f69e6'
-----------------------------------------------------------------------------------------------
Step 2: Verify the uploaded software for the deployment in the deployment space
- Source Code
This contains the ai_service.py function code.

- Observation during the execution of the script

- Deployment

7. Test the Agent in the deployment
7.1 Use the Test in the watsonx UI
Step 1: Select the Test tab in the deployment
Step 2: Insert the following JSON code into the test
{
        "messages": [
                {
                        "content": "What is the weather in Worms?",
                        "data": {
                                "endog": [
                                        0
                                ],
                                "exog": [
                                        0
                                ]
                        },
                        "role": "User"
                }
        ]
}
Step 3: Press Predict

Step 4: Verify the result
Now we see the Agent’s answer as an assistant and which tool was used to get the final answer.

The following code is an example response with the answer, The hottest city is Worms with a temperature of 2 degrees Celsius., and we can see that the weather_service was used.
{
  "choices": [
    {
      "index": 0,
      "message": {
        "role": "assistant",
        "tool_calls": [
          {
            "function": {
              "arguments": "{\"cities\": [\"Worms\"]}",
              "name": "weather_service"
            },
            "id": "ghn3L1cNb",
            "type": "function"
          }
        ]
      }
    },
    {
      "index": 0,
      "message": {
        "content": " The hottest city is Worms with a temperature of 2 degrees Celsius.",
        "id": "0a017b9c-251a-4a02-a291-b7f0bbb8b6ad",
        "name": "weather_service",
        "role": "tool",
        "tool_call_id": "ghn3L1cNb"
      }
    },
    {
      "index": 0,
      "message": {
        "content": "  The hottest city is Worms with a temperature of 2 degrees Celsius.",
        "role": "assistant"
      }
    }
  ]
}
7.2 Connect to the existing deployment using the example code
Next, we use the query_existing_deployment.py application from the example folder to connect to the deployed Agent and execute queries.
Step 1: Navigate to the correct folder
cd /agents/langgraph-arxiv-research
Step 2: Navigate to the right folder
Execute following command:
source ./.venv/bin/activate<br>poetry run python examples/query_existing_deployment.py
Insert following question: What is the temperature in NY?
- Output:
The following commands are supported:
--> help | h : prints this help message
--> quit | q : exits the prompt and ends the program
--> list_questions : prints a list of available questions
You can ask a follow up questions and have the agent generate a summary for research papers on arXiv.
Questions:
1) Find a list of papers on Granite models on arXiv
2) Return an overview of arXiv papers on AI Engineering from 2024
3) Summarize the arXiv research paper 2407.01502
4) NEW: What is the temperature in NY?
Choose a question or ask one of your own.
--> What is the temperature in NY?
============================== Assistant Message ===============================
{'role': 'assistant', 'tool_calls': [{'id': 'j7vpIEKNg', 'type': 'function', 'function': {'name': 'weather_service', 'arguments': '{"cities": ["NY"]}'}}]}
================================= Tool Message =================================
The hottest city is NY with a temperature of 1 degrees Celsius.
============================== Assistant Message ===============================
The current temperature in NY is 1 degrees Celsius.
Choose a question or ask one of your own.
-->
8. Running the Deployed Agent in a Local Streamlit UI
The Streamlit UI offers the following functionalities:
- Toggle Streaming: Switch between streaming the model’s response or displaying it all at once. (please use non streaming)
- Customize System Prompt: Redefine the Agent’s system prompt dynamically.
- View Prompt History: Display a history of prompts on the left-hand side.
- Monitor Agent Progress: Track the Agent’s tool usage directly within the UI.

There are implementation options for the application:
- Use the pure REST API from the machine learning service
- Use the Python SDK from the machine learning service
Step 1: Generate the environment file and set the needed variables
cat ./ui/code/.env_template > ./ui/code/.env
- Example content of the
.envfile.
# WATSONX
export WATSONX_APIKEY=XXX
export WATSONX_REGION=us-south
export WATSONX_DEPLOYMENT_ID=XXX
export WATSONX_PUB_DEPLOYMENT_URL="https://${WATSONX_REGION}.ml.cloud.ibm.com/ml/v4/deployments"
export WATSONX_SOFTWARE_NAME="ai_service"
export WATSONX_SPACE_ID=XXX
export WATSONX_INSTANCE_ID=XXX
export WATSONX_URL="https://${WATSONX_REGION}.ml.cloud.ibm.com"
Step 2: Generate a config.toml file for the streamlit app
cat ./ui/code/config.toml_template > ./ui/code/config.toml
Step 3: Run the application with the Machine Learning SDK
Execute following commands using the bash automation to start the application using the watsonx.ai Python SDK:
cd ./ui/code
bash start_sdk.sh
Log on with admin/admin and ask following question.
Question: What is the weather in Worms?
9. Summary
IBM has introduced Agent Lab in Watsonx.ai as a Beta feature, providing new possibilities for AI Agent deployment, and IBM provides template examples to build custom Agent deployments on the watsonx Developer hub.

In this blog post, we explored how to build a custom ReAct Agent using the LangGraph framework on a local machine and later deploy it as a watsonx.ai deployment.
With this Watsonx.ai deployment, we gain seamless access to the Agent without managing any infrastructure. Key benefits include:
- Enterprise security integration out of the box
- Easy runtime access
- Cost estimation and optimization
- Scalability, allowing us to scale up or down as needed
- Potential variability for future Agent frameworks
By leveraging deployments, software specifications, and function access, we can keep both the Agent’s source code and its deployment scripts under version control, ensuring better maintainability and collaboration.
Looking ahead, we can envision deploying Agents built on various frameworks, expanding the flexibility and use cases of AI Agents in watsonx.ai.
10. Additional resources
- Debug Streamlit
- IBM Resources
- LangGraph
I hope this was useful to you and let’s see what’s next?
Greetings,
Thomas
#agent, #langgraph, #ai, #watsonx, #deployment, #ibm, #python, #streamlit

In case you need to change the Python version.
pyenv versionspyenv install -l | grep 3.12.2
pyenv install 3.12.2
pyenv global 3.12.2
LikeLike
Good day Thomas Thank you for the video I an everything successfully til section 8 ( streamlit)
that fails with an error code 500. I verified the api-key, spaceid, deployment id are ok
the failure is in the watsonx-ai deployments.py. Is there a technique I can use to troubleshoot
this issue? Thans for your response Claude
LikeLike
Hi Claude, I would verify the deployment url.
Maybe this is:
* a wrong message format
* The model is not available at the moment
* wrong deployment id
May you can uncomment the https://github.com/thomassuedbroecker/watsonx-agent-langgraph-deployment-example/blob/main/ui/code/modules/watsonx_deployment.py#L33 and verify the output and add additional output for the data send to the model https://github.com/thomassuedbroecker/watsonx-agent-langgraph-deployment-example/blob/f1676bb681bc45cbd77737e6e9861d0a6ff24e6b/ui/code/modules/watsonx_deployment.py#L44 . Please verify the tests and the local invocation with the deployment and that the local CLI client is working. You can also set up the debug for streamlit `https://ploomber.io/blog/streamlit-debugging/` or try to test the `watsonx-ai deployments.py`.
Have success, and thanks for providing feedback. Thomas
LikeLike