

The combination of Knowledge Graphs and Retrieval-Augmented Generation (RAG) is becoming increasingly popular, especially with the growing use of Knowledge Graph databases like Neo4j. To explore this combination, I started with the example Graph RAG template with LangGraph and Neo4j from the watsonx developer hub The Graph RAG template with LangGraph and Neo4j 🚀.
In this example setup, we are actually dealing with two kinds of graphs:
- The
Knowledge GraphinNeo4j, which stores entities and relationships extracted from documents. - The
State Graph in LangGraph, which defines the workflow of theAI agent.
To make the example more concrete, I customized it to work with the Galaxium Travels example:
- The process looks like this: We import the company overview.pdf document using docling, we extract the text from the company overview PDF.
- Based on the node and relationship definitions from the Graph RAG template, we discover and represent meaningful connections inside the document using the LangChain Experimental LLM Graph Transformers.
- This way, the company profile is transformed into a graph-based structure that can be queried and explored with the help of a LangGraph agent.
Related GitHub repository: https://github.com/thomassuedbroecker/galaxium-travels-graph-rag-watsonx-ai-example
Table of content
- Why this matters
- Example Flow
- Key Components
- Setup locally
- The Setup Langfuse
- Chat with the GraphRAG
ai_servicelocally - Example using Docling
- Summary
- Additional resources
1. Why this matters
In this setup, two graphs are at play:
- Knowledge Graph (Neo4j): Stores extracted entities (e.g., company, profile, vision) and their relationships.
- LangGraph State Graph: Controls the workflow of the agent by defining how nodes (steps) and edges (connections) interact.
Together, they enable us to ask natural questions about a document and retrieve fact-based, structured answers.
Related YouTube Video with four experiments for the LLMGraphTransformers configuration:
2. Example Flow
- Set up the Knowledge Graph with a vector index (RAG):
- Entities and relationships are extracted from the PDF using Docling.
- The data is stored in Neo4j and enhanced with embeddings for semantic search.
- Run the AI service with LangGraph:
- The AI service (ai_service.py) communicates with the LangGraph agent.
- The agent combines vector search with graph queries to answer questions.
- Ask Questions via Chat:
- Example prompts to test the system:
- “What does the vision mention?”
- “What does the mission statement mention?”
- Example prompts to test the system:
- The agent answers by combining structured graph relations and semantic matches from the text. (combine structured and unstructured data)
The table below contains example questions and the relevant relation in the knowledge graph.
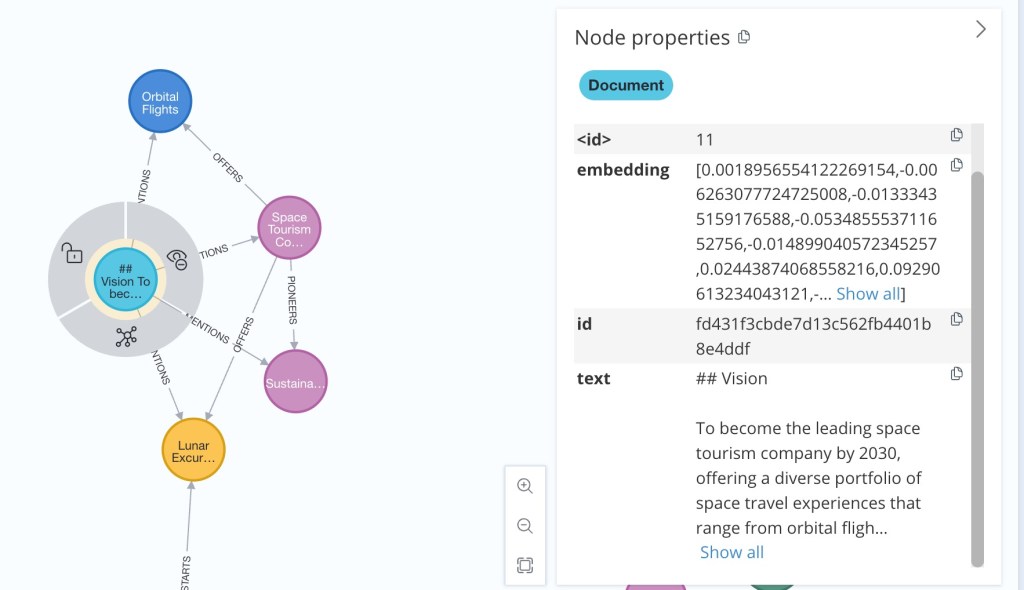
| Question | The image shows the relations in the Knowledge Graph | Answer |
|---|---|---|
| What does the vision mention? |  | The vision mentions several key points, including: 1. Zero-gravity activities 2. Earth observation opportunities … 8. Sustainability |
| What does the mission statement mention? |  |
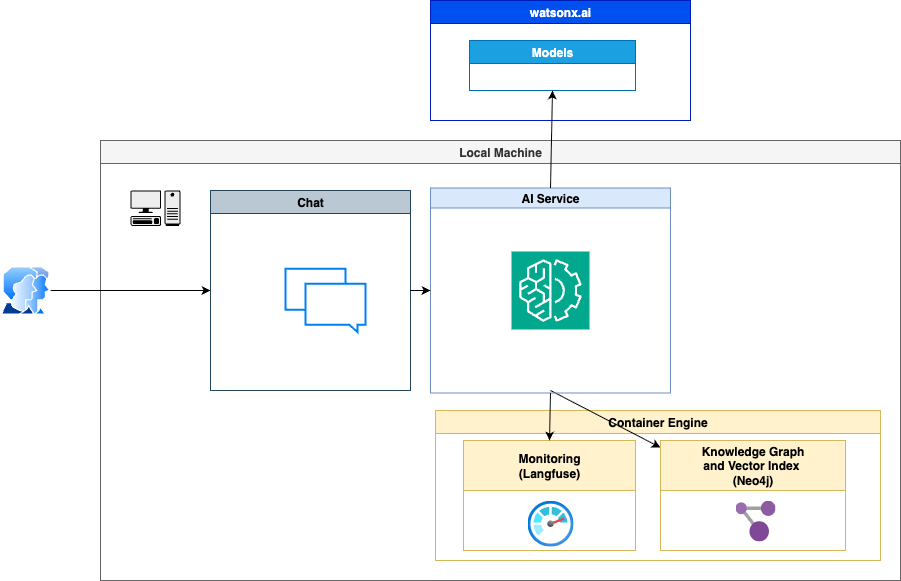
The diagram below shows the simplified high-level dependencies of the example.
- watsonx.ai
- Chat
- AI Service
Additional resources: RAG Tutorial: How to Build a RAG System on a Knowledge Graph
3. Key Components
3.1 Chat
This is the interface where you can “talk” with the AI service.
To enable local testing, two scripts are included:
_interactive_chat.py– provides an interactive way to ask questions.execute_ai_service_locally.py– runs the chat service locally.
example: After starting the AI service, you can type questions like “What does the vision mention?” and the agent will answer based on the document.
3.2 AI Service
The AI service (ai_service.py) is the heart of the application. It connects the user’s questions to the agent and the knowledge graph.
In this example, it runs only locally (no cloud deployment).
Example: The service acts like a bridge between the chat interface and the underlying graph/agent logic.
For a detailed breakdown of the ai-service's implementation, please refer to the IBM Cloud docs
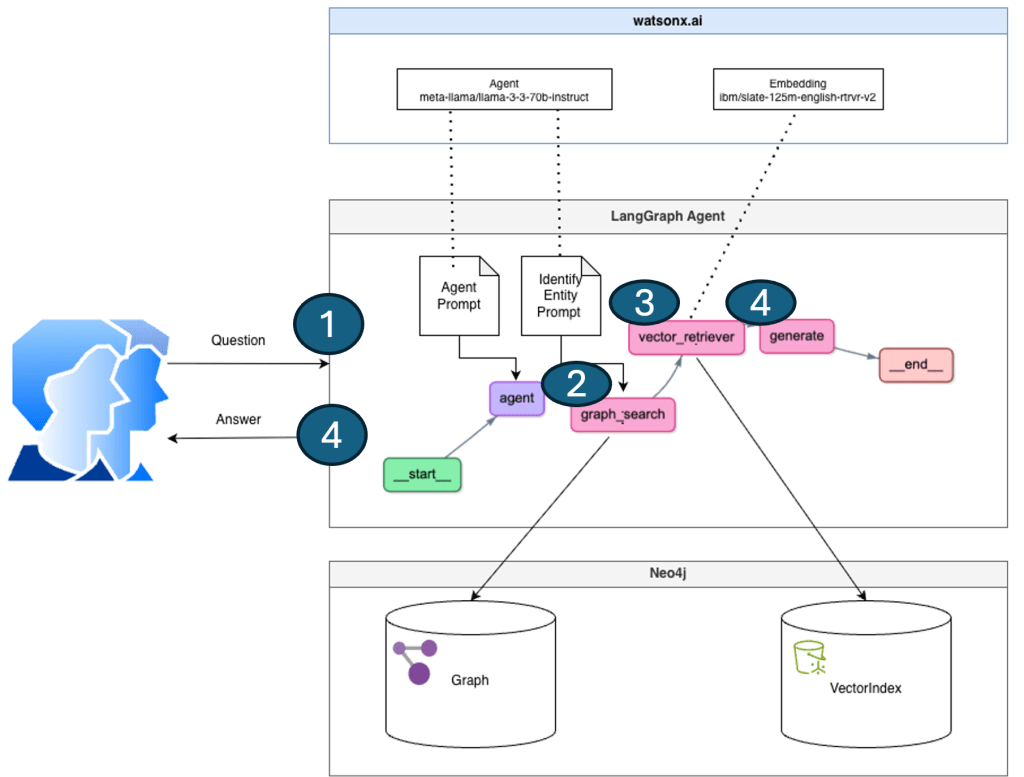
3.3 Agent
The agent.py file builds the app agent state graph, consisting of nodes and edges.
For detailed info on how to modify the agent state graph object, please refer to LangGraph’s official docs
| The image below shows the state graph implementation of the LangGraph agent. | Screenshot from the Langfuse monitor, which also reflects the given diagram below. |
|---|---|
 |  |
- User Question
- Graph Search “Structured Data”
- Vector Search “Unstructured Data”
- Combine “Structured Data” and “Unstructured Data” to generate the answer.
The following code excerpts display the implementations for the GraphSearch and Vector Search.
GraphSearch
The following code is an excerpt from the code for GraphSearch in the nodes.py file. Here, you can see that the entities from the question were extracted earlier in the code, using an LLM. Then, for each entity, the mentions were searched and combined into a result for the dependencies of the entities in question, using the Cypher Query Language.
for entity in entities:
            response = self.graph.query(
                """CALL db.index.fulltext.queryNodes('entity', $query, {limit:2})
            YIELD node,score
            CALL () {
              MATCH (node)-[r:!MENTIONS]->(neighbor)
              RETURN node.id + ' - ' + type(r) + ' -> ' + neighbor.id AS output
              UNION
              MATCH (node)<-[r:!MENTIONS]-(neighbor)
              RETURN neighbor.id + ' - ' + type(r) + ' -> ' +  node.id AS output
            }
            RETURN output LIMIT 20
            """,
                {"query": self._generate_full_text_query(entity)},
            )
            result += "\n".join([el["output"] for el in response]) + "\n"
Vector search
The following code is an excerpt from the VectorIndexSearch code in the nodes.py file. Here, you can see that a similarity_search is used based on the input question. Then, all the resulting data of the search will be returned.
question = state["question"]
        unstructured_data = [
            el.page_content for el in self.vector_index.similarity_search(question)
        ]

        unstructured_context = "\n".join(
            map(
                lambda doc: "#Document:\n" + doc + "\n",
                unstructured_data,
            )
        )
        context_prompt = f"""Structured data:
{state["structured_data"]}
Unstructured data:\n{unstructured_context}
3.4 Knowledge Graph
The Knowledge Graph (built with Neo4j) is where the extracted information from the document is stored as Entity and Relationship.
- Entities (e.g., Company, Vision, Mission) become nodes.
- Relationships (e.g., HAS_PROFILE, MENTIONS_VISION) become edges.
This graph structure makes it possible to query relationships directly, not just rely on plain text search.
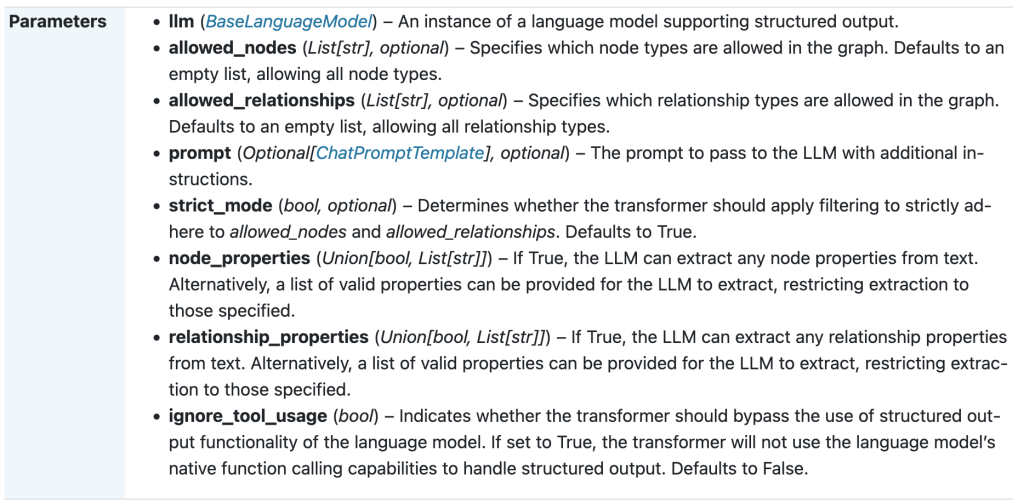
This image is an example prompt in LangChain to extract and discover, during the preprocessing, the Entities, and Relationships with LangChain Experimental Graph Transforms.

Usage of the LangChain Experimental LLM Graph Transformers parameters for Graph generation:
- Additional Instructions: You are an business expert for ‘Company Profiles’. You can understand the impact and dependencies of the information, impacting requirements, to identify nodes and relations.
- Allowed relationships: [“RELATED_TO”, “ASSOCIATED_WITH”, “PART_OF”, “MENTIONS”, “CHANGES”]
- Allowed nodes: [“Company”, “Person”, “Objective”]
Screenshot from LangChain Graph Transformers (additional instructions aren’t listed here)
Extract of the relevant code section in the create_knowledge_graph.py file.
    # Experimental LLM graph transformer that generates graph documents
    # Documentation: https://api.python.langchain.com/en/latest/graph_transformers/langchain_experimental.graph_transformers.llm.LLMGraphTransformer.html
    print(f"***Log: 3. Start LLMGraphTransformer with `llm`: ({llm})\n\n")
    allowed_nodes = ["Company", "Person", "Objective"]
    print(f"***Log: - allowed nodes: {allowed_nodes}")
    allowed_relationships = ["RELATED_TO", "ASSOCIATED_WITH", "PART_OF", "MENTIONS", "CHANGES"]
    print(f"***Log: - allowed nodes: {allowed_relationships}")
    prompt = ChatPromptTemplate([("system", "You are an business expert for 'Company Profiles'. You can understand the impact and dependencies of the information, impacting requirments, to identify nodes and relations.")])
    print(f"***Log: - prompt: {prompt}")
    llm_transformer = LLMGraphTransformer(llm=llm,
                                          allowed_nodes=allowed_nodes,
                                          allowed_relationships=allowed_relationships,
                                          #strict_mode=True,
                                          prompt=prompt)
This knowledge graph result is based on the relations we imported from the company-overview.pdf document during the preprocessing into Neo4j.

The following section contains an extract of the related to the preprocessing context during the Graph and Vector generation in section: 2.7 Create an example
knowledge graphin Neo4j.
Input data
- Input markdown text -> converted with Docling from PDF to Markdown
- Text chunking
Vector index
- Generate embeddings with LLM
- Save embeddings for the chunks
Graph
- Find nodes and relationships with LLM for the given chunks
- Generate Neo4j statements to save the nodes and relationships as graph document
- Save the nodes and relationships in the Graph
Example generated statements during the preprocessing for nodes, relationships and source definitions:
- Nodes
nodes=[Node(id='Galaxium Travels', type='Company', properties={})]
- Relationships
relationships=[Relationship(source=Node(id='Galaxium Travels', type='Company', properties={}), target=Node(id='Company Profile', type='Profile', properties={}), type='HAS_PROFILE', properties={})]
- Source
source=Document(metadata={}, page_content='## Galaxium Travels - Company Overview\n\nGalaxium Travels Logo\n\n## Company Profile')
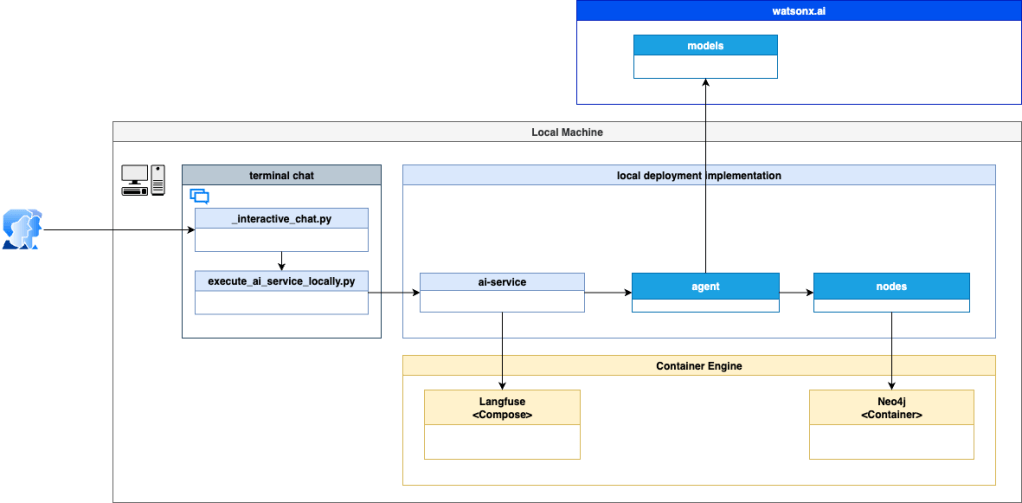
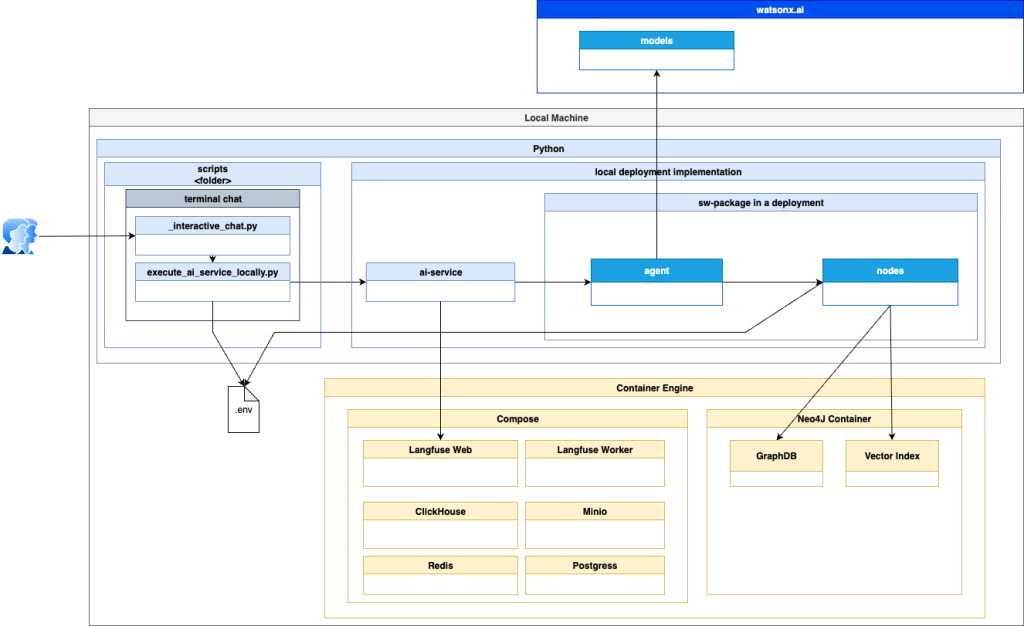
3.5 Architecture overview
In this example, we will run the ai service only locally. The agent nodes connect to Nex4j and connect to watsonx.ai to run the models. To monitor during agent invocation, we use Langfuse integrated into the ai service when the agent is invoked.
- This is a simplified overview of the implementation dependencies.
- This is a simplified but more detailed overview of the implementation dependencies.
3.6 Changes in the template from the watsonx developer hub
The example started from the watsonx developer hub template, but was modified to work only locally.
Here are the main changes I made:
- Added _interactive_chat.py and execute_ai_service_single_agent_locally.py for local chat.
- Adjusted nodes.py to use locally saved secrets (via .env file).
- Integrated Langfuse into execute_ai_service_locally.py for monitoring.
- Converted the Galaxium Travels PDF into a Markdown file using Docling .
- Enhanced create_knowledge_graph.py with logging to show what gets generated during graph creation.
The concept of the agent’s state graph was kept the same as in the original template.
4. Setup locally
4.1 Clone the repository
git clone https://github.com/thomassuedbroecker/galaxium-travels-graph-rag-watsonx-ai-example.git
cd galaxium-travels-graph-rag-watsonx-ai-example
4.2 Understand the folder structure of the example
The folder structure is more or less the same as for an agent implementation as an ai-service in the blog post Develop and Deploy Custom AI Agents to watsonx.ai on IBM Cloud.
.
├── code
│   ├── langgraph-graph-rag
│   │   ├── ai_service.py
│   │   ├── CHANGES.rst
│   │   ├── config.toml.example
│   │   ├── schema
│   │   ├── scripts
│   │   │   ├── __init__.py
│   │   │   ├── _interactive_chat.py
│   │   │   ├── convert_pdf_to_markdown.py
│   │   │   ├── create_knowledge_graph.py
│   │   │   ├── execute_ai_service_locally.py
│   │   │   ├── input_data
│   │   │   │   ├── company_overview.md
│   │   │   │   └── company_overview.pdf
│   │   │   └── README.md
│   │   ├── src
│   │   │   └── langgraph_graph_rag
│   │   │       ├── __init__.py
│   │   │       ├── agent.py
│   │   │       └── nodes.py
│   │   ├── template.env
│   │   └── utils.py
│   └── local_monitoring
│       ├── docker-compose.yml
│       └── start_langfuse.sh
├── images
├── LICENSE
└── README.md
Key folders and files:
scripts/→ helper scripts like chat, graph creation, and PDF conversion.src/langgraph_graph_rag/→ the agent implementation.input_data/→ contains the company overview in PDF and Markdown.local_monitoring/→ setup for Langfuse monitoring.
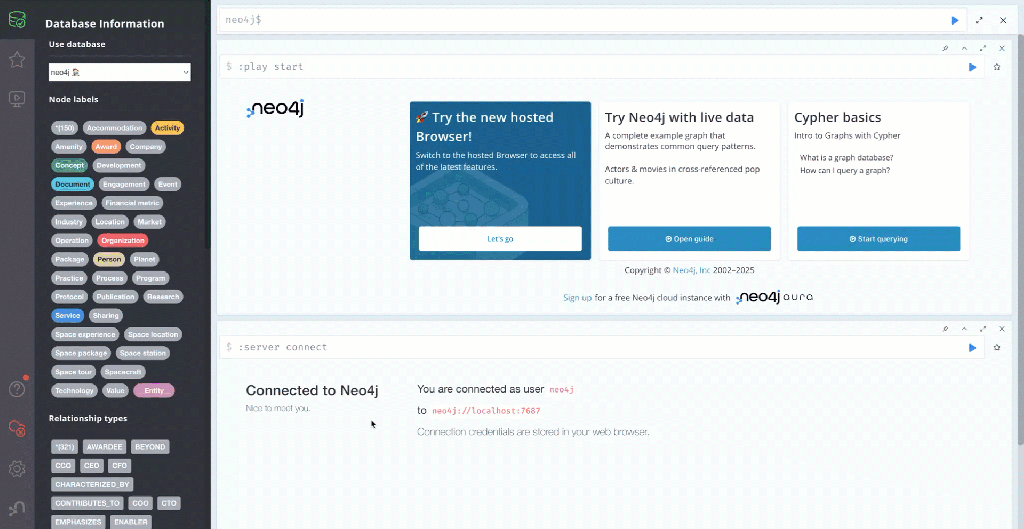
4.3 Set up Neo4j locally
Neo4j is the graph database where the knowledge graph will be stored.
4.3.1 Start the Neo4j locally
Run Neo4j in Docker:
- Delete the existing container (delete the exiting data)
- Prepare that data can be exported from Neo4j
docker container rm neo4j
docker run  -it --name neo4j \
  -p 7474:7474 -p 7687:7687 \
  -e NEO4J_AUTH=neo4j/password \
  -e NEO4JLABS_PLUGINS='["apoc"]' \
  -e NEO4J_apoc_export_file_enabled=true \
  -e NEO4J_apoc_import_file_enabled=true \
  -e NEO4J_dbms_security_procedures_unrestricted='apoc.*' \
  neo4j:latest
- If you’ve already created the container, just restart it (not losing configurations and data):
docker container start -i neo4j
4.3.2 Access the UI on the local machine
Open http://localhost:7474/ in your browser.
- User: neo4j
- Password: password
.4 Generate a virtual environment and install Poetry
Set up a clean Python environment:
cd code
python3.12 -m venv .venv
source ./.venv/bin/activate
python3 -m pip install --upgrade pip
python3 -m pip install poetry
2.5 Generate Config Files
- Create copies of the template files to edit:
cd code
cat ./langgraph-graph-rag/template.env > ./langgraph-graph-rag/.env
cat ./langgraph-graph-rag/config.toml.example > ./langgraph-graph-rag/config.toml
- Insert the needed credentials into the Environment variables and Config.toml file
Environment variables file content:
# One of the below is required.
# To determine your `watsonx_apikey`, refer to `IBM Cloud console API keys <https://cloud.ibm.com/iam/apikeys>`_.
export WATSONX_APIKEY=
export WATSONX_TOKEN=
export REGION=us-south

# should follow the format: `https://{REGION}.ml.cloud.ibm.com`
export WATSONX_URL=https://${REGION}.ml.cloud.ibm.com

# Deployment space id is required to create deployment with AI service content.
export WATSONX_SPACE_ID=

# variable, that is populated with last created deployment_id every time when command `watsonx-ai service new` finish successfully
export WATSONX_DEPLOYMENT_ID=

# Neo4j
export NEO4J_URI="bolt://localhost:7687"
export NEO4J_USERNAME="neo4j"
export NEO4J_PASSWORD="password"
export NEO4J_DATABASE="neo4j"

# Model IDs
export WATSONX_MODEL_ID="meta-llama/llama-3-3-70b-instruct"
export WATSONX_EMBEDDING_MODEL_ID="ibm/granite-embedding-278m-multilingual"

#Langfuse you need to generate the keys
export LANGFUSE_PUBLIC_KEY=YOUR_KEY
export LANGFUSE_SECRET_KEY=YOUR_KEY
export LANGFUSE_HOST=http://localhost:3000

# Filename runtime log output
export FILENAME_AGENT_LOG_OUTPUT="<INSERT_YOUR_ABSOLUT_FOLDER_PATH>/scripts/output_data"

# LangChain GraphTransformer
export USE_PROMPT=false
export USE_ADDITIONAL_INSTRUCTIONS=true
export USE_NODES_RELATION_DEFINITIONS=false
Config.toml file content:
[cli.options]
  # If true, cli `invoke` command is trying to use `ai_service.generate_stream` function for local tests, and `ai_service.generate` otherwise.
  # Default: true
  stream = true

  # Path to json file with a complete payload that will be send to proper AI service generate function.
  # Note that, the payload file will be only used when no `query` is provided when running `invoke ` command
  # Default: None
  payload_path = ""

[deployment]
  # One of the below is required.
  # To determine your `api_key`, refer to `IBM Cloud console API keys <https://cloud.ibm.com/iam/apikeys>`_.
  watsonx_apikey = ""
  watsonx_token = ""

  # should follow the format: `https://{REGION}.ml.cloud.ibm.com`
  watsonx_url = ""


  # Deployment space id is required to create deployment with AI service content.
  space_id = "PLACEHOLDER_FOR_YOUR_SPACE_ID"

  # variable, that is populated with last created deployment_id every time when command `watsonx-ai service new` finish successfully
  deployment_id = ""

[deployment.online.parameters]
  # during creation of deployment additional parameters can be provided inside `ONLINE` object for further referencing
  # please refer to the API docs: https://cloud.ibm.com/apidocs/machine-learning-cp#deployments-create
  model_id = "meta-llama/llama-3-3-70b-instruct"  # underlying model of WatsonxChat
  embedding_model_id = "ibm/slate-125m-english-rtrvr-v2"
  knowledge_graph_description=""
  url = ""  # should follow the format: `https://{REGION}.ml.cloud.ibm.com`

  # Secret Manager configuration
  # Required:
  service_manager_service_url = "<YOUR_SECRETS_MANAGER_SERVICE_URL>"
  secret_id = "<YOUR_SECRET_ID>"

[deployment.software_specification]
  # Name for derived software specification. If not provided, default one is used that will be build based on the package name: "{pkg_name}-sw-spec"
  name = ""

  # Whether to overwrite (delete existing and create new with the same name) watsonx derived software specification
  # Default: false
  overwrite = false

  # The base software specification used to deploy the AI service. The template dependencies will be installed based on the packages included in the selected base software specification
  # Default: "runtime-24.1-py3.11"
  base_sw_spec = "runtime-24.1-py3.11"
2.6 Install Dependencies with Poetry
Inside the project:
cd code
source ./.venv/bin/activate
cd langgraph-graph-rag
poetry install
#Langfuse
#poetry add --no-cache langfuse==3.3.3
# Docling
#poetry add --no-cache docling
#poetry lock
2.7 Create an example knowledge graph in Neo4j
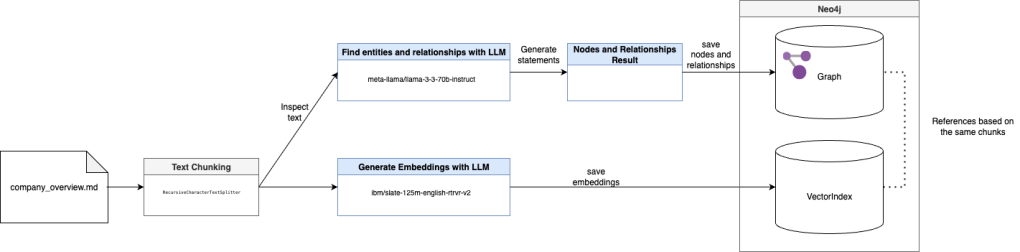
The Graph RAG agent utilizes a later the knowledge graph enriched with vectorized text chunks as a knowledge base for LLM, which provides relevant answers to users’ specialized questions.
These are the main steps of the knowledge graph generation:
- To automatically convert raw text into graph-based documents, we use
LLMGraphTransformer(for more details, see documentation) fromlangchain-experimental. - It enables the quick extraction of entities from raw text and then converts them into graph nodes connected by relationships.
- When a graph-based document is added to the database, a full-text index entity is created on entity identifiers for searching the graph.
- Finally, based on the created knowledge graph, we initialize Neo4j Vector Index for source text embedding vectors.
The image illustrates the process within the create_knowledge_graph.py implementation.
Input data
- Input markdown text
- Text chunking
Vector index
- Generate embeddings with LLM
- Save embeddings for the chunks
Graph
- Find nodes and relationships with LLM for the given chunks
- Generate Neo4j statements to save the nodes and relationships as graph document
- Save the nodes and relationships in the Graph
Here is an extract from the generation of graph with create_knowledge_graph.py in the output console and in Neo4j.
- Documents: 1
- Chunksize: 512
- Chunks: 34
***Log: define llm and embedding models
***Log: 1. Document count: (1 and size 512)
...
***Log: 2. Chunks count: (34)
****Log: 2.1 Chunk:
***
page_content='## Galaxium Travels - Company Overview

Galaxium Travels Logo

## Company Profile'
***

...

***Log: 3. Start LLMGraphTransformer with llm: (model_id='meta-llama/llama-3-3-70b-instruct'
...
***Log: 4. Start converting to graph documents using the chunks: (34)
...
****Log: 5.1 Graph document:
***
nodes=[Node(id='Galaxium Travels', type='Company', properties={})] relationships=[Relationship(source=Node(id='Galaxium Travels', type='Company', properties={}), target=Node(id='Company Profile', type='Profile', properties={}), type='HAS_PROFILE', properties={})] source=Document(metadata={}, page_content='## Galaxium Travels - Company Overview\n\nGalaxium Travels Logo\n\n## Company Profile')
***
...
***Log: create_knowledge_graph:
By default, url, username, and password are read from env variables
***Log: 6. Create the vector index from the Graph
...
Along with the Graph RAG Agent source code, we prepare a Python script scripts/create_knowledge_graph.py, that can be used to create a knowledge graph based on raw text.
All secrets needed to connect with the Neo4j graph database management system and the IBM watsonx.ai inference service are read from the .env file.
Moreover, to generate a knowledge graph, you need to specify the LLM model ID and the embedding model ID, also in .env.
Example:
# Model IDs
WATSONX_MODEL_ID="meta-llama/llama-3-3-70b-instruct"
WATSONX_EMBEDDING_MODEL_ID="ibm/slate-125m-english-rtrvr-v2"
This is the text used to set up the example graph: company overview.pdf
From this text, the following graph will be generated.
2.7.1 Generate the knowledge graph by executing the following steps
Ensure Neo4j is running and open a new terminal.
- Navigate to the
codefolder
cd code
source ./.venv/bin/activate
- Navigate to the
langgraph-graph-rag/scriptsfolder
cd langgraph-graph-rag/scripts
- Run the
create_knowledge_graph.pyapplication
poetry run python create_knowledge_graph.py
- Navigate back
cd ../..
- Access the
knowledge graphinNeo4jand verify the result
5. The Setup Langfuse
5.1. Start container engine
For example, you can use Ranger as a container engine.
5.2 Start compose
Open a new terminal.
cd code/local_monitoring
bash start_langfuse.sh
5.3 Open Langfuse UI
open http://localhost:3000
5.4 Register a user
When you enter the UI, you can create a local user.
- Email: graphrag@graphrag.net
- Name: graphrag
- Password: graphrag_123
5.5 Set up a project
- Organization: graphrag
- Owner: graphrag
- Project name: graphrag
5.6 Generate API keys for langchain
Example screenshots for the UI usage:
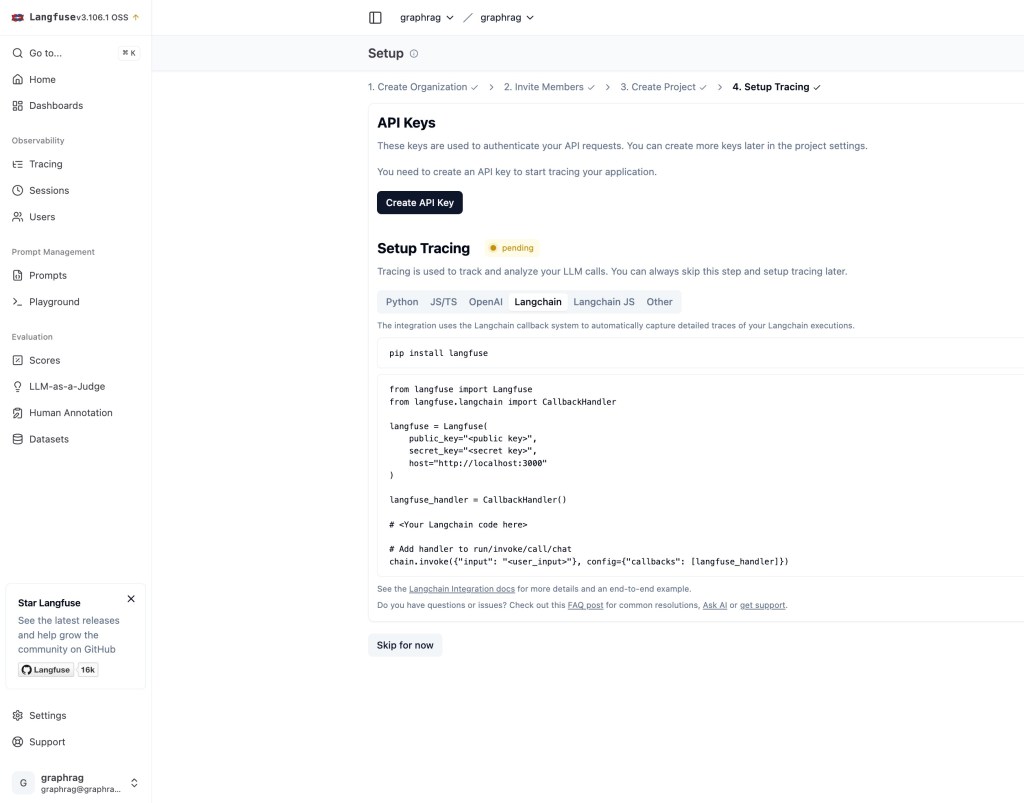
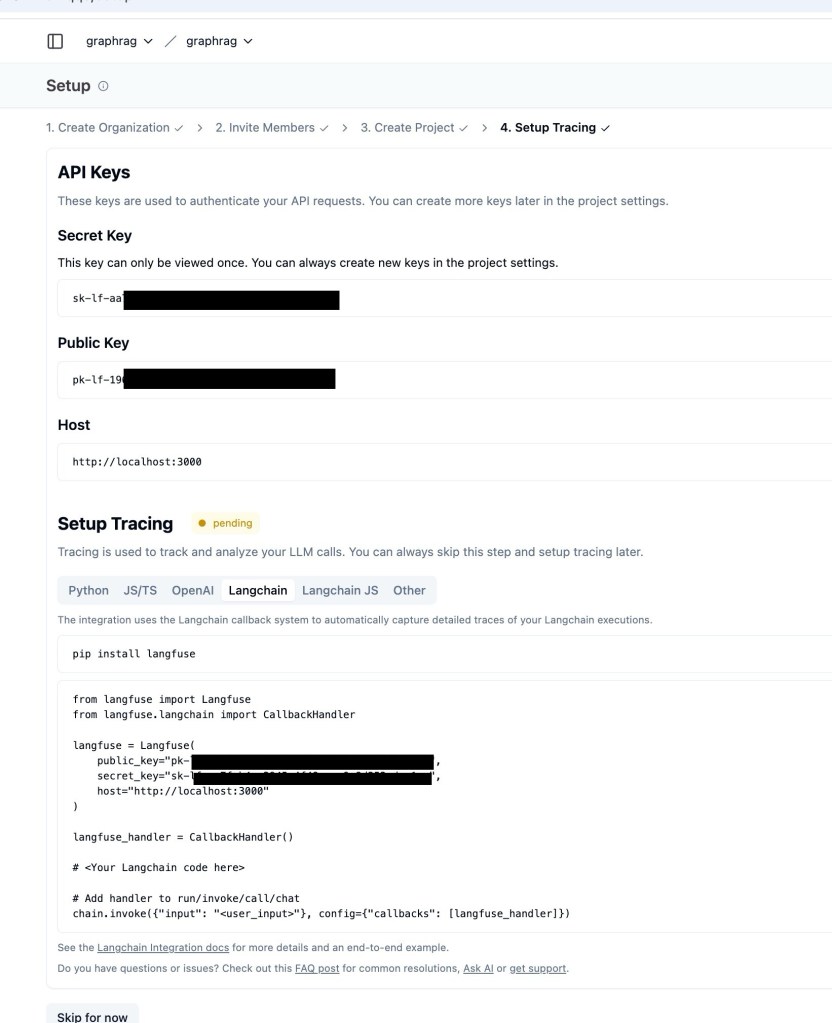
You need to save the key in the code/langgraph-graph-rag/.env file.
Example:
export LANGFUSE_PUBLIC_KEY=pk-XXXX
export LANGFUSE_SECRET_KEY=sk-XXXX
export LANGFUSE_HOST=http://localhost:3000
Additional resources:
5.7 How the integration into the code works
The following code was inserted into the code/langgraph-graph-rag/ai_service.py file to implement the Langfuse integration.
 ....
    #########################################
    # Langfuse only for local!
    # doesn't work in the deployment
    #########################################

    from langfuse import Langfuse
    from langfuse.langchain import CallbackHandler
    from dotenv import load_dotenv
 load_dotenv()
    import os

    # 1. Load configuration
 LANGFUSE_PUBLIC_KEY= os.getenv('LANGFUSE_PUBLIC_KEY')
 LANGFUSE_SECRET_KEY= os.getenv('LANGFUSE_SECRET_KEY')
 LANGFUSE_HOST= os.getenv('LANGFUSE_HOST')
 langfuse = Langfuse(
 public_key=LANGFUSE_PUBLIC_KEY,
 secret_key=LANGFUSE_SECRET_KEY,
 host=LANGFUSE_HOST
 )
    # 2. Verify connection
    from langfuse import get_client
 langfuse = get_client()
    if langfuse.auth_check():
 print("Langfuse client is authenticated and ready!")
    else:
 print("Authentication failed. Please check your credentials and host.")

 langfuse_handler = CallbackHandler()

    #########################################

 ...

        # Invoke agent
        # generated_response = agent.invoke({"messages": messages})

        ################ Langfuse ##############
 generated_response = agent.invoke({"messages": messages}, config={"callbacks": [langfuse_handler]})
        ####################################
6. Chat with the GraphRAG ai_service locally
Once Neo4j is running and the knowledge graph has been created, you can start chatting with the AI service. This step shows how to interact with the system and test it with your own questions.
6.1 Ensure you started the configured Neo4J
docker container start -i neo4j
6.2 Run the chat locally
Example usage:
You ask: “What does the vision mention?”
- The AI agent searches the knowledge graph and the vector index (RAG).
- It then returns a fact-based answer extracted from the Galaxium Travels company overview.
- This demonstrates how the system combines graph relationships with AI-powered retrieval to provide reliable answers.
Open a new terminal and execute the following commands.
cd code
source ./.venv/bin/activate
cd langgraph-graph-rag
poetry run python scripts/execute_ai_service_locally.py
- Example Output:
Choose a question or ask one of your own.
 --> What does the vision mention?

Output:
 The vision mentions several key points, including:
 1. Zero-gravity activities
 2. Earth observation opportunities
 3. Lunar Excursions, which include:
      * 7-day lunar orbit packages
      * Moon surface exploration
      * Luxury accommodations in lunar orbit
 4. Space Hotel Stays
 5. Continuous training and certification
 6. State-of-the-art spacecraft maintenance
 7. Innovation, which includes:
      * Continuous research and development
      * Adoption of cutting-edge space technology
      * Creative approach to space tourism
 8. Sustainability
7. Example using Docling
cd code/
source .venv/bin/activate
cd langgraph-graph-rag/
python3 scripts/convert_pdf_to_markdown.py
8. Summary
This post showed how to combine Knowledge Graphs and Retrieval-Augmented Generation (RAG) to create an AI system that answers document-based questions more precisely.
I like the initial watsonx developer hub templates. This new template helped me to get an initial step into this topic. I focused only on the local machine to minimize the effort and integrate additional monitoring.
- The setup used:
- Neo4j as the knowledge graph database
- LangGraph to define the agent workflow
- IBM watsonx.ai for AI models
- Langfuse for monitoring
- Docling to convert PDFs into structured Markdown
- What we learned step by step
- Understand the components
- Chat interface to talk to the AI
- AI service that connects user questions to the agent
- LangGraph agent with a state graph workflow
- Knowledge Graph (Neo4j) storing entities and relationships
- Local monitoring with Langfuse
It’s a practical way to explore how LLMs can be enhanced with real-world context.
With this setup, we can start experimenting with your own documents and discover how Knowledge Graphs and RAG improve the quality of AI-powered answers.
9. Additional resources
- Docling
- The Graph RAG template with LangGraph and Neo4j 🚀
- Langfuse – Cookbook: LangGraph Integration
- LangChain LLM Graph Transformer
- Ranger container engine
- LangGraph’s official docs
- RAG Tutorial: How to Build a RAG System on a Knowledge Graph
Poetry- Extracting Knowledge Graphs From Text With GPT4o
I hope this was useful to you and let’s see what’s next?
Greetings,
Thomas
#KnowledgeGraph, #RAG, #Neo4j, #LangGraph, #watsonx, #Langfuse, #Docling, #AI, #LLM, #GraphDatabase, #AIagents, #Tutorial
