

This is a “simple” cheat sheet, how to create a single virtual server instance (VSI) in the virtual private cloud (VPC) infrastructure on IBM Cloud.
The blog post has four major sections:
- Example architecture
- Setup of a VPC network
- Setup and configure the
virtual server instanceinside the VPC network - Access the
virtual server instancefrom a local machine
For more information, please visit the VPC IBM Cloud documentation.
Keep in mind: The objective is not to show all awesome additional capabilities the virtual private cloud on IBM Cloud has. The objective is just to provide a simple cheat sheet to create one simple virtual server instance.
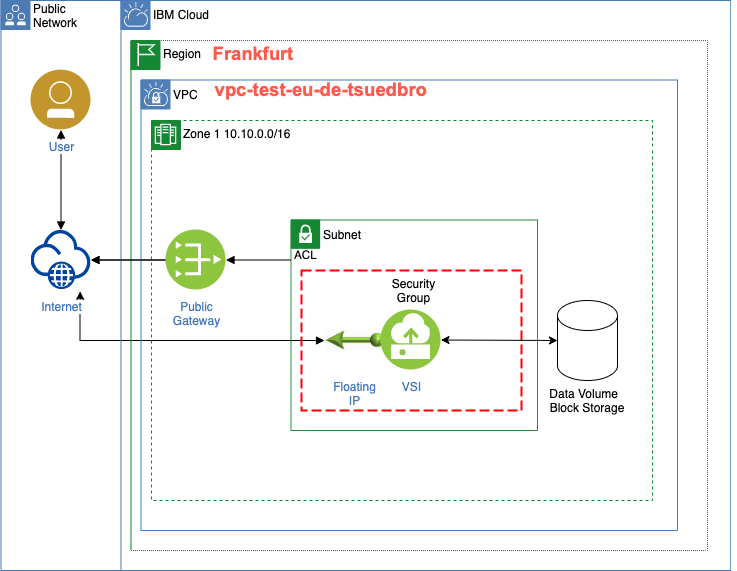
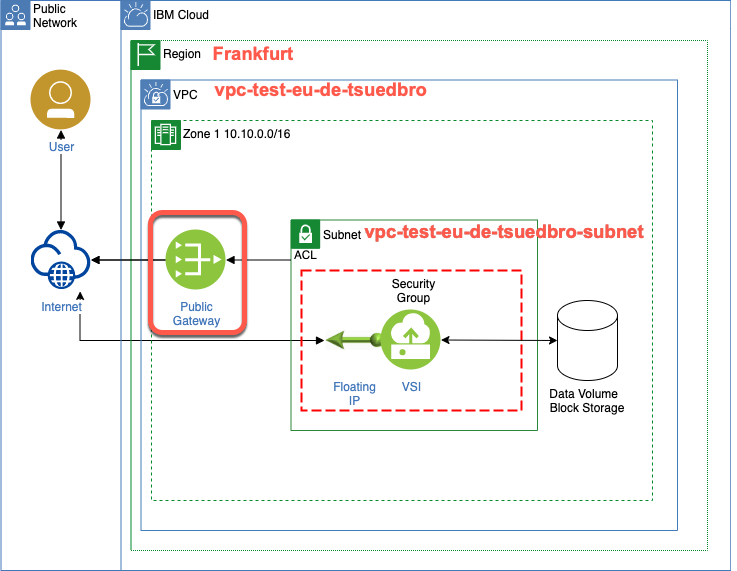
Architecture
The diagram shows the target architecture for this cheat sheet.
We will create:
- one
virtual server instance(VSI) - one
virtual private cloud(VPC) - one
public gateway(to access the internet from thevirtual server instance) - one
Access Control List(ACL) (to limit the subnet’sinboundandoutboundtraffic) - one
floating IP(to access thevirtual server instance)

Note: The diagram was created with the IBM Cloud template available on diagrams.net or draw.io.
(optional additional icons)
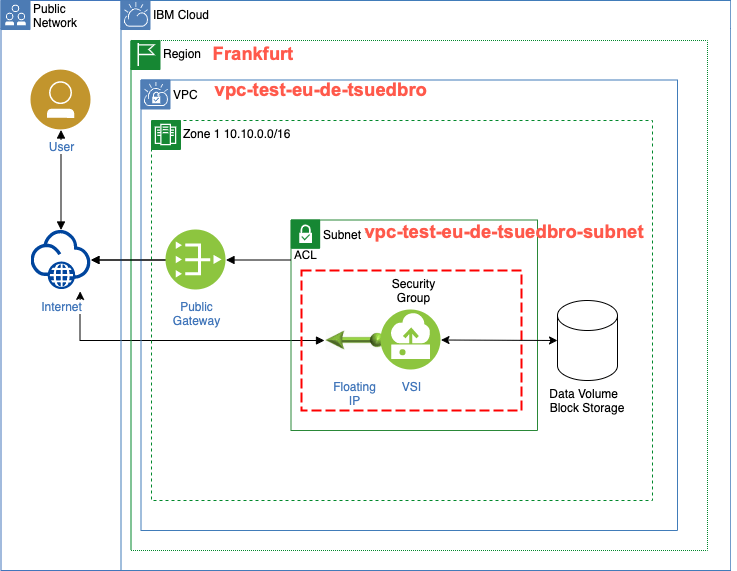
At of the end of this cheat sheet we will see following VPC layout in the IBM Cloud, as you see in the image below.
- A virtual private cloud called
vpc-test-eu-de-tsuedbro - A subnet called
vpc-test-eu-de-tsuedbro-subnet - A virtual server instance called
vpc-virtual-machineinside the subnet

Setup a VPC network
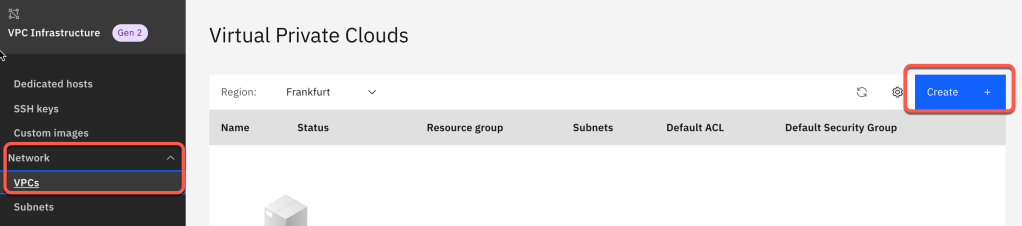
Step 1: Create a VPC network
To create the VPC network open the link and press Create.
Step 2: Use following example values for your VPC
- Region:
Frankfurt - Name:
vpc-test-eu-de-tsuedbro - Resource group:
default - Tag:
vpc-test
Step 3: Define the subnet
You can create subnets in one or more zones in suggested prefix ranges or in your own IP ranges that you bring to IBM Cloud. Here we only create one subnet.
- New subnet for VPC
- Name:
vpc-test-eu-de-tsuedbro-subnet - Resource group:
default
- Name:
Step 3: Define the access control list (ACL)
The VPC default access control list (ACL) is our default for the security groups.
- Default
security groupAllow SSH(Port 22)Allow ping
- Default address prefixes
- Create a default prefix for each zone
- Location:
Frankfurt
The image below displays an inbound access control list (ACL) configuration.
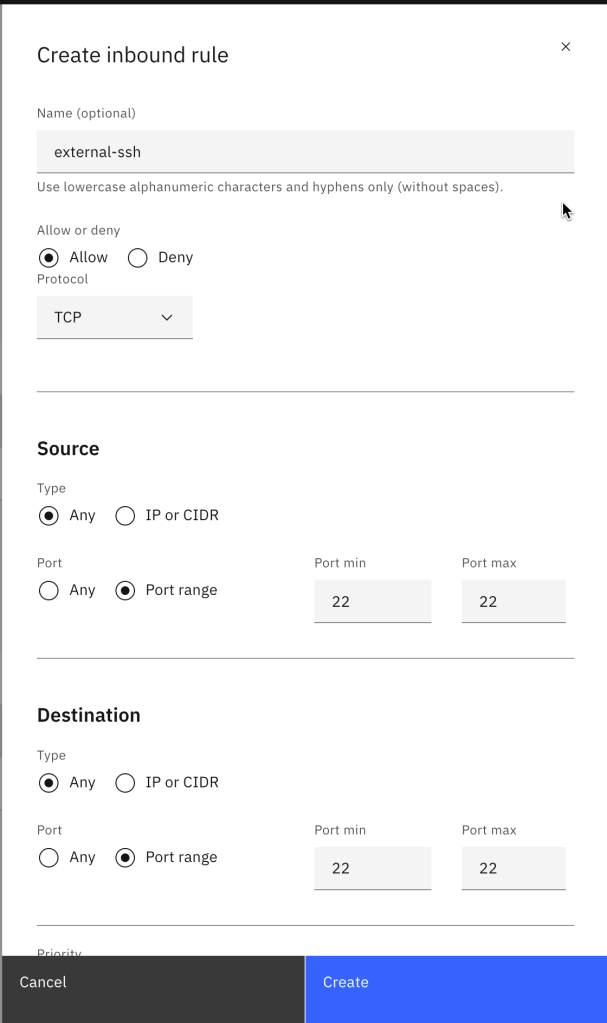
The image below displays an inbound rule for a security group (SG) configuration.
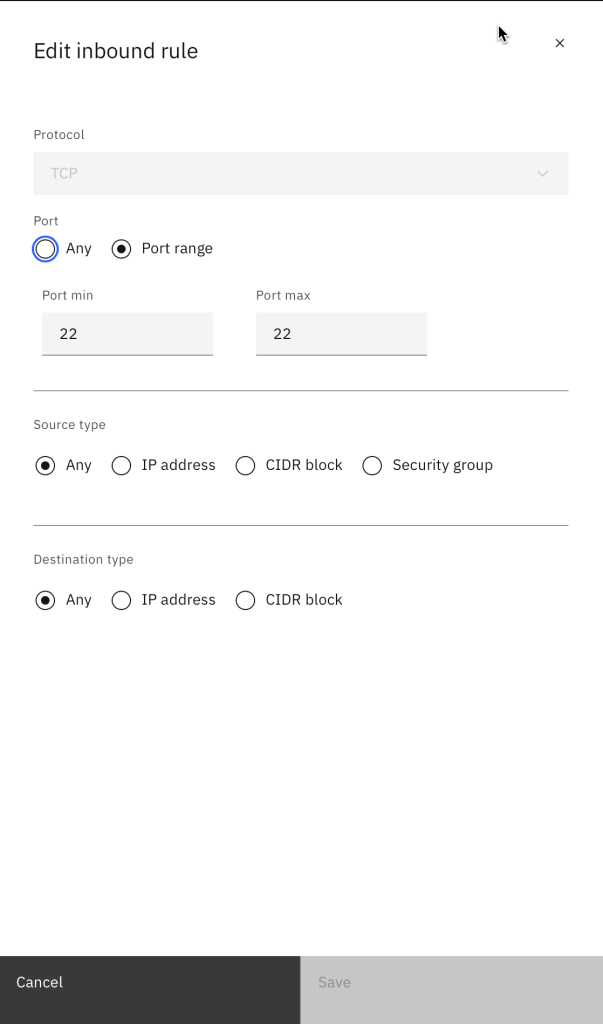
You can configure an access control list (ACL) to limit the subnet’s inbound and outbound traffic.
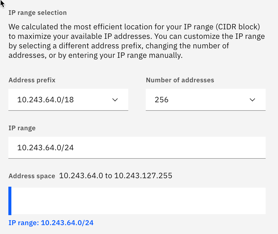
- IP range selection
Step 4: Attach a public gateway
Attach a public gateway, if you want to allow all resources in a subnet to communicate with the public internet.
- Public gateway
Attached
Step 5: Verify the result for the VPC:
The image shows the example instance we have defined for our virtual private cloud.

The gif show the different configuration we created.

Setup and configure the virtual server instance inside the VPC network
Now we add a virtual server instance (VSI), a floating IP and a data volume (block storage).

Step 1: Configure virtual server instance profile
Now we define the right core and RAM configuration for your workload. By default, a 100 GB boot volume is attached to each instance. (virtual server instance (VSI))

- Name:
vpc-virtual-machine - Resource group:
default - Tag:
vpc-test - Location:
Frankfurt - Type of virtual server:
Public - Operating System:
CentOS - Profile:

Step 2: Create and upload a SSH key
For more details please visit the SSH Key documentation on IBM Cloud.
- Create a SSH Key on your local machine:
ssh-keygen -t rsa -C "root"
Example output:
ssh-keygen -t rsa -C "root"
Generating public/private rsa key pair.
Enter file in which to save the key (/Users/thomassuedbroecker/.ssh/id_rsa): vpc-ibmcloud-ssh-key
Enter passphrase (empty for no passphrase):
Enter same passphrase again:
Your identification has been saved in vpc-ibmcloud-ssh-key.
Your public key has been saved in vpc-ibmcloud-ssh-key.pub.
The key fingerprint is:
SHA256:7FPv44hIfokLkf4YYr645zQXO16DrMkjzbkgcmwsE root
The key's randomart image is:
+---[RSA 3072]----+
|                 |
|        .        |
|.      o .       |
| E  o.o..        |
|. ..o+  S .      |
|o.o..... . .     |
|.+o*++..o.  .    |
| oO=OOo.oo o.    |
|  =@*o=o. ..o.   |
+----[SHA256]-----+
- Add the created SSH key to your virtual server instances.

Copy the content of your just created public key file and add content to a new SSH Key for your machines.
- Name:
vpc-ssh-key - Region:
Frankfurt - Resource group:
default
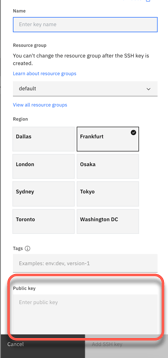
- Now you have added the your ssh key.

Don’t forget where your private key file is located and don’t forget the
passphraseyou used!
Step 3: Add a data volume to your virtual server instance
If you want more storage, create block storage volumes and attach them to your instances. We will create one.
- Name:
vpc-test-data-volume
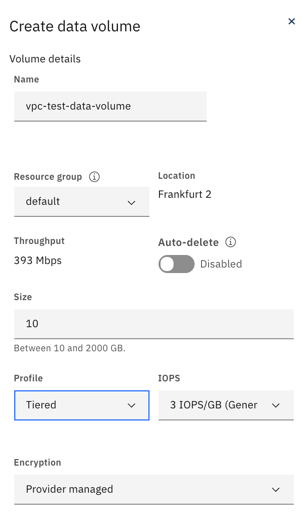
Result:
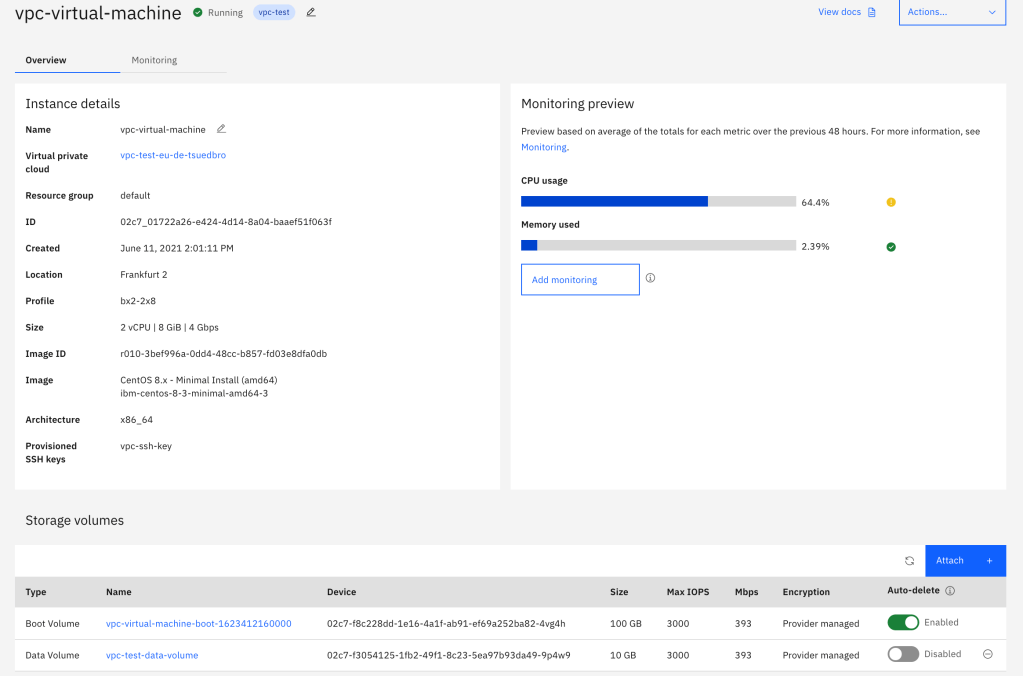
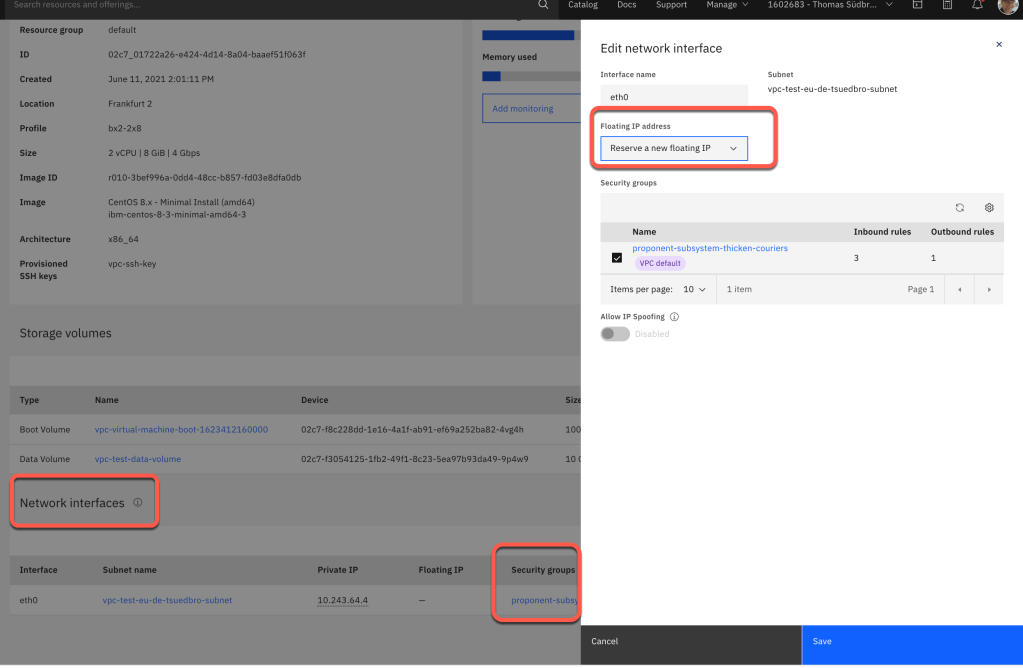
Step 4: Add a floating IP
In network interface you can define the inbound and outbound traffic that’s allowed for instances, configure their security groups, and reserve a floating IP for your virtual server instance. Later we will use this IP to access the virtual server instance from our local machine.
Access the virtual server instance VSI
For more details please visit the documentation access the VPC linux machine on IBM Cloud.
Open a terminal session on you MacOS.
Step 1: Login to IBM Cloud
ibmcloud login
export RESOURCE_GROUP=default
export REGION=eu-de
ibmcloud target -g $RESOURCE_GROUP
ibmcloud target -r $REGION
Step 2: Install the VPC Infrastructure plugin for the IBM Cloud CLI
ibmcloud plugin install vpc-infrastructure
Step 3: Get a list of the existing virtual server instances
ibmcloud is instances
Example output:
Listing instances for generation 2 compute in resource group default and region eu-de under account Thomas Südbröcker's Account as user thomas.suedbroecker@user...
ID                                          Name                  Status    Address       Floating IP       Profile   Image                            VPC                       Zone      Resource group
02c7_01722a26-e424-4d14-8a04-baae51f063f   vpc-virtual-machine   running   10.243.64.4   161.156.165.189   bx2-2x8   ibm-centos-8-3-minimal-amd64-3   vpc-test-eu-de-tsuedbro   eu-de-2   default
Step 4: Copy the floating IP and create an environment variable for the terminal session.
export FLOATING_IP=161.156.165.189
Step 5: Connect to your virtual server instance
Remember where you have saved your SSH private key and your passphrase.
Save the PATH_TO_PRIVATE_KEY_FILE in a variable and use FLOATING_IP to access the virtual server instance from your local machine.
export PATH_TO_PRIVATE_KEY_FILE=/Users/thomassuedbroecker/vpc-ibmcloud-ssh-key
ssh -i $PATH_TO_PRIVATE_KEY_FILE root@$FLOATING_IP
Example output:
Last login: Mon Jun 14 08:05:10 2021 from 79.198.175.88
[root@vpc-virtual-machine ~]#
Step 6: Verify the data volume is available
fdisk -l
Example output:
Disk /dev/vda: 100 GiB, 107374182400 bytes, 209715200 sectors
Units: sectors of 1 * 512 = 512 bytes
Sector size (logical/physical): 512 bytes / 512 bytes
I/O size (minimum/optimal): 512 bytes / 512 bytes
Disklabel type: dos
Disk identifier: 0xf3ec8a95

Device     Boot   Start       End   Sectors Size Id Type
/dev/vda1  *       2048   2099199   2097152   1G 83 Linux
/dev/vda2       2099200 209715199 207616000  99G 8e Linux LVM


Disk /dev/vdb: 10 GiB, 10737418240 bytes, 20971520 sectors
Units: sectors of 1 * 512 = 512 bytes
Sector size (logical/physical): 512 bytes / 512 bytes
I/O size (minimum/optimal): 512 bytes / 512 bytes

...
I hope this was useful for you and let’s see what’s next?
Greetings,
Thomas
#ibmcloud #vpc #vsi #sshkey

This is also a useful link, if you are working with ubuntu tab “autocomplete for new user”
https://serverfault.com/questions/99787/tab-autocomplete-for-new-user
Thanks to Alan for the tip 😉
execute as root user following command: chsh -s /bin/bash brewuser
LikeLike
This is a grreat post
LikeLike