

As fas as I notice from the official IBM Cloud documentation “VPC responsibilities“, there is no official support for a nested Hypervisor listed in the official IBM Cloud documentation (Date 14.09.2021). IBM provides in the official IBM Cloud documentation: How to manually enable nested virtualization on a virtual server instance?, but you can do this on your own risk, as far as I understand for now. For me the nested Hypervisor worked for several times, but it’s not official supported.
This is a cheat sheet about, how to setup a virtual machine or virtual appliance in an IBM Cloud virtual private cloud (vpc) on a virtual server instance (vsi) with Red Hat Enterprise Linux 8 minimal install (RHEL8) as host operating system and a Ubuntu Linux operating system for the virtual machine or virtual appliance. I reuse different blog posts and references to documentations on IBM Cloud or Red Hat and I use the information from an exchange with Stefan Trimborn and Marc Haecker. (Thanks and greetings Stefan and Marc ;-))
This blog post covers the setup until the network configuration for the virtual machine (vm) or virtual appliance (va) to access for example a web application from the internet, which runs in the vm or va.
The image below shows a simplified diagram of the setup on IBM Cloud:

These are the simplified steps in a sequence for the setup:
- Create a vpc and vsi on IBM Cloud.
- Connect to the vsi using the ssh connection.
- Add the Red Hat KVM to Red Hat Enterprise Linux minimal install.
- Upload an ISO image from your local machine to the vsi.
- Setup the vm in the Kernel-based Virtual Machine (KVM).
- Start the vm.
- Connect to the
vmfrom our local computer with ssh connection and port binding to the VNC Client. - Install a VNC client on your computer.
- Connect with VNC client to the vm.
1. Create a vpc and vsi on IBM Cloud
My older blog post, which we find here, contains a cheat sheet how to do the major steps of the setup. The difference to that older blog post is: we don’t use a CentOS for the vsi, in this new blog post we use the Red Hat Enterprise Linux minimal install when we create the vsi.
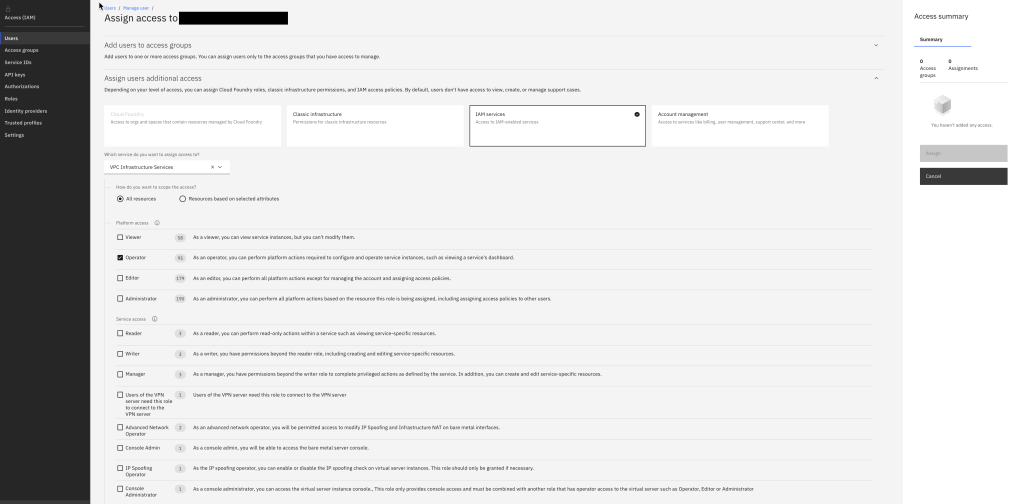
In addition, we should ensure we have the access rights to connect to the vsi from the IBM Cloud console to the instance using serial consoles or VNC. Therefor we need to configure our IBM Cloud user role. To do this we can follow the steps in the IBM Cloud documentation Accessing virtual server instances by using VNC or serial consoles.
2. Connect to the vsi using the ssh connection
During the setup on IBM Cloud we uploaded a ssh key to IBM Cloud and we bind this ssh key to our vsi. Now we will use this ssh key to access the vsi from our local machine.
a) Log on to IBM Cloud and list exsting virtual server instances
We log on to the IBM Cloud using the IBM Cloud CLI on our local machine.
ibmcloud login #-sso
export RESOURCE_GROUP=default
export REGION=us-south
export VSI_NAME=EXAMPLE
ibmcloud target -g $RESOURCE_GROUP
ibmcloud target -r $REGION
ibmcloud is instances
b) Extract the external IP (FLOATING_IP) using the IBM Cloud CLI
export FLOATING_IP=$(ibmcloud is instances | awk '/EXAMPLE/ {print $5;}')
echo $FLOATING_IP
c) Search for existing ssh keys on our MacOS, which we uploaded to IBM Cloud before
cd ~/.ssh
ls
d) Now we connect to the vsi by using the ssh connection
export PATH_TO_PRIVATE_KEY_FILE="~/.ssh/EXAMPLE"
ssh -i $PATH_TO_PRIVATE_KEY_FILE root@$FLOATING_IP
3. Add the Red Hat KVM to Red Hat Enterprise Linux minimal install
The KVM is included to a Red Hat Enterprise Linux 8.x subscription, which is included to our vsi creation. We find a guide for the installation in the Red Hat documentation Virtualization in Red Hat Enterprise Linux 8 getting started.
Here is the relevant extraction from the documentation.
yum module install virt
yum install virt-install virt-viewer
systemctl enable libvirtd
systemctl start libvirtd
virt-host-validate
4. Upload an iso image from your local machine to the vsi.
We maybe have already downloaded a vm or va on our local machine, which we want to run in the KVM.
a) We use secure copy (scp) to upload the image to the vsi on IBM Cloud.
scp '/Users/$USER/example.iso' root@$IPADRESS:/home
Maybe we need to edit “known_hosts” file, if it’s the case that we need to delete existing fingerprints for the ssh connections.
nano ~/.ssh/known_hosts
For example, if we face a problem ssh : Permission denied (publickey,gssapi-with-mic), the linked
stackoverflowentry contains a guide how to solve it.
b) Add an existing ssh key
We can add an existing ssh key simply with ssh-add command.
cd ~/.ssh/
ls
ssh-add <SSH private key>
ssh-add <SSH public key>
5. Setup the vm or va in the KVM
Now the image is uploaded and we can setup the vm or va. Here we use virt-install command. Here are some useful virsh commands.
In this example case we don’t focus on the network setup on Red Hat Enterprise Linux KVM host system. Here is an example command to setup a va in our the given KVM.
sudo virt-install --name=EXAMPLE --arch=x86_64 --vcpus=8,cores=8 --memory=10240 --os-type=linux --os-variant=ubuntunatty --hvm --virt-type=kvm --connect=qemu:///system --network type=bridge,source=virbr0,model=e1000 --network type=bridge,source=virbr0,model=e1000 --network type=bridge,source=virbr0,model=e1000 --accelerate --cdrom=/home/EXAMPLE.iso --disk path=/home/EXAMPLE.qcow2,size=50,format=qcow2,cache=none,io=native --graphics vnc --noautoconsole --check all=off
6. Start the vm or va
Here are some of the virsh commands to work with the vm or va
- Start the
vm
sudo virsh start EXAMPLE
- Verify the
vmis running
virsh list
 Id   Name     State
------------------------
 1    EXAMPLE   running
- Show the
vminformation
virsh dominfo EXAMPLE
7. Connect to the vm from our local computer with ssh connection and port binding to the VNC Client
We have the challenge that we want to use a ssh key to connect to our vsi running on IBM Cloud using te command line. We haven’t installed a graphical user interface on the vsi. That means we don’t use a user and password to connect to vsi, but our vm has a graphical user interface and we want to connect to this graphical user interface.
We need a way to connect to vsi using a ssh connection and we link the VNC port in vsi to connect the graphical user interface of the vm.
In the vsi by default a VNC Server is installed and configured. We open a new terminal session on our local computer and connect to the vm by binding the Virtual Network Computing (VNC) port to our localhost using the parameter -L 5001:127.0.0.1:5900 for the Transmission Control Protocol (TCP).
Here we find the documentation for the binding of the ssh command -L [bind_address:]port:host:hostport[-L address] paramater and here is the port number documentation and the Port 5001 definition.
export PATH_TO_PRIVATE_KEY_FILE="~/.ssh/example"
ssh -i $PATH_TO_PRIVATE_KEY_FILE root@$FLOATING_IP -L 5001:127.0.0.1:5900
8. Install a VNC client on your computer
Now we install a VNC Client on our local computer.
9. Connect with VNC client to the vm
We open the VNC client and connect to the 127.0.0.1:5001 linked port.

Summary
We need to know different technologies and networking topics, when we going to setup a vm or va on a vsi on IBM Cloud or other clouds. This cheat sheet stops before we setup an example web application on our vm or va and doing the needed network configuration on the vsi the KVM and the vm or va. Maybe this will be a part of a future blog post.
I hope this was useful for you and let’s see what’s next?
Greetings,
Thomas
PS: If you run in trouble use the “Troubleshooting virtual server instances for VPC” in the IBM Cloud documentation: How to manually enable nested virtualization on a virtual server instance?
#ibmcloud, #vpc, #vsi, #vm, #vpc, #kvm, #rhel8
Optional: Add the GUI to the minimal RHEL 8
STEP 1: List the given repositories
dnf repolist
Example output should include `rhel-8-for-x86_64-appstream-rpms` and `rhel-8-for-x86_64-baseos-rpms`.
updating Subscription Management repositories.repo id repo namerhel-8-for-x86_64-appstream-rpms
Red Hat Enterprise Linux 8 for x86_64 - AppStream (RPMs)rhel-8-for-x86_64-baseos-rpms Red Hat
Enterprise Linux 8 for x86_64 - BaseOS (RPMs)rhel-8-for-x86_64-supplementary-rpms Red Hat
Enterprise Linux 8 for x86_64 - Supplementary (RPMs)
STEP 2: Install the GUI to the Server
dnf groupinstall "Server with GUI"
systemctl set-default graphical
reboot

Maybe it’s also useful to
1) Enable cockpit (https://www.redhat.com/sysadmin/intro-cockpit) and register for insights
Open the cockpit with: https://YOUR_FLOATING_IP:9090/
2) Change user password for the `vpcuser` to logon with the Cockpit
LikeLike
Maybe it’s also useful to add the GUI:
1) Connect to the machine
2) List the given repositories dnf
3) Verify the repository:
Example output:
4) Add UI and reboot
LikeLiked by 1 person
Maybe in that context also interesting to you:
HOW TO SETUP A VIRTUAL MACHINE OR VIRTUAL APPLIANCE IN AN IBM CLOUD VIRTUAL PRIVATE CLOUD (VPC) ENVIRONMENT ON A VIRTUAL SERVER INSTANCE (VSI)? (NESTED HYPERVISOR)
https://suedbroecker.net/2021/09/05/how-to-setup-a-virtual-machine-or-virtual-appliance-in-an-ibm-cloud-virtual-private-cloud-vpc-on-a-virtual-server-instance-vsi/
LikeLike