

Generative AI opens many opportunities to address various business use cases. Therefore, you often need to run a Generative AI model on a Graphics Processing Unit (GPU). The transformer used in Generative AI needs intensive computing power. (Helpful blog post: Why GPUs Are Great for AI). IBM Cloud provides an easy instantiation with a Virtual Server Instance (VSI) in a Virtual Private Cloud on demand. This blog post is a short guide: How to set up a Virtual Server Instance (VSI) with a GPU on IBM Cloud?
With a Virtual Server Instance (VSI), you only pay per usage and don’t have an upfront cost. It is available in minutes (when a GPU is available ;-), ideal for testing or short-term usage.
Structure of this blog post:
- Create and configure a Virtual Private Cloud
- Create a VSI with a GPU
- Access the remote machine with SSH from your local machine
- Helpful components to install in the VSI
- Enable the Ubuntu OS system to access the GPU
- Verify if the GPU is accessible from a Python application
Note: In addition, here is a blog post from Niklas Heidloff Deploying a Virtual Server with GPU in the IBM Cloud
1. Create and configure a Virtual Private Cloud
The blog post How to create a single Virtual Server Instance (VSI) in a Virtual Private Cloud (VPC) Infrastructure on IBM Cloud shows how to create a Virtual Private Cloud and Visual Service Instance.
- Here is an example configuration for a
Virtual Private Cloud:- Region:
eu-de - Location:
Frankfurt-3 - Others:
Subnet, Access Control List, Security Group, Floating IP, Public Gateway, Routing Table
- Region:
2. Create a VSI with a GPU
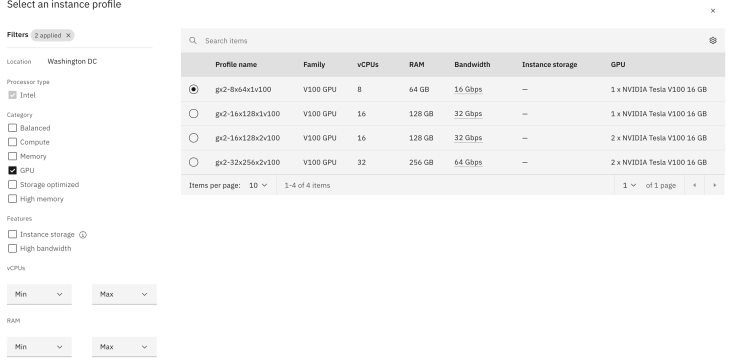
When you define the configuration for a Virtual Server Instance select Change the image profile. In the following dialog, mark the GPU option to see the available GPU options for the VSI. The image below shows the available GPU options at the moment.
The image below shows an example configuration.
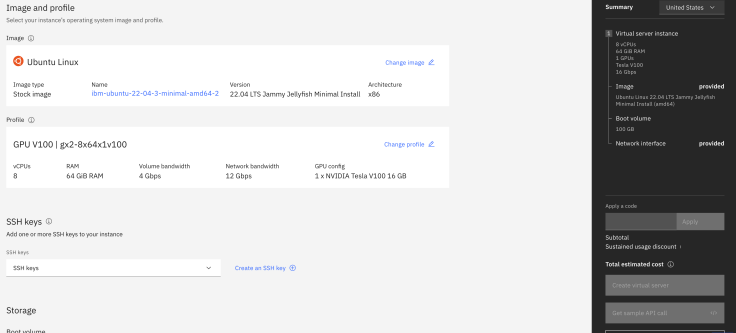
- Example Virtual Server Instance (VSI) configuration:
- OS:
Ubuntu Linux 22.04 LTS Jammy Jellyfish Minimal Install (amd64) - Machine:
Intel | x86_64 | 8 vCPU | 64 GiB | 16 Gbps - GPU:
Tesla V100-PCIE-16GB - SSH Keys:
3
- OS:
3. Access the remote machine with SSH from your local machine
export FLOATING_IP="YOUR_IP"
export RSA_FILE=YOUR_KEY
export REMOTE_USER=root
chmod 400 ~/.ssh/${RSA_FILE}
eval $(ssh-agent -s)
ssh-add ~/.ssh/${RSA_FILE}
ssh -i ~/.ssh/${RSA_FILE} ${REMOTE_USER}@${FLOATING_IP}
4. Helpful components to install in the VSI
These may be helpful packages to install on the Ubuntu OS.
apt update -y
apt install -y docker-compose
apt install -y git
apt install -y python3-pip
apt install -y net-tools
apt install -y jq
apt-get install -y python3-venv
5. Enable the Ubuntu OS system to access the GPU
For NVIDIA follow the installation instructions The image below shows an example of a possible selection for an installation.
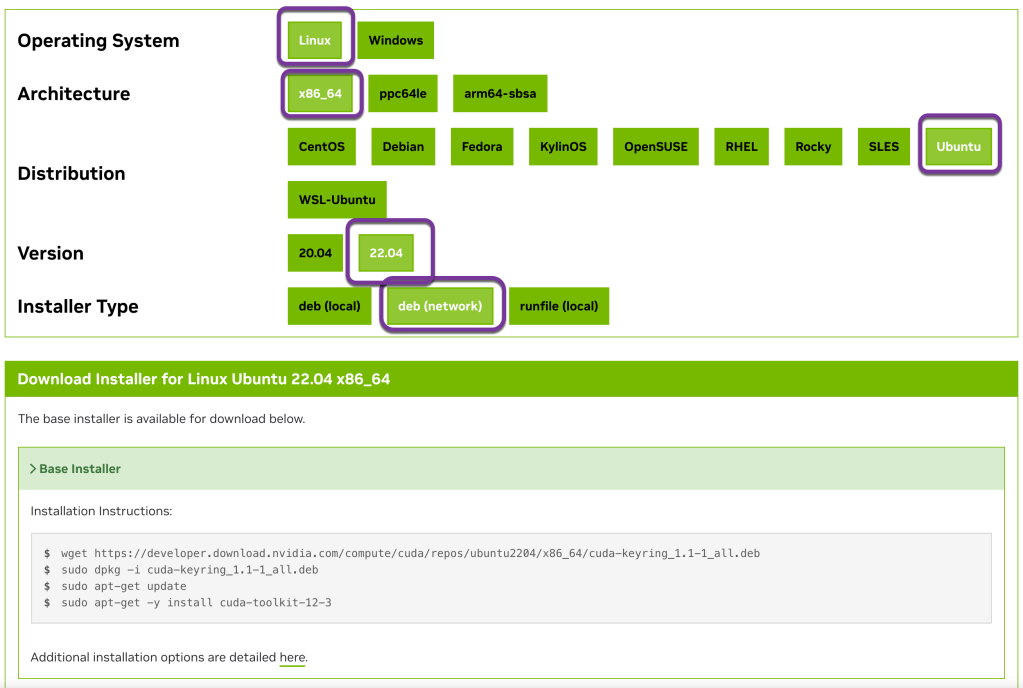
The following code is an extract of the commands for the selection in the image above (Januar 2024):
wget https://developer.download.nvidia.com/compute/cuda/repos/ubuntu2204/x86_64/cuda-keyring_1.1-1_all.deb
sudo dpkg -i cuda-keyring_1.1-1_all.deb
sudo apt-get update
sudo apt-get -y install cuda-toolkit-12-3
- Driver installation
sudo apt-get install -y cuda-drivers
- Verify the installation
lspci | grep -i nvidia
lshw | grep nvidia
nvidia-smi
Example output for nvidia-smi:
+---------------------------------------------------------------------------------------+
| NVIDIA-SMI 545.23.08              Driver Version: 545.23.08    CUDA Version: 12.3     |
|-----------------------------------------+----------------------+----------------------+
| GPU  Name                 Persistence-M | Bus-Id        Disp.A | Volatile Uncorr. ECC |
| Fan  Temp   Perf          Pwr:Usage/Cap |         Memory-Usage | GPU-Util  Compute M. |
|                                         |                      |               MIG M. |
|=========================================+======================+======================|
|   0  Tesla V100-PCIE-16GB           Off | 00000000:04:01.0 Off |                    0 |
| N/A   37C    P0              40W / 250W |      0MiB / 16384MiB |      3%      Default |
|                                         |                      |                  N/A |
+-----------------------------------------+----------------------+----------------------+

+---------------------------------------------------------------------------------------+
| Processes:                                                                            |
|  GPU   GI   CI        PID   Type   Process name                            GPU Memory |
|        ID   ID                                                             Usage      |
|=======================================================================================|
|  No running processes found                                                           |
+---------------------------------------------------------------------------------------+
- (Optional) Remove all downloaded models from Huggingface
ls -a ~/.cache/huggingface/hub/
rm -rf ~/.cache/huggingface/hub/
- (Optional) Change the Huggingface cache location
Verify your existing model location.
huggingface-cli scan-cache

REPO ID                                REPO TYPE SIZE ON DISK NB FILES LAST_ACCESSED LAST_MODIFIED REFS LOCAL PATH
-------------------------------------- --------- ------------ -------- ------------- ------------- ---- -------------------------------------------------------------------------
TheBloke/CodeLlama-13B-instruct-GPTQ   model             7.3G        3 2 days ago    2 days ago    main /text-to-sql/hfmodels/hub/models--TheBloke--CodeLlama-13B-instruct-GPTQ
export HF_HOME=/[your_cache_dir]

               or

ln -s /[your_cache_dir]/hub ~/.cache/huggingface
- (Optional) Add the location to your bash configuration file
nano nano ~/.bashrc
# Add custom model location for Hugging Face
export HF_HOME=/[your_cache_dir]
6. Verify if the GPU is accessible from a Python application
python3 -m pip install torch
cd /
mkdir gpu-test
nano /gpu-test/simple-gpu-test.py
Copy and paste the following code into the simple-gpu-test.py file.
import torch

print(f"{torch.cuda.is_available()}")
print(f"{torch.cuda.device_count()}")
print(f"{torch.cuda.current_device()}")
print(f"{torch.cuda.device(0)}")
print(f"{torch.cuda.get_device_name(0)}")
Execute:
python3 /gpu-test/simple-gpu-test.py
I hope this was useful to you and let’s see what’s next?
Greetings,
Thomas
#python, #gpu, #ai, #ibmcloud ,#vsi, #virtualserver, #virtualprivatecloud, #vpc, #aiapplication
