

The blog post discusses adding a custom TypeScript tool, TravelAgentTool, to the Bee API and UI, as an example for enhancing the Bee Framework capabilities. It outlines the steps for integration, including modifying various source files, configuring environment variables, and demonstrating the tool’s functionality in a travel inquiry scenario. Detailed code instructions are provided for setup.
With this in mind we see possible development contribution to the core Bee system of the Bee API and Bee UI by using a custom tool you may build with TypeScript and the Bee Framework.
For this example, we use the TravelAgentTool from the blog post Bee Agent example for a simple travel assistant using a custom tool and observe the agent behavior in detail (Bee Framework 0.0.34 and watsonx.ai).
This TravelAgentTool will be added to the Bee API and the Bee UI. We will use the OutOfTheBox tool for the weather OpenMeto of the Bee Framework.
- We will be able to answer the question again:
What is the best city to visit Europe and what is the current temperature in this city?
- Answer:
The best city to visit in Europe is Rome, Italy. The current temperature in Rome is 12.4°C.
The GIF below shows the interaction.

We will change two parts in the Bee Stack.
These instructions are not intended to be the best practices for adding TypeScript tools in the future; this is only about how it currently works by changing the system settings and source code of the Bee Stack. We know there is a different approach for Python tools.
The initial information for this customization is based on the pull request made by Heinz Busch in the Bee API. Heinz and I used these initial instructions to finalized it and to get it work with the TravelAgentTool return values of a JSON array as a text, in the finalizeToolCall function, as we see later.
Note: This was verified with MacOS installed and Podman as the container engine, Bee API (v0.0.14) and Bee UI (v0.0.6). In case of problems please verify the documentation inside the cloned and working repositories.
Table of content
- Prerequisites
- Add the TravelAgentTool to the Bee API
- Copy and past the tool to the Bee API folder
- Add an entry to the environment variable for the Bee API
- Add the TravelAgentTool to the SystemTools definition src/tools/entities/tool-calls/system-call.entity.ts file
- Configure the TravelAgentTool usage in the src/runs/execution/tools/helpers.ts file
- Set the TravelAgentTool in the handlers in src/tools/tools.service.ts file
- Make the TravelAgentTool available in listTools
- Start the Bee API
- Add the TravelAgentTool to the Bee UI
- Add the TravelAgentTool to the UI system schema in the src/app/api/schema.d.ts file
- Add the TravelAgentTool to SYSTEM_TOOL_NAME and SYSTEM_TOOL_ICONSin src/modules/tools/hooks/useToolInfo.tsx file
- Build and Start the UI
- Use the TravelAgentTool and OpenMeteoTool in the Bee UI
- Click New bee +
- Give the new Bee Agent a name
- Delete all current tools
- Add our TravelAgentTool and OpenMeteoTool
- Now save the Bee Agent
- Ask the question and inspect the output in the Bee API’s console and Bee UI
- Summary
Here is a related 43 min video to this blog post.
1. Prerequisites
- We need to prepare the development environment for the Bee UI and Bee API
- We should know what the
TravelAgentTooldoes.
2. Add the TravelAgentTool to the Bee API
We need to configure the following TypeScript files in the Bee API repository.
bee-api/src/runs/execution/tools/helpers.tsbee-api/src/tools/entities/tool-calls/system-call.entity.tsbee-api/src/tools/tools.service.ts
Here is a simplified architecture overview of the relevant Bee API source code.

Step 1: Copy and past the tool to the Bee API folder
Copy and past the travel_agent_tools.ts file from the watsonx AI platform demos to the src/runs/execution/tools directory.
We must insert the prefix “TOOL_” in the copied tool source code.
The TravelAgentTool uses a different model in watsonx.ai, so we need to indicate this.
    const llm_granite = new WatsonXLLM({
            modelId: "ibm/granite-13b-chat-v2",
            projectId: process.env.TOOL_WATSONX_PROJECT_ID,
            baseUrl: process.env.TOOL_WATSONX_BASE_URL,
            apiKey: process.env.TOOL_WATSONX_API_KEY,
            parameters: {
                decoding_method: "greedy",
                max_new_tokens: 500,
                stop_sequences: ["]\n"],
                repetition_penalty: 1,
            },
    });
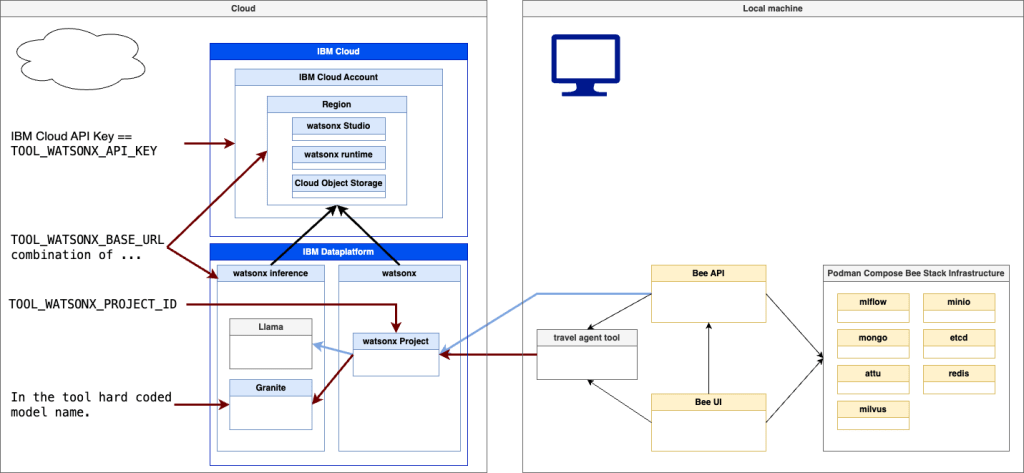
Here is a bit background to this we will access to models inside watsonx.ai with runs with service of IBM Cloud in this case.
One model is for the basic Bee Agent we configure with the
Step 2: Add extra entries to the environment variables for the Bee API and configure the model access for the basic Bee Agent in the Bee API
- Bee Agent watsonx model
# https://www.ibm.com/products/watsonx-ai
export WATSONX_REGION="eu-de"
export WATSONX_PROJECT_ID="YOUR_PROJECT_ID"
export WATSONX_API_KEY="YOUR_IBM_CLOUD_API_KEY"
export WATSONX_MODEL="meta-llama/llama-3-1-70b-instruct"
The following simplified architecture diagram shows the context for using these variables.
- The WATSONX_API_KEY is the IBM Cloud API key we need to access the IBM Cloud Services used to run watsonx.ai. This key is related to an IBM Cloud Account.
- The WATSONX_REGION reflects the REGION where the relevant watsonx runtime service runs on the related IBM Cloud account.
- The WATSONX_PROJECT_ID reflects the Watsonx project you can access on watsonx.ai.
- The WATSONX_MODEL reflects a valid name of a model in watsonx, which you can access on watsonx.ai.

- TravelAgentTool watsonx model
Add additional entries to the environment variables for the Bee API in the file bee-api/.env because we need additional variables in the TravelAgentTool to ensure we are independent of the Bee Agent model configuration. We need to reflect this in the environment variables when we maybe using various watsonx projects and IBM Cloud Account for the tool and the Bee Agent.
...
# Tool
export TOOL_WATSONX_BASE_URL=https://eu-de.ml.cloud.ibm.com
export TOOL_WATSONX_PROJECT_ID=YOUR_YOUR_WATSONX_PROJECT_ID_FOR_THE_TOOL"
export TOOL_WATSONX_API_KEY="YOUR_IBM_CLOUD_API_KEY_FOR_THE_TOOL"
...
The following simplified architecture diagram shows the context for using these new variables. The difference in usage is only in the TOOL_WATSONX_BASE_URL. This URL contains the full information to access the right watsonx runtime service on IBM Cloud in the right region.
TOOL_WATSONX_BASE_URL=https://eu-de.ml.cloud.ibm.com
Step 3: Add the TravelAgentTool to the SystemTools definition bee-api/src/tools/entities/tool-calls/system-call.entity.ts file
In the following source code file, we will redefine the Definition of SystemTools.
...
export enum SystemTools {
  WEB_SEARCH = 'web_search',
  WIKIPEDIA = 'wikipedia',
  WEATHER = 'weather',
  ARXIV = 'arxiv',
  READ_FILE = 'read_file',
  // *** START ***
  TRAVEL_AGENT = 'travel_agent_tool'
  // *** END ***
}
...
Step 4: Configure the TravelAgentTool usage in the bee-api/src/runs/execution/tools/helpers.ts file
This helpers.ts file contains the information on which tools are available out of the box of an agent.
There are three relevant functions in the source code helpers.ts:
- getTools
- createToolCall
- finalizeToolCall
- Add import statement for the
TravelAgentTool
The following code is an extract of the source code, and shows where we need to change the source code.
...
import { Loaded, ref, Ref } from '@mikro-orm/core';
import { unique } from 'remeda';
import { ORM } from '@/database.js';
// Insert this code
// *** START ***
import { TravelAgentTool } from './tools/travel_agent_tools.js';
// *** END ***
...
- Add the new tool to the tool list in
getTools
The function getTools contains an array of the available tools in the Bee API at startup. Here, we add our tool.
The following code is an extract of the source code, and shows where we need to change the source code.
...
export async function getTools(run: LoadedRun, context: AgentContext): Promise<FrameworkTool[]> {
const tools: FrameworkTool[] = [];
const vectorStores = getRunVectorStores(run.assistant.$, run.thread.$);
for (const vectorStore of vectorStores) {
vectorStore.lastActiveAt = new Date(); // side effect
}
// Add the TravelAgentTool to the list
// *** START ***
const travelAgentUsage = run.tools.find(
(tool): tool is SystemUsage =>
tool.type === ToolType.SYSTEM && tool.toolId === SystemTools.TRAVEL_AGENT
);
if (travelAgentUsage) {
tools.push(new TravelAgentTool());
}
// *** END ***
...
- Add the tool in
createToolCallfunction
In this function, we define when a TravelAgentTool will be instantiated. So, we need to add an additional else if to create an instance.
The following code is an extract of the source code, and shows where we need to change the source code.
...
if (tool instanceof FileSearchTool) {
    return new FileSearchCall({
 input: await tool.parse(input).then((result) => result.query)
 });
 } // New TravelAgentTool entry
    // *** START ***
    else if (tool instanceof TravelAgentTool) {
    return new SystemCall({
 toolId: SystemTools.TRAVEL_AGENT,
 input: await tool.parse(input)
 });
 }
  // *** END ***
...
- Add the tool in
finalizeToolCallfunction
Here, we need to ensure how our agent response result is handled in the Bee API. In this situation, we use the basic ‘ToolOutpot’ to double-check the return given by a tool. The return value of the TravelAgentTool will provide only text, even when the text contains a JSON array as a return result. It works.
With the logs in the code, you can inspect the return value provided by the Bee API. The image below shows a screenshot of the terminal output.
...
if (toolCall instanceof SystemCall) {
    switch (toolCall.toolId) {
      // Add the TravelAgentTool in the `switch` statement
      // ** Begin **
      case SystemTools.TRAVEL_AGENT: {
 console.log("LOG 'SystemTools.TRAVEL_AGENT'  result: " + result)
        // result can be an instance of arbitrary class
        // here we use the basic 'ToolOutpot' to double check the return was given by a tool and it will provide only text.
        if (!(result instanceof ToolOutput)) throw new TypeError();
 console.log("LOG SystemTools result.result: " + result)
 toolCall.output = result;
        break;
 }
      // *** END ***
...
Step 5: Set the TravelAgentTool in the handlers in bee-api/src/tools/tools.service.ts file
Here, we will configure the following two functions.
- getSystemTools
- listTools
- Import the
TravelAgentTool
...
import { TravelAgentTool } from '@/runs/execution/tools/travel_agent_tools.js';
...
- Create an instance of the
TravelAgentToolin thegetSystemToolsfunction
...
function getSystemTools() {
  // New entry for the travelAgentTool
  // *** START ***
  const travelAgentTool = new TravelAgentTool();
  // *** END ***
...
- Set the
TravelAgentToolat the end ofgetSystemTools
That code finally adds the tool to the system setting.
...
 const systemTools = new Map<string, SystemTool>();

 // Additional the TravelAgentTool as an additional system
 // *** START ***
systemTools.set(SystemTools.TRAVEL_AGENT, {
type: ToolType.SYSTEM,
id: SystemTools.TRAVEL_AGENT,
createdAt: new Date('2024-12-04'),
...travelAgentTool,
inputSchema: searchTool.inputSchema.bind(travelAgentTool),
isExternal: true,
metadata: {
$ui_description_short: 'Retrieve real-time questions results from an LLM model running in watsonx.ai with a travel agent prompt.'
},
userDescription:
     "Retrieve real-time question results from an LLM model running in watsonx.ai with a travel agent prompt."
});
 // *** END ***
...
Step 6: Make the TravelAgentTool available in listTools
 ...
   const systemTools: (SystemTool | undefined)[] =
 !type || type.includes(ToolType.SYSTEM)
 ? [
 allSystemTools.get(SystemTools.WEB_SEARCH),
 allSystemTools.get(SystemTools.WIKIPEDIA),
 allSystemTools.get(SystemTools.WEATHER),
 allSystemTools.get(SystemTools.ARXIV),
 allSystemTools.get('read_file'),
           // add this line
           // *** START ***
 allSystemTools.get(SystemTools.TRAVEL_AGENT)
           // *** END ***
 ]
 : [];
 ...
Step 7: Start the Bee API
It should start without any errors.
./bee-api/pnpm start:dev
- Open a browser and Bee API swagger UI
http://0.0.0.0:4000/docs
- Log on to the
Bee APIusing the JWT token from the Bee UI.envfile - Execute the method GET
v1/tools
You now should find the TravelAgentTool in the result.

3. Add the TravelAgentTool to the Bee UI
To add TravelAgentTool to the Bee UI, we need to touch following source code:
bee-ui/src/app/api/schema.d.tsbee-ui/src/modules/tools/hooks/useToolInfo.tsx
Here is a simplified overview of the relevant Bee UI source code.

Step 1: Add the TravelAgentTool to the UI system schema in the src/app/api/schema.d.ts file
The name here “travel_agent_tool” must be the same as in “Step 2” the bee-ui/src/modules/tools/hooks/useToolInfo.tsx file.
Search and replace in the entire file for:
"web_search" | "wikipedia" | "weather" | "arxiv" | "read_file"
Replace it with:
"web_search" | "wikipedia" | "weather" | "arxiv" | "read_file" | "travel_agent_tool"
Step 2: Add the TravelAgentTool to SYSTEM_TOOL_NAME and SYSTEM_TOOL_ICONS in bee-ui/src/modules/tools/hooks/useToolInfo.tsx file
To enable system-wide access, we added the following entries to the code.
 const SYSTEM_TOOL_NAME: Record<SystemToolId, string> = {
 wikipedia: 'Wikipedia',
 web_search: 'WebSearch',
 weather: 'OpenMeteo',
 arxiv: 'Arxiv',
 read_file: 'ReadFile',
   // add this line
   // *** START ***
 travel_agent_tool: 'TravelAgent',
   // *** END ***
 };
 const SYSTEM_TOOL_ICONS: Record<SystemToolId, ComponentType> = {
 wikipedia: Wikipedia,
 web_search: IbmWatsonDiscovery,
 weather: PartlyCloudy,
 arxiv: Arxiv,
 read_file: DocumentView,
   // add this line
   // *** START ***
 travel_agent_tool: Code,
   // *** END ***
 };
Step 3: Build and Start the UI
We can ensure that the UI can be compiled, before we start the Bee UI in the development mode.
./bee-ui/pnpm build
./bee-ui/pnpm start:dev
4. Use the TravelAgentTool and OpenMeteoTool in the Bee UI
We create a new Bee Agent to answer this question:
What is the best city to visit Europe and what is the current temperature in this city?
Step 1: Click New bee +

Step 2: Give the new Bee Agent a name
- Name:
MyTravelAgent - Description:
This Agent is an example of adding a custom TypeScript tool and using an OutOfTheBox tool.

Step 3: Delete all current tools
We want to ensure only our TravelAgentTool and OpenMeteoTool will be used.

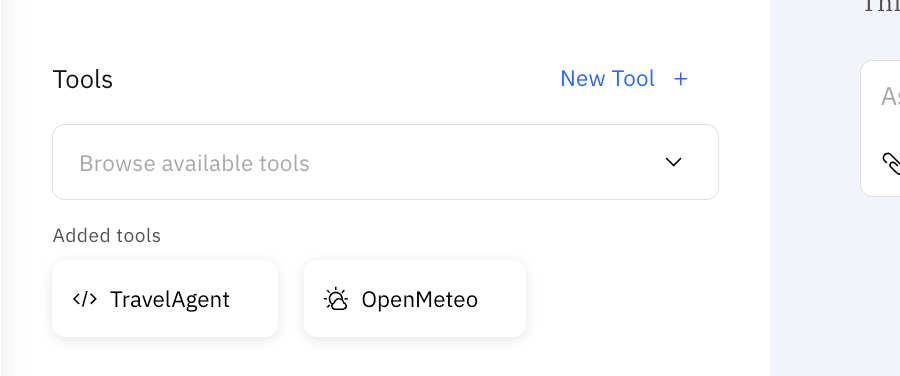
Step 4: Add our TravelAgentTool and OpenMeteoTool
As you can see, the TravelAgentTool is available with the icon code.

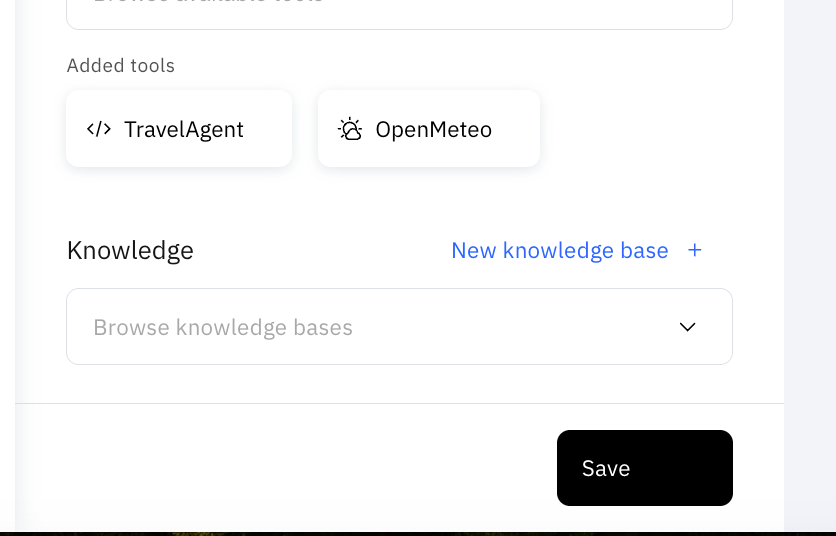
Step 5: Now save the Bee Agent
Step 6: Ask the question and inspect the output in the Bee API’s console and Bee UI
- Bee UI

- Bee API

5. Summary
These steps gave us an understanding of how we can currently add a TypeScript custom tool natively to the Bee system stack by changing the source code for the Bee API and the Bee UI.
It is incredible what powerful Bee Stack already provides for building and using Agent in various ways. So, I agree with the mission, and I like how far they are currently.
“Bee The open-source platform for building powerful agentic workflows with open-source models”
I hope this was useful to you and let’s see what’s next?
Greetings,
Thomas
#watsonx, #typescript, #ai, #ibm, #agents, #ai, #beagentframework, #beagent, #aiagents, #podman, #tools, #agents, #mlflow, #beeui, #beeapi, #customtool

FYI: Related to … Step 1: Add the
TravelAgentToolto the UI system schema in the src/app/api/schema.d.ts fileFor the newer Bee – UI version 2024.12.18 you need to search for “web_search” | “wikipedia” | “weather” | “arxiv” | “read_file” | “llm” | “calculator” changes which works with the Pull Request.
Then replaces it with “web_search” | “wikipedia” | “weather” | “arxiv” | “read_file” | “llm” | “calculator”
| "travel_agent_tool"LikeLike