

In that blog post I want to highlight how I did my first configuration of the App Identity and Access Adapter for Istio Mixer in my Cloud Native Starter system on a free IBM Cloud Kubernetes cluster.
In my last blog post I described how I did the installation of the App Identity and Access Adapter.
Once more I want to highlight, that the cool thing from my perspective of App Identity and Access Adapter is “that the adapter can be configured to work with any OIDC compliant identity provider, which enables it to control authentication and authorization policies in all environments including frontend and backend applications. And, it does it all without any change to your code or the need to redeploy your application.”
I did a combination of the steps from the videos inside the IBM Cloud App ID service documentation and of the videos from Anton Aleksandrov. With that in mind I applied needed changes of that configurations in the videos to run it on our Cloud Native Starter setup.
Here are the main steps I did to secure the “front end” example helloworld application.
(more details on github about protecting frontend apps)
- Install App Identity and Access Adapter for Istio Mixer
- Setup App ID
- Setup the example helloworld application
- Configuration of Ingress and Istio
- Open the helloworld application from the internet
- Configuration of the App Identity and Access Adapter
- Configuration of the redirect URL for of the App ID service
2. Setup App ID
First I followed the setup of App ID in our Cloud Native Starter example Demo Authentication to setup the IBM Cloud AppID service. Then I used that IBM App ID instance configuration to secure the access to the helloword application.
3. Setup the example helloworld application
Let’s start with the deployment of the helloword application from Anton Aleksandrov . The following step are very close to our 1h Cloud Native Starter hands-on workshop , please take a look in that workshop to get more details from lab 4.
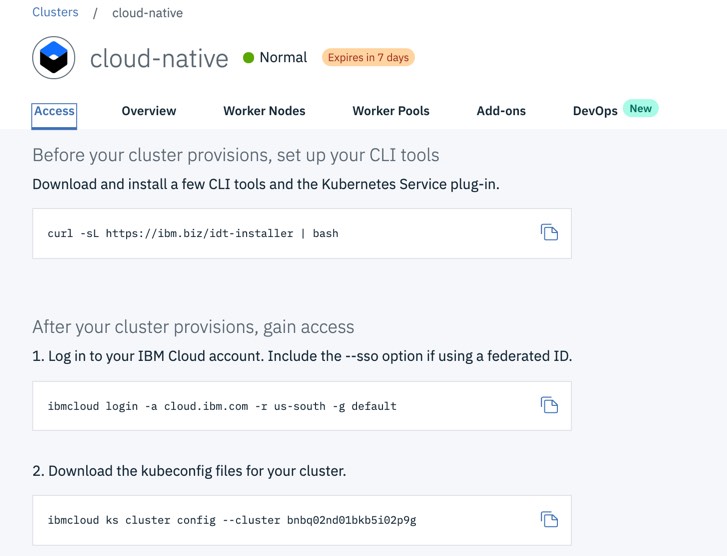
1. I opened a terminal and I logged on to my Kubernetes cluster, by just following the documented steps in my free cluster, as you see in the following image.
2. Then I ensured that I was in the default Kubernetes namespace inside my terminal instance.
$ kubectl config set-context --current --namespace=default
$ kubectl config view --minify | grep namespace
3. Then I deployed the helloword application.
$ kubectl apply -f 1-deployment.yaml
Here is the Kubernetes deployment definition, that contains the location of the container image of the helloworld example.
kind: Deployment
apiVersion: apps/v1beta1
metadata:
  name: helloworld
spec:
  replicas: 1
  template:
    metadata:
      labels:
        app: helloworld
        version: v1
    spec:
      containers:
      - name: helloworld
        image: antonal80/hello-world-web-app:latest
        ports:
        - containerPort: 3000
4. Now I deployed the service for that example application.
$ kubectl apply -f 2-service.yaml
That is the content of the 2-service.yaml.
kind: Service
apiVersion: v1
metadata:
  name: helloworld
spec:
  selector:
    app: helloworld
  ports:
    - port: 3000
      name: http
      protocol: TCP
  type: NodePort
4. Configuration of Ingress and Istio
The following content is very close to the Cloud Native Starter workshop content of the lab 4 traffic management, please take a look into the workshop to get more details.
1. Then I configured Istio Ingress to find the helloword application inside Kubernetes.
$ kubectl apply -f 3-ingress.yaml
Here is configuration of for that virtual service.
apiVersion: networking.istio.io/v1alpha3
kind: VirtualService
metadata:
  name: helloworld
spec:
  hosts:
  - helloworld

  http:
  - route:
    - destination:
        host: helloworld
        subset: v1
2. Now it was time to configure the Istio Ingress mapping to access the helloworld application from the internet.
$ kubectl apply -f 4-istio-ingress-service-mapping.yaml
Here is the relevant part of that file.
apiVersion: networking.istio.io/v1alpha3
kind: VirtualService
metadata:
  name: virtualservice-ingress-web-api-web-app
spec:
  hosts:
  - "*"
  gateways:
  - default-gateway-ingress-http
  http:
  - match:
    - uri:
        prefix: /helloworld
    route:
    - destination:
        port:
            number: 3000
        host: helloworld
5. Open the helloworld application from the internet
I had still my terminal session open.
1. I got the cluster name, clusterip and ingress Port
$ ibmcloud ks clusters
$ clusterip=$(ibmcloud ks workers --cluster cloud-native  | awk '/Ready/ {print $2;exit;}')
$ echo "$clusterip"
$ ingressport=$(kubectl -n istio-system get service istio-ingressgateway -o jsonpath='{.spec.ports[?(@.name=="http2")].nodePort}')
2. Then I opened the URL in a Browser.
$ echo "http://"$clusterip":"$ingressport"/helloworld"
Now, the application was deployed in the free Kubernetes Cluster and I was able to access the helloworld application from the internet.

Here you see the deployed application in the Kubernetes cluster.

6. Configuration of the App Identity and Access Adapter
1. Now I did create and apply the appid adapter policy.
$ kubectl apply -f 5-appid-policy.yaml
My policy configuration was mostly based on the App Identity and Access Adapter example.
apiVersion: "security.cloud.ibm.com/v1"
kind:       Policy
metadata:
  name:      appid-policy
  namespace: default
spec:
  targets:
    - serviceName: helloworld
      paths:
        - exact: /helloworld
          method: ALL
          policies:
            - policyType: oidc
              config: oidc-provider-config
              rules
                - claim: scope
                  match: ALL
                  source: access_token
                  values:
                    - openid
2. Now I inserted the following values for `discoveryUrl`, `clientId` and `clientSecret` into the 6-addpi-config.yaml. I got all information from my AppID service instance using the service credentials.
Here is an example extract of that 6-addpi-config.yaml.
  discoveryUrl: https://us-south.appid.cloud.ibm.com/oauth/v4/0c8457c0-......-5e281491440c/.well-known/openid-configuration
  clientId:     5d51ba9e-…..-e6530687fc92
  clientSecret: Y2YxNjBiMmEtMm…….E3YzNkNDdkYzA5
Here is an example of the IBM Cloud App ID service credenticals.

3. Then I applied the appid adapter configuration
$ kubectl apply -f 6-addpi-config.yaml
7. Configuration of the redirect URL for of the App ID service
I still had my terminal session open.
1. I opened the URL in a browser
$ echo "http://"$clusterip":"$ingressport"/helloworld"
2. I got following error in the browser, which gave me the guide how to configure the redirect url in the IBM Cloud App ID service instance.

3. Here is an example how I configured the copied URL
a) The full URL
https://us-south.appid.cloud.ibm.com/oauth/v4/0c8457c0-.......-5e281491440c/authorization?client_id=5d51ba9e-........-e6530687fc92&redirect_uri=http%3A%2F%2F173.193.101.3%3A31380%2Fhelloworld%2Foidc%2Fcallback&response_type=code&scope=openid+profile+email&state=VbuEfzoLla
b) The extraction that URL from the `redirect` parameter until the`callback`
http%3A%2F%2F173.193.101.3%3A31380%2Fhelloworld%2Foidc%2Fcallback
c) Here the cleaned URL
http://173.193.101.3:31380/helloworld/oidc/callback
4. Then I copied the cleaned URL and inserted the URL into the App ID service.
a) Open the IBM Cloud App ID service instance
b) Navigate to Identity Providers > Manage > Authentication Settings
c) Add the URL

5. Now it was time to test the secured helloworld application. I opened the URL in a browser and logged to the application with following credentials.
User: admin@demo.email
Password: verysecret
These credentials were defined inside the App ID service.

$ echo "http://"$clusterip":"$ingressport"/helloworld"
And it worked, as you can see in the gif below … remember no code changes were needed 😉 isn’t it awesome?
(is could take time to load the following gif)

In 2020 we will add the App Identity and Access Adapter to our Cloud Native Starter example application 🙂
I hope this was useful for you and let’s see what’s next?
Greetings,
Thomas
PS: You can try out Cloud Foundry Apps or Kubernetes on IBM Cloud. By the way, you can use the IBM Cloud for free, if you simply create an IBM Lite account. Here you only need an e-mail address.
#Kubernetes, #Istio, #AppID, #IBMCloud, #CloudNativeStarter, #IBMDeveloper

Leave a comment