

In this blog post I want to share how to handle basic dynamic content with Vue.js on our Cloud Native Starter landing webpage. Vue.js is an open source licensed “progressive framework for building user interfaces”.
The gif below shows following sequence:
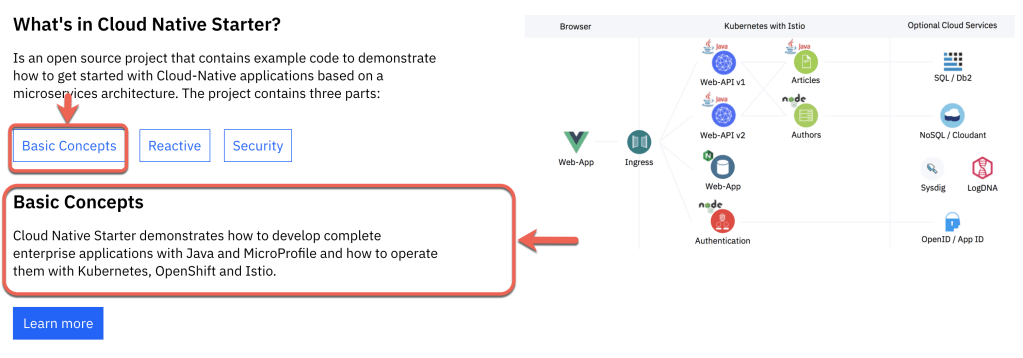
- First, the page content changes when a button is clicked. The page shows a little pre-view of content for one of the selected topics on the Cloud Native Starter project landing page. The topics are “Basic Concepts”, “Reactive” and “Security”.
- Second, the image on the right hand side changes, a headline appears or changes, a description appears or changes, and a Learn more button appears and changes the content for routing to another webpage.
- Third, at the end in the gif the button Learn more is pressed and the page for Basic Concepts is shown.

The questions are: How ..
- … to change images?
- … can a text be changed or appear?
- … to show a button and change the rooting to other webpages?
A short introduction to Vue.js programming
Simplified, in a Vue.js file for a single webpage, we have two major sections let me call them:
1. The <template> section with html code for the layout of our webpage.
2. The binding section where we implement the interactions with JavaScript.
The following example code does display “hello world” on a webpage. (For more click export or <template>)
// Template
<template>
   <div> {{ message }} </div>
</template>

// Bindings for the interactions
export default {
    name: 'mypage',
    data: function() {
        return { message: "hello world"};
    };
};
In this blog post we use data binding, instance Lifecycle Hooks, and event binding to implement the interaction. For more insides please use the getting started with Vue.js.
How to change images?
Let’s start with how to change images on the right hand side of our webpage.
This is the simplified sequence we follow to implement a change of that image on the webpage (code details we will take a look later):
1) The webpage is invoked and the first initial image is shown.
2) The button is pressed and invokes the event method onCloudNativeClicked() . In that method we set the right value for the data binding variable image .
3) Now the image on the webpage will be loaded. We use require.context in method getImgUrl()to get the right path to the image.

Webpage template
The following extract of the <template> code contains the button definition with the event binding to a method: v-on:click=”onCloudNativeClicked” . In that event method we set the correct value for the needed variable to display the right image on the webpage. With the method :src=”getImgUrl()” we get the right image context to show the image.
In our project we use IBM’s open source design framework Carbon for the webpage layout.
The cv in the cv-button indicates that we use a Carbon design UI element.
<template>
...
                <cv-button
                  style="padding-right: 12px; font-size: 20px; margin-right: 20px; margin-bottom: 5px"
                  v-on:click="onCloudNativeClicked"
                  kind="tertiary"
                >Basic Concepts</cv-button>
...
            <div class="bx--col-md-4 bx--offset-lg-1 bx--col-lg-8">
              <img class="landing-page__illo" :src="getImgUrl()" v-bind:alt="pic">
            </div>
Binding implementation
The next code extraction contains the relevant parts in export to bind our interaction implementation to the template. Here we use following elements from Vue.js:
- Data which contains the data binding to the variable image we use in the Created and Methods sections. Here we do the initialization for the data.
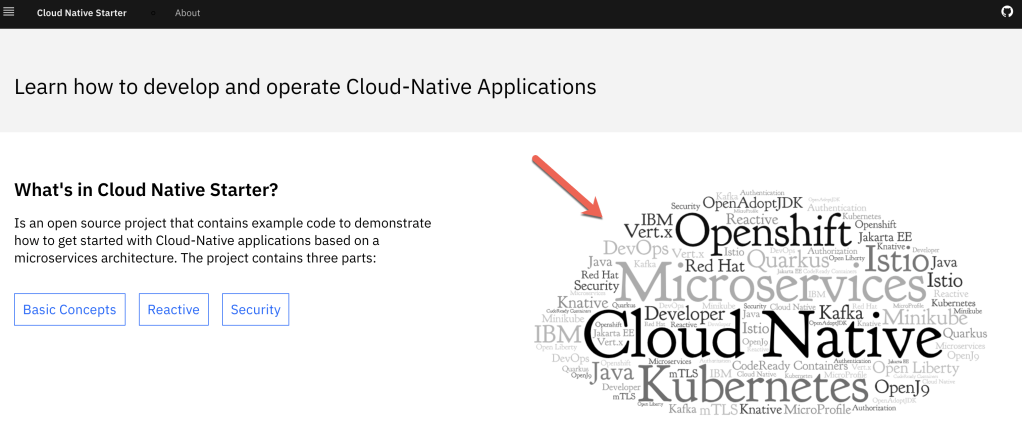
- Created realizes the binding to instance Lifecycle Hooks. The Created hock is used to run code after an instance is created. Here we put the initial value for the image variable. So we show word-cloud-opentechnologies every time when the webpage is invoked or refreshed.
- Methods contains the event binding. In our case we have two methods:
1. The method getImgUrl() which will be invoked in the template to return the right context path to the image we want to display.
2. The event method onCloudNativeClicked() which will be invoked when the button Basic Concepts is pressed.
export default {
  name: 'LandingPage',
  data: function() {
    return {
...
      image: null,
...
    };
  },
  // Event - page created
  created() {
...
    this.image = 'word-cloud-opentechnologies';
...
  },
  methods: {
    getImgUrl() {
     var images = require.context('../../assets/', false, /\.png$/)
     return images('./' + this.image + ".png")
    },
...
    // Event - button clicked
    onCloudNativeClicked() {
...
      this.image='architecture-synchron';
...
    },
...
How to change text?
In the image you see “no text” is shown at the startup :

The next image shows after pressing the Basic Concepts button the text is shown:
Webpage template
Changing the text works very closely to how we changed the image. Here we just use the data binding of our variables {{header}} and {{content}} as we see in the <template>. When the webpage is invoked the text value variable is shown.
<template>
...
               <cv-button
                  style="padding-right: 12px; font-size: 20px; margin-right: 20px; margin-bottom: 5px"
                  v-on:click="onCloudNativeClicked"
                  kind="tertiary"
               >Basic Concepts</cv-button>
...
              <h1
                class="landing-page__subheading"
                style="font-size: 1.7rem;"
              >{{header}}</h1>
              <p
                class="landing-page__p"
              >{{content}}</p>
            </div>
...
Binding implementation
We use once more the data binding, instance Lifecycle Hooks and event binding to set the right values for our header and content variable.
export default {
  name: 'LandingPage',
  data: function() {
    return {
      content: null,
      header: null
...
    };
  },
  // Event - page created
  created() {
    this.content = "";
    this.header = '';
...
  },
  methods: {
...
      // Event - button clicked
      onCloudNativeClicked() {
...
      this.header="Basic Concepts";
      this.content="Cloud Native Starter demonstrates how to .. Istio.";
...
    },
...
};
How to show a button and change rooting to other webpages?
The gif shows that the Learn more button appears, when the Basic Concepts button is pressed. After this we navigate to the related webpage.
Webpage template
We see in the template two buttons. These buttons will create the events onCloudNativeClicked and onLearnMoreClicked. In onLearnMoreClicked we check the buttonstate to hide or show the button, therefor we use: v-show. The value for buttonstate will be set to true in the onCloudNativeClicked event method.
<template>
...
                 <cv-button
                  style="padding-right: 12px; font-size: 20px; margin-right: 20px; margin-bottom: 5px"
                  v-on:click="onCloudNativeClicked"
                  kind="tertiary"
                >Basic Concepts</cv-button>
...
              <cv-button
                  style="padding-right: 12px; font-size: 20px; margin-right: 20px; margin-bottom: 5px"
                  v-on:click="onLearnMoreClicked"
                  v-show="buttonstate"
              >Learn more</cv-button>
...
Binding implementation
We use once more the data binding, instance Lifecycle Hooks and event binding. The binding works mostly like for changing the images and text. We set the needed variables here buttonstate and the link for the routing. In the onLearnMoreClicked we invoke this.$router.push(this.link); with the right value for the link to the page we want to open.
export default {
  name: 'LandingPage',
  data: function() {
    return {
...
      buttonstate:false,
      link: null
...
    };
  },
  // Event - page created
  created() {
...
    this.link= '';
...
  },
  methods: {
...
    // Event - button clicked
    onLearnMoreClicked() {
      this.$router.push(this.link);
    },
    onCloudNativeClicked() {
      ...
      this.buttonstate = true;
      this.link='basic-concepts';
    },
...
    },
...
};
I hope this was useful for you and let’s see what’s next?
Greetings,
Thomas
#vuejs, #binding, #webui, #template, #carbondesign

Leave a comment