

This blog post is written in the context of creating a text classification model. The objective is to build and train a text classification model to identify topics in a text. These topics are Kubernetes and Watson NLP. As the train and test data, we will use an export from my blog on wordpress.com. This data we will label this with the open-source tool called Label Sleuth.
Label Sleuth needs for a CVS file two columns, the first column is called ‘document_id’ and the second is called ‘text’.
The ‘document_id’ is the id for the post and there will be linked multiple ‘text’ entries. These entries are representing the sentences (tokens) of a post.
document_id
|
+-- text
|
+-- text
The blog post is structured in:
- Prepare the data structure for
Label Sleuth - Installation of
Label Sleuth - Use
Label Sleuthto label the data - Summary
1. Prepare the data structure for Label Sleuth
Before we can use Label Sleuth we need to ensure we have the data in the valid format. To build this structure we run following sequence.
- Load the CSV file with pandas and process data with the pandas data frame.
- Extract the sentences from the post and save them as ‘document_id’ and ‘text’ using Natural Language Toolkit NLTK, we need to ensure to isolate sentences with the ‘.’.
- The “document_id” must contains all sentences (“text”) which are a part of the post.
1.1 Load the CSV file with pandas and process data it with the pandas data frame
import pandas as pd
df = pd.read_csv(csv_file_name)
1.2 Extract the sentences from the post and save them as ‘document_id’ and ‘text’ using Natural Language Toolkit NLTK, we need to ensure to isolate sentences with the ‘.’.
Here is an extraction of the source code from a Jupyter Notebook.
%%capture
!pip install nltk
import nltk
nltk.download('punkt')
import nltk as punkt
csvfile = "data_clean_for_label_sleuth.csv"
csvfile = open(csv_file_name,'w',encoding='utf-8')
csvfile_writer = csv.writer(csvfile)
csv_line = ["document_id", "text", "title", "pubdate", "doc_sentence_id"]
csvfile_writer.writerow(csv_line)

i = 0
for row in range(len(df)):
    title = df.at[row, 'title']
    pubdate = df.at[row, 'pubdate']
    text = df.at[row, 'post']
    text_clean = text.replace('.',' . ')
    tokens = punkt.sent_tokenize(text_clean)
    j = 0
    for t in tokens:
        document_id = '#doc_id' + str(i)
        doc_sentence_id = '#doc_id' + str(i) + '.#sentence' + str(j)
        text = t
        csv_line = [document_id, text, title, pubdate, doc_sentence_id]
        csvfile_writer.writerow(csv_line)
        j = j + 1
    i = i + 1
csvfile.close()
2. Installation of Label Sleuth
When you are going to use Label Sleuth you need to know that Label Sleuth is currently only supported for Python 9, so you need to maintain and install multiple versions of Python. This blog post helps to manage multiple versions of Python: Installing multiple versions of Python on Mac using Homebrew.
The installation is easy and well documented in Label Sleuth.
- Install Anaconda
- Activate Environment
conda create --yes -n label-sleuth python=3.9
conda activate label-sleuth
- Install
Label Sleuth
pip install label-sleuth
- Start Label Sleuth
python -m label_sleuth.start_label_sleuth
- Example output:
user:
thomassuedbroecker
2023-03-07 20:34:54,663 INFO     [start_label_sleuth.py:104] Starting label-sleuth using config file /Users/thomassuedbroecker/opt/anaconda3/envs/label-sleuth/lib/python3.9/site-packages/label_sleuth/config.json. Output directory is /Users/thomassuedbroecker/label-sleuth
2023-03-07 20:34:54,664 INFO     [start_label_sleuth.py:105] (Starting the service for the first time may take a little longer)
2023-03-07 20:34:56,450 INFO     [wasyncore.py:485] Serving on http://[::1]:8000
2023-03-07 20:34:56,450 INFO     [wasyncore.py:485] Serving on http://127.0.0.1:8000
3. Use Label Sleuth to label the data
3.1 Upload a new dataset

3.2 Create a workspace

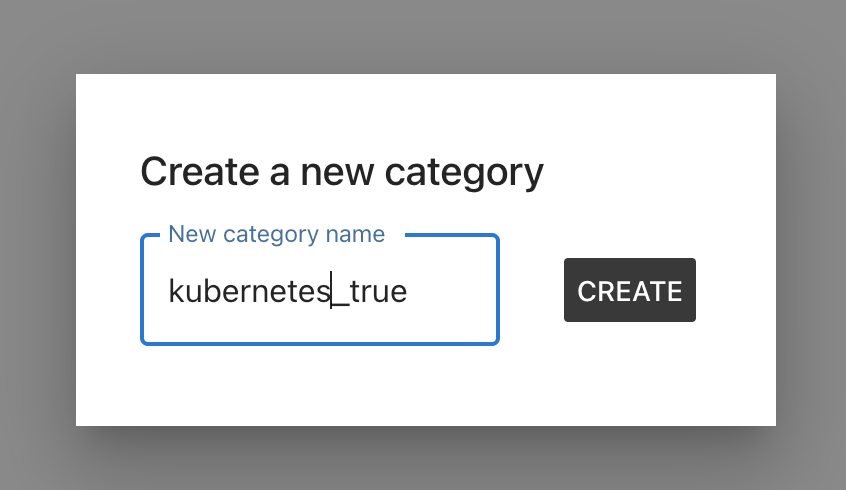
3.3 Create a category to label

3.4 Label the category

3.5 More labeling
If you do more labeling for an existing category of a post, then the model version for that category will be updated.

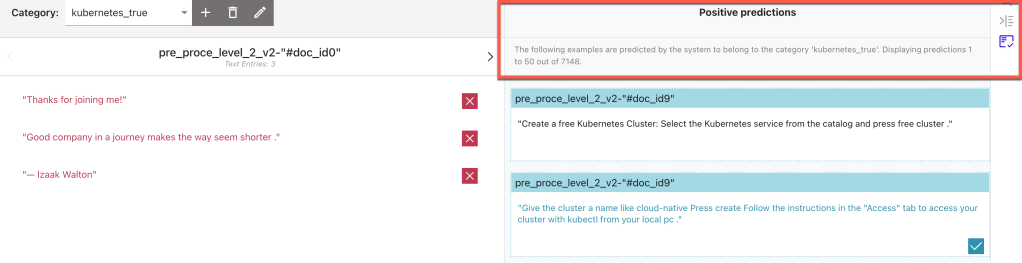
3.6 Use of positive prediction
The created models will help you to find more sentences with a positive prediction for the actual category.
3.7 Export the labeled category data
Now you can also select to include automatically labeled data in your export.

4. Summary
From my perspective, the tool Label Sleuth is awesome, and easy-of-use for labeling/annotating the text for custom categories to create training and test data for your models. Check out the great tutorial.
I hope this was useful to you, and let’s see what’s next?
Greetings,
Thomas
#python, #jupyternotebook, #labelsleuth, #labeling, #annotating, #nltk

Leave a comment