

This blog post is about how to set up Bring Your Own Search (BYOS) for the Question Answering Service based on IBM Software in Watson Assistant. The implementation of the Question and answering Service is available on GitHub.
You can find more details about the Bring Your Own Search (BYOS) concept in the medium blog post Bring your own search to IBM Watson Assistant.
The blog post contains following main topics.
- Simplified architecture overview
- Custom extension for Watson Assistant
- Setup of “Bring Your Own Search (BYOS)”
- Summary
- YouTube video
These are the main steps of the Setup for the question and answering extension using Bring Your Own Search (BYOS) for Watson Assistant.
- Deploy a
Question Answering Service instance Watson Assistant Service- Setup an extension for the
Question Answering Service instance - Configure your
assistantto use the extension - Test the
assistant
Here is a short reminder of the dependencies for the Watson Assistant configuration you should be aware of:
You can create from a
Watson Assistant Servicein theIBM Cloud catalogaWatson Assistant Service Instancebased on a pricing plan; this service instance can contain several Assistants. Each Assistant will include its configuration. (you can visit the IBM Cloud documentation for more details)
We will configure one assistant to access a custom search using an extension. This extension will access a Question Answering Service instance deployed on the cloud. (for example, IBM Cloud Code Engine)
The result will look like this:

The first entry is the answer; below, you see the linked resources the AI has used to create the answer.
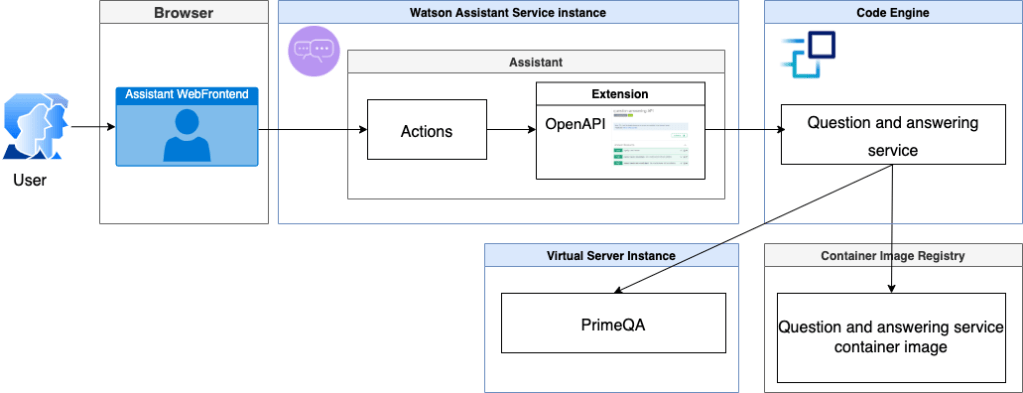
1. Simplified architecture overview
In the diagram you see, that we will access the “assistant” in the Watson Assistant Service from a Watson Assistant “Web Frontend”. The assistant uses a prepared actions configuration to invoke an extension, and this extension will call a REST API endpoint of a running “Question and Answering Service” in IBM Cloud Code Engine. IBM Cloud Code Engine gets the right container images from a container registry. The “Question and answering service” get its data from a PrimeQA instance installed in a VSI.
2. Custom extension for Watson Assistant
The Question Answering Service instance implements a custom extension for Watson Assistant with Java and Quarkus. If you want to dig a bit more into the topic of “how to write custom extensions?”, you can visit my blog post “Open the door wide open for Watson Assistant with “custom extensions” – an excellent progression“. This blog post shows how to build a simple extension with Node.js, or you can take a look at the IBM Documentation.
3. Setup of example
1. Deploy a Question Answering Service instance.
- Deploy an instance of the
Question Answering Service, for example, toIBM Cloud Code Engine - Insert your public server
https://URLto access theQuestion Answering Servicein theOpenAPI.jsonfile by changing theserversvalues to your needs.
"`json "servers": [ { "url": "https://YOUR_URL", "description": "YOUR_DESCIPTION" } ],
A server URL doesn’t contain any endpoint invocation.
"`json
  "servers": [
    {
      "url": "https://api-server.xyz122345.us-east.codeengine.appdomain.cloud",
      "description": "My API server on Code Engine"
    }
  ],
Note: You can also use a fake implementation for the “Question and answering service” in the container nodejs-assistant-extension on the quay.io. This implementation doesn’t connect to any search engine and only returns a predefined return value. The needed OpenAPI 3.0.0 specification is available in assistant-extension-query.json file, and the necessary fake response is available in the variable EXAMPLE_JSON_RETURN for the query API endpoint.
2. Watson Assistant Service
Note: You should create a new
assistantbecause we will replace your currentactionsconfiguration later!
3. Setup an extension for the Question Answering Service instance
3.1 Create an extension
- Select your
Assistantinstance of yourWatson Assistant service. - Open
Integrationfrom the side menu - Navigate to the
Extensionssection - Press
Build custom extension - Follow the steps in the wizard and insert the requested values.
- Get started
- Basic information
Title: Question and answering extensionDescription: This is the extension to integrate the question and answering microservice via a REST API.
- Import OpenAPI
- Import your modified
OpenAPI.jsonfile
- Import your modified
- Review the extension
3.2 Deploy the extension to an assistant environment
An assistant has two minimal environments: Draft and Live. We will add the extension to the Draft environment.
- Open
Integrationfrom the side menu - Navigate to the
Extensionssection - Press
Addon your created extension in the integration catalog - Select
Draftand pressConfirm
4. Configure your assistant to use the extension
Now we will import an existing configuration for the assistant actions to use the question and answering extension, and then we will configure the actions and variables to use the extension.
4.1 Import an existing configuration for the actions
- Open
Actionsfrom the side menu - Select
Global settingsin the upper right corner - Select the tab
Upload/Download - Upload the action JSON file called demo-question-and-answering-action-configuration.json and press
Save.
Note: This will replace the current configuration of your existing assistant instance.
4.2 Verify the newly created actions
The following table contains an overview of the created actions and their responsibilities. The numbering represents the order and the execution of the actions.
| Action | Responsibility |
|---|---|
1-search | This action handles the user’s search entry and will start the search with the extension. The return values of the search will be saved in variables when a search is successful. Then the action 2-process-result will be invoked. |
2-process-result | This action gives you additional verification possibilities for the search result return values. Then the action 3-select-search-result-to-show will be invoked. |
3-select-search-result-to-show | This action selects one of the search’s return values to be displayed later. The configuration of this action defines the number of return values you will display later. Then the action 4-display-search-result will be invoked. |
4-display-search-result | This action is responsible for the search results entries. Here you can define how the result entry will be displayed and add conditions before it is displayed. |
4.3 Configure the 1-search action
Now we need to configure the use of the extension of our extension.
- You will see that Step 4 is marked red.
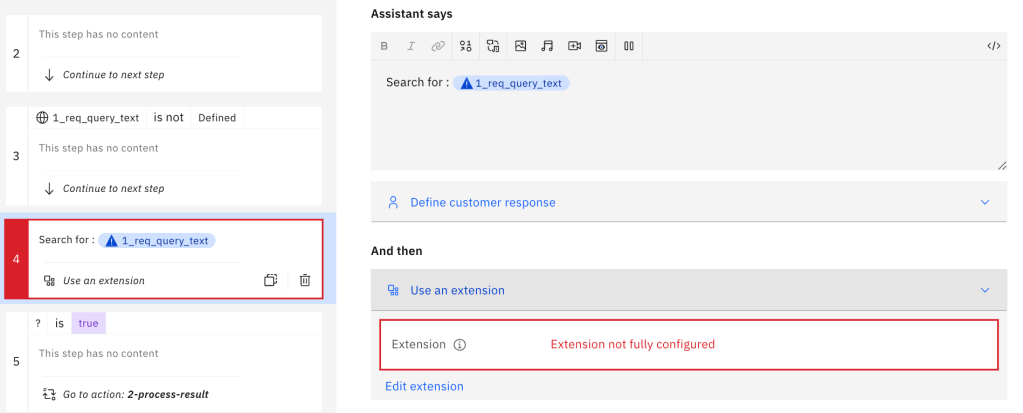
- Select
Edit extension
Example for a configuration:
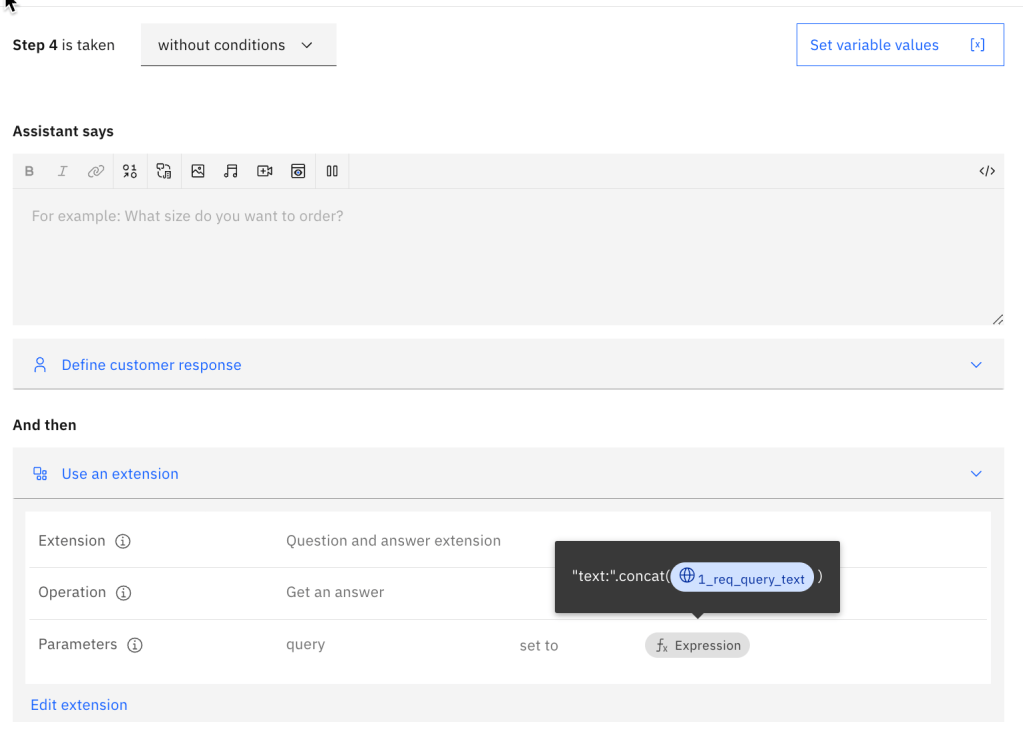
Note: If you don’t see the same result as in the image above, select for the parameter value `query` the option `Expression` in the Set to field and insert `”text:”.concat(${1_req_query_text})` in the text field.
5. Test the assistant
- Open
Previewfrom the side menu - Enter demo search:
When and for how much did IBM acquire Red Hat?
The first entry is theanswer; below, you see the resources the AI has used to create the answer.
4. Summary
With the concept of the “Bring Your Own Search (BYOS)” and the extension capability, you can set up an integration to a custom search in minutes, as we did in this example.
5. YouTube video
This long (1h) live stream is about how to set up BYOS in Watson Assistant.
- 1. Deploy Example Node.js Application to IBM Cloud Code Engine
- 2. The setup of BYOS in Watson Assistant
- 3. Inspect the setup
Content of the video:
- 00:00 Introduction
- 04:14 Basic flow for the extension
- 09:44 Setup of Code Engine
- 22:07 OpenAPI specification and the swagger editor
- 26:52 Watson Assistant overview
- 29:50 Create Watson Assistant Service instance
- 33:34 Add extension to an Assistant
- 38:00 Overview Assistant environments
- 38:41 Import Actions for BYOS
- 40:54 Configure BYOS “1-search “Action
- 45:50 Parameter in BYOS “1-search “Action
- 48:11 Try out assistant
- 50:46 Action invocations
- 55:42 Invoke the pod with
kubectlfor logging in Code Engine - 01:00:00 Summary and ending
I hope this was useful to you, and let’s see what’s next?
Greetings,
Thomas
#extension, #watsonassistant, #byos, #bringyourownsearch, #codeengine, #ibmcloud
