

The objective of this project is to deploy the Reranker to a Kubernetes cluster in a VPC on IBM Cloud and access the REST API of the Reranker.
The Reranker is a component of PrimeQA.
“PrimeQA is a public open-source repository that enables researchers and developers to train state-of-the-art models for question answering (QA). Using PrimeQA, a researcher can replicate the experiments outlined in a paper published in the latest NLP conference while also enjoying the capability to download pre-trained models (from an online repository) and run them on their own custom data.”
“The Reranker component takes a question and a list of documents and returns a rescored and reranked list of documents.”
This GitHub project contains the source code, which is shown in this blog post: https://github.com/thomassuedbroecker/custom-reranker-deployment
Content
- 1. Simplified architecture overview
- 2. Kubernetes deployment
- 3. Prerequisites
- 4. Setup an example instance
1. Simplified architecture overview
In the create-primeqa-app repository, you will find how to run prime qa locally with “Docker Compose”. Furthermore, by inspecting the source code in the repositories, you can find the following dependencies of applications and components.
The image below shows the dependencies of applications and components when you use a Docker Compose to run Prime QA on your local machine.
In the image below, you see three applications.
- UI
- Prime QA
- Orchestrator
Prime QA contains four components.
- Indexer
- Retreivers
- Readers
- Reranker
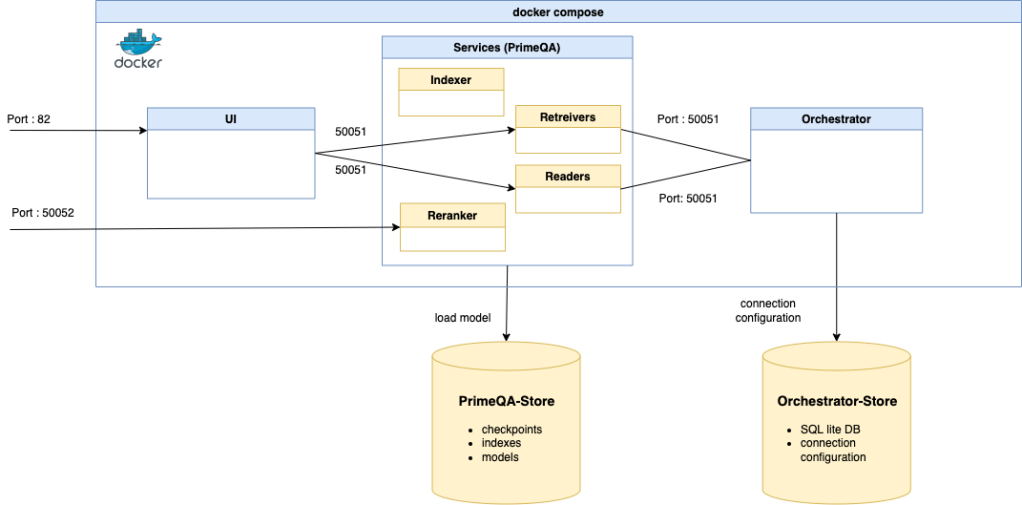
In the image below, we see what we need to deploy when we only want to use the Reranker component with the REST API on port 50052.

2. Kubernetes deployment
When we deploy the Reranker, we need to ensure that a model is loaded and is an accessible folder structure for a store.
To realize this functionality, we will use an init container and a “runtime” container. (sure, the init container takes time at the startup, but this is an easy and straightforward approach for a starting point )

Init container Dockerfile
This Dockerfile is used in the first step and can be optimized to be more configurable during the startup later, for example, here with a docker-entrypoint.sh automation and environment variable usage, like in this Dockerfile.
FROM registry.access.redhat.com/ubi8/ubi:latest
RUN yum update -y && \
    yum install -y wget && \
     yum install -y curl
WORKDIR /store
RUN mkdir checkpoints && \
    mkdir indexes && \
    mkdir models
USER 2000
Later in the deployment we will load the model with this command
args: ["-c", "echo 'Setup a model' && echo $(whoami) && echo $(ls) && echo '****' && mkdir /store/checkpoints/drdecr && echo 'Using: wget https://huggingface.co/PrimeQA/DrDecr_XOR-TyDi_whitebox/resolve/main/DrDecr.dnn -P /store/checkpoints/drdecr' && wget https://huggingface.co/PrimeQA/DrDecr_XOR-TyDi_whitebox/resolve/main/DrDecr.dnn -P /store/checkpoints"]
Deployment configuration
Here is a simple Deployment.yaml which can be optimized.
Be aware that the basic Prime-QA Dockerfile has no-curl installed. That is the reason why I created an example file for the CPU configuration.
The deployment file contains the volume, init, and “runtime” container image configuration.
kind: Deployment
apiVersion: apps/v1
metadata:
  name: reranker
  namespace: reranker
  labels:
      app: reranker
spec:
  selector:
    matchLabels:
      app: reranker
  replicas: 1
  template:
    metadata:
      labels:
        app: reranker
        version: v1
    spec:
      volumes:
      - name: store
        emptyDir: {}
      - name: indexes
        emptyDir: {}
      - name: models
        emptyDir: {}
      - name: cache
        emptyDir: {}
      initContainers:
        - name: install-store
          image: icr.io/reranker-tsuedbro/init-tsuedbro:v1
          imagePullPolicy: Always
          command: ["/bin/sh"]
          args: ["-c", "echo 'Setup a model' && echo $(whoami) && echo $(ls) && echo '****' && mkdir /store/checkpoints/drdecr && echo 'Using: wget https://huggingface.co/PrimeQA/DrDecr_XOR-TyDi_whitebox/resolve/main/DrDecr.dnn -P /store/checkpoints/drdecr' && wget https://huggingface.co/PrimeQA/DrDecr_XOR-TyDi_whitebox/resolve/main/DrDecr.dnn -P /store/checkpoints"]
          volumeMounts:
          - name: store
            mountPath: /store/checkpoints
          - name: indexes
            mountPath: /store/indexes
          - name: models
            mountPath: /store/models
          - name: cache
            mountPath: /cache/huggingface
          securityContext:
            allowPrivilegeEscalation: false
      containers:
      - name: reranker
        image: icr.io/reanker-tsuedbro/reranker-tsuedbro:v1
        imagePullPolicy: Always
        livenessProbe:
          exec:
            command: ["sh", "-c", "ls"]
          initialDelaySeconds: 20
        readinessProbe:
          exec:
            command: ["sh", "-c", "curl http://localhost:50052/rerankers"]"]
          initialDelaySeconds: 40
        env:
        - name: STORE_DIR
          valueFrom:
            configMapKeyRef:
              name: reranker-confmap
              key: STORE_DIR
        - name: mode
          valueFrom:
            configMapKeyRef:
              name: reranker-confmap
              key: mode
        - name: require_ssl
          valueFrom:
            configMapKeyRef:
              name: reranker-confmap
              key: require_ssl
        volumeMounts:
        - name: store
          mountPath: /store/checkpoints
        - name: indexes
          mountPath: /store/indexes
        - name: models
          mountPath: /store/models
        - name: cache
          mountPath: /cache/huggingface
        securityContext:
          allowPrivilegeEscalation: false
        ports:
        - containerPort: 50052
      restartPolicy: Always
3. Prerequisites
You need to have the following in place to follow the example setup steps.
You can set up an IBM Cloud Kubernetes cluster, for example, by following the steps in my blog post Use Terraform to create a VPC and a Kubernetes Cluster on IBM Cloud.
4. Setup a example instance
In this example the names of the container images for the init and runtime containers are hard coded in the deployment.yaml file and you need to change them to your values.
- Runtime: “
icr.io/reanker-tsuedbro/reranker-tsuedbro:v1” Related environment variables:$CR/$CR_REPOSITORY/$CI_NAME - Init: “
icr.io/reranker-tsuedbro/init-tsuedbro:v1” Related environment variables:$CR/$CR_REPOSITORY/$CI_INIT_NAME
Step 1: Clone project
export HOME_PATH=$(pwd)
git clone https://github.com/thomassuedbroecker/custom-reranker-deployment.git
Step 2: Create a copy of the needed environment
cd $HOME_PATH/custom-reranker-deployment/code
cat .env_template > .env
- The environment values:
# IBM Cloud
export IBM_CLOUD_RESOURCE_GROUP=reranker
export IBM_CLOUD_REGION=us-east
export IBM_CLOUD_API_KEY=XXX
# Kubernetes
export CLUSTER_NAME=XXX
# IBM Cloud Container Registry
export CR_RESOURCE_GROUP=reranker
export CR_REGION=global
export CR=icr.io
export CR_USER=iamapikey
export CR_REPOSITORY=reanker-XXX
export CR_EMAIL=xxxx@xxx
export CI_NAME="reranker-XXX"
export CI_INIT_NAME="init-XXX"
export CI_TAG="v1"
Step 3: Build and push containers to the IBM Cloud registry
Use the values of your environment.
Example values:
- export CR=icr.io
- export CR_REPOSITORY=reranker-tsuedbro
- export CI_NAME=reranker-tsuedbro
- export CI_INIT_NAME=init-tsuedbro
The hard coded value and the related environment variables:
- Runtime: “
icr.io/reranker-tsuedbro/reranker-tsuedbro:v1” Related environment variables:$CR/$CR_REPOSITORY/$CI_NAME - Init: “
icr.io/reranker-tsuedbro/init-tsuedbro:v1” Related environment variables:$CR/$CR_REPOSITORY/$CI_INIT_NAME
cd $HOME_PATH/code/scripts
sh build_and_push_container_images.sh
Step 4: Deploy the reranker to the cluster
Before you execute this automation, ensure you set the correct values also in the deployment.yaml file for your container images.
- Runtime: “
icr.io/reanker-tsuedbro/reranker-tsuedbro:v1” Related environment variables:$CR/$CR_REPOSITORY/$CI_NAME - Init: “
icr.io/reranker-tsuedbro/init-tsuedbro:v1” Related environment variables:$CR/$CR_REPOSITORY/$CI_INIT_NAME
cd $HOME_PATH/code/scripts
sh deploy_to_kuberentes.sh
These are the steps of the automation:
- Create a namespace
- Get existing secrets to access the IBM
- Copy the IBM Cloud container registry
- Patch the service account for registry access
- Create a config map
- Create the deployment
- Create a service
- Create service loadbalancer > Only work for a Kubernetes Cluster in VPC
- Example output:
*********************
loginIBMCloud
*********************
API endpoint: https://cloud.ibm.com
...
*********************
Connect to cluster mycluster
*********************
...
The configuration for mycluster was downloaded successfully.
1. Create namespace
namespace/reranker created
2. Get existing secrets to access the IBM Cloud Registry  in the default namespace
all-icr-io   kubernetes.io/dockerconfigjson   1      146m
3. Copy the IBM Cloud container registry access secret to the reranker namespace
secret/all-icr-io created
4. Patch the service account to in the default namespace.
all-icr-io   kubernetes.io/dockerconfigjson   1      0s
*********************
Create pull secret and patch default service account
*********************
secret/custom-reg-credentials created
serviceaccount/default patched
serviceaccount/default patched
apiVersion: v1
imagePullSecrets:
- name: custom-reg-credentials
- name: all-icr-io
kind: ServiceAccount
metadata:
  creationTimestamp: "2023-XXX:04:XXX"
  name: default
  namespace: reranker
  resourceVersion: "2753"
  uid: XXX
5. Create configmap
configmap/reranker-confmap created
6. Create deployment
deployment.apps/reranker created
7. Create service
service/reranker-service created
8. Create service loadbalancer
service/reranker-nlb created
Step 5: Wait until the load balancer service is available
kubectl get svc reranker-nlb -n reranker
- Example output:
NAME           TYPE           CLUSTER-IP      EXTERNAL-IP   PORT(S)           AGE
reranker-nlb   LoadBalancer   172.21.101.92   XXXXXXXXXXX   50052:31945/TCP   26m
Step 6: Invoke the endpoint
HOST_NAME=$(kubectl get svc reranker-nlb -n reranker --ignore-not-found --output 'jsonpath={.status.loadBalancer.ingress[*].hostname}')
echo $HOST_NAME
curl http://$HOST_NAME:50052/rerankers
- Example output:
[{"reranker_id":"SeqClassificationReranker","parameters":[{"parameter_id":"model","name":"Model","description":"Path to model","type":"String","value":"ibm/re2g-reranker-nq","options":null,"range":null},{"parameter_id":"max_num_documents","name":"Maximum number of retrieved documents","description":null,"type":"Numeric","value":-1,"options":null,"range":[-1,100,1]},{"parameter_id":"max_batch_size","name":"Maximum batch size","description":null,"type":"Numeric","value":128,"options":null,"range":[1,256,8]}]},{"reranker_id":"ColBERTReranker","parameters":[{"parameter_id":"model","name":"Model","description":"Path to model","type":"String","value":"drdecr","options":null,"range":null},{"parameter_id":"max_num_documents","name":"Maximum number of retrieved documents","description":null,"type":"Numeric","value":-1,"options":null,"range":[-1,100,1]},{"parameter_id":"doc_maxlen","name":"doc_maxlen","description":"maximum document length (sub-word units)","type":"Numeric","value":180,"options":null,"range":null},{"parameter_id":"query_maxlen","name":"query_maxlen","description":"maximum query length (sub-word units)","type":"Numeric","value":32,"options":null,"range":null}]}]
I hope this was useful to you, and let’s see what’s next?
Greetings,
Thomas
#kubernetes, #initcontainer, #primeqa, #reranker, #docker, #ibmcloud, #bashscript, #ai

Leave a comment