

The blog post shows integrating watsonx Assistant and watsonx.ai to create a full-screen user interface for interacting with a large language model (LLM) using minimal coding. It outlines the motivation, architecture, setup process, and specific actions necessary to deploy the integration on IBM Cloud Code Engine.
How can watsonx Assistant and watsonx.ai be combined to provide an initial full-screen user interface for interacting with a large language model (LLM) running on watsonx.ai with a minimum of coding?
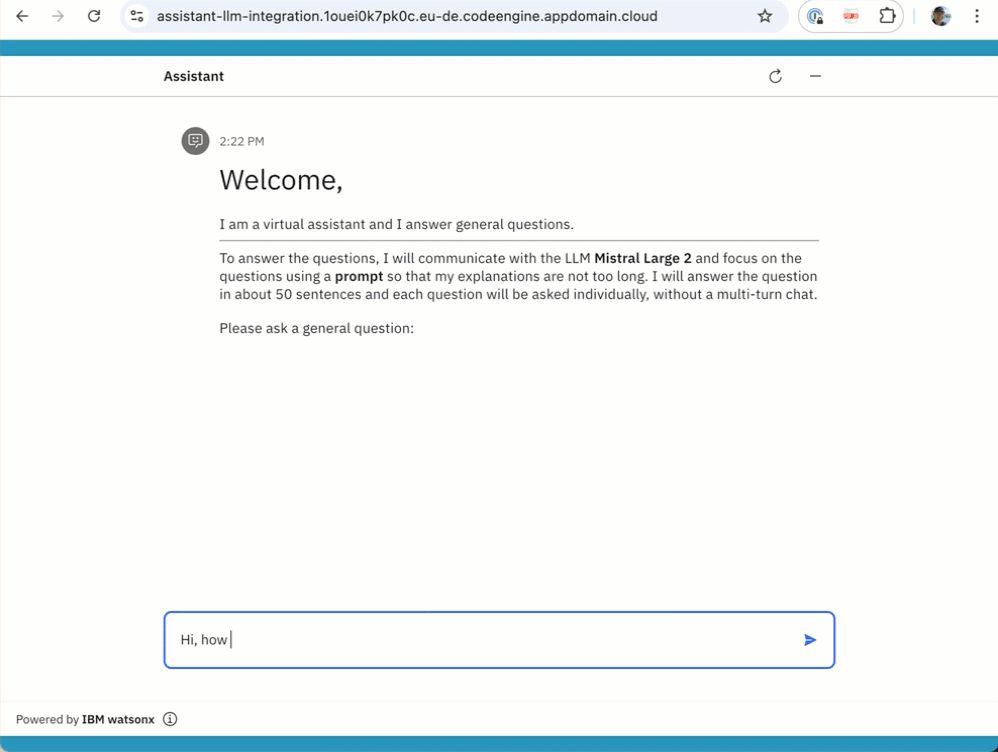
The GIF below shows the resulting Web Chat.
Note: If you want to use something other than the Out Of The Box demo website from watsonx.ai.
The code for the example is in this GitHub repository https://github.com/thomassuedbroecker/watsonx-assistant-chat-ui-and-watsonx.git
- Motivation
- Architecture
- The Example
- Setup
- Prerequisites
- Clone the repository to your local machine
- Configuration
- Set up a project in watsonx.ai
- watsonx Assistant
- Create an Assistant service instance
- Create an assistant
- Create a watsonx Assistant extension to access watsonx LLMs
- Create an extension
- Import the Open API specification
- Create the needed actions
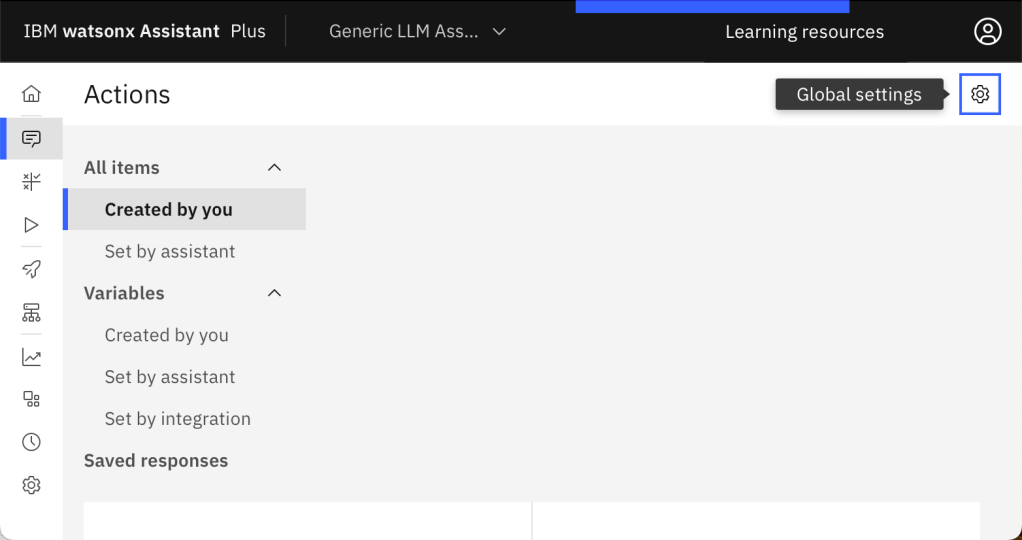
- Step 1: Select actions and then Global settings
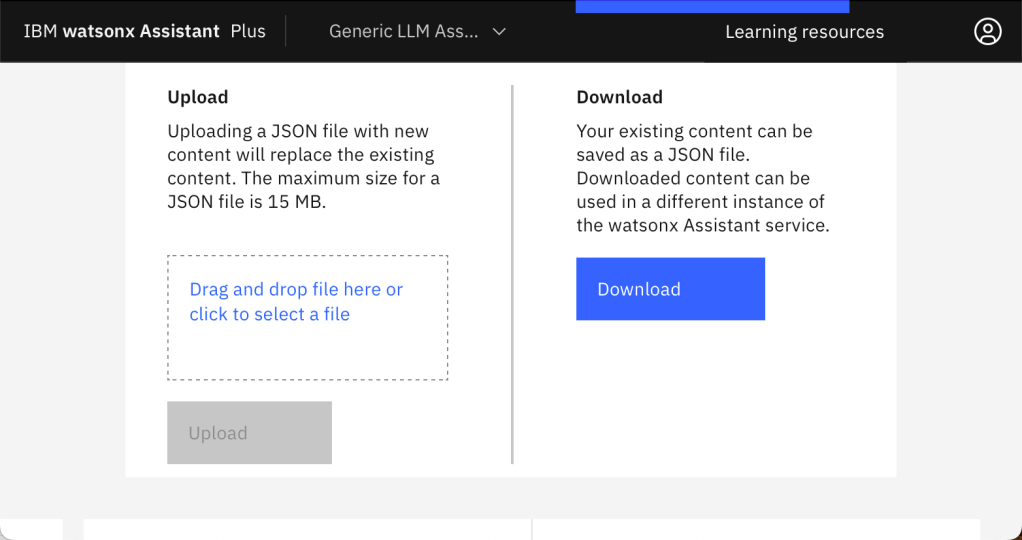
- Step 2: In Global settings you chose the tab Upload/Download
- Step 5: Get the needed project ID to access the watsonx models.
- Step 6: Past the project ID into the action variable watsonx_project_id
- Customize the web chat
- Deploy the web page to Code Engine
- Create the needed web page environment variables
- Follow the steps for the automated deployment
- Execution
- Local web page
- Local container
- Step 1: Build the container
- Step 2: Run the container
- Step 3: Invoke the URL
- IBM Cloud Code Engine container
- Additional resources
- Summary
1. Motivation
If you want to build a full-screen UI to interact with a Large Language Model running on watsonx, a simple option is to use the watsonx Assistant functionality of extensions, actions, and Web Chat.
You can easily configure a Web Chat layout in watsonx Assistant in various ways for default, fullscreen and sidebar format just by changing the layout.
You can share these UI’s by using a web link, but for the fullscreen, the web chat starts minimized in the corner. Use the copy-link to share.

But we want to use the full-screen mode directly when the web page opens, so we need to add a single web page with the integration to Watson Assistant to an Ngnix HTTP web server in a container. That container will run on IBM Cloud Code Engine, the serverless platform from IBM.
2. Architecture
We can configure the appearance of the watsonx Assistant web chat in a full-screen mode to ensure it happens directly when a website is invoked; therefore, we need to use the `”embed” code on the web page.
The following diagram shows the simplified architecture realization:
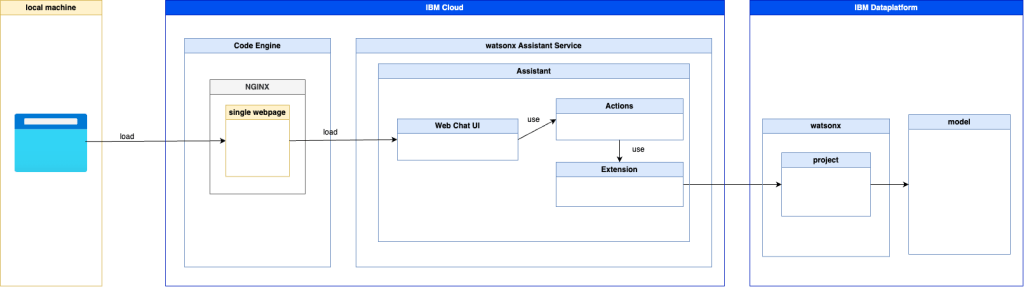
- Ngnix
- IBM Cloud Services:
- watsonx Assistant:
3. The Example
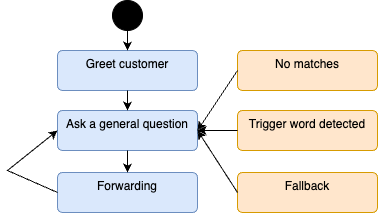
The example uses watsonx Assistant actions. We ensure that the Assistant only executes the action Ask task general question; we define a loop in a watsonx Assistant action, and all remaining system actions will also point to the loop entry action.
The image below shows the loop.
For the integration with the watsonx and the large language model with we use extension and we use the pre-defined OpenAPI specification created for watsonx in the watsonx Assistant toolkit.
Invoking the extension involves using variables to create a user input using a prompt. The image below shows the flow of the action Ask a general question.

The invocation of the extension to connect to the model in watsonx.ai will be configured with the needed parameters using the variables defined before.
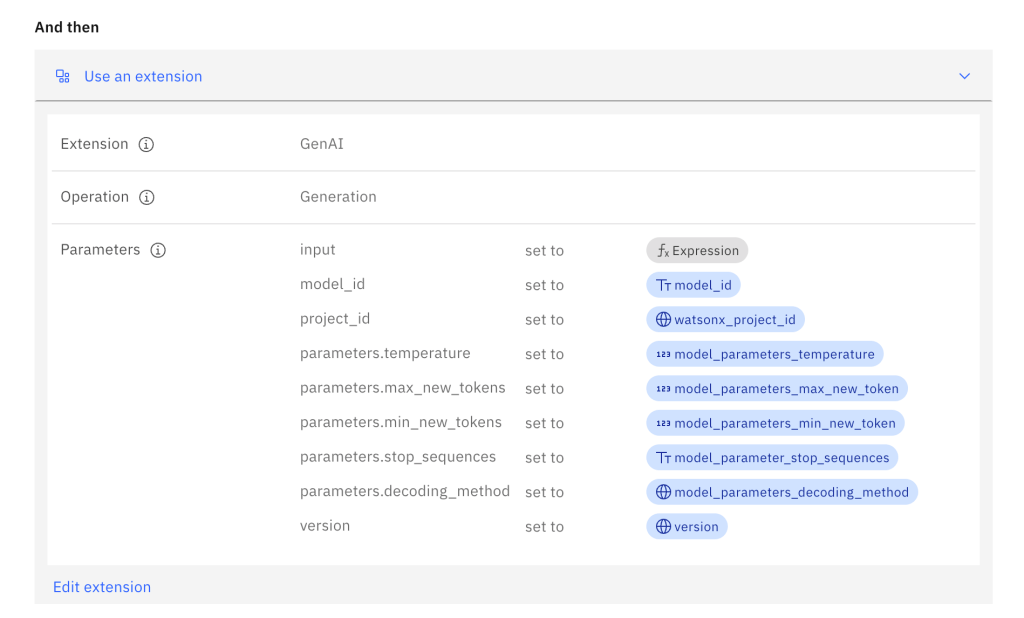
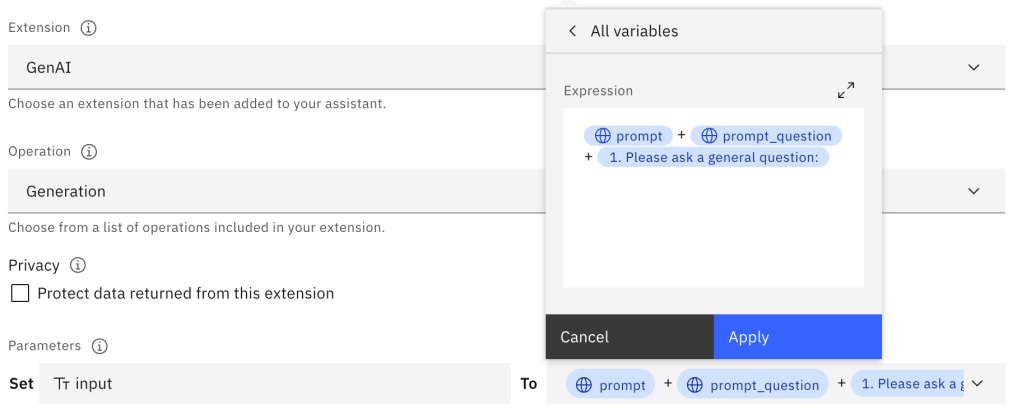
The input to the model contains the prompt definition built with a combination of variables in an expression.
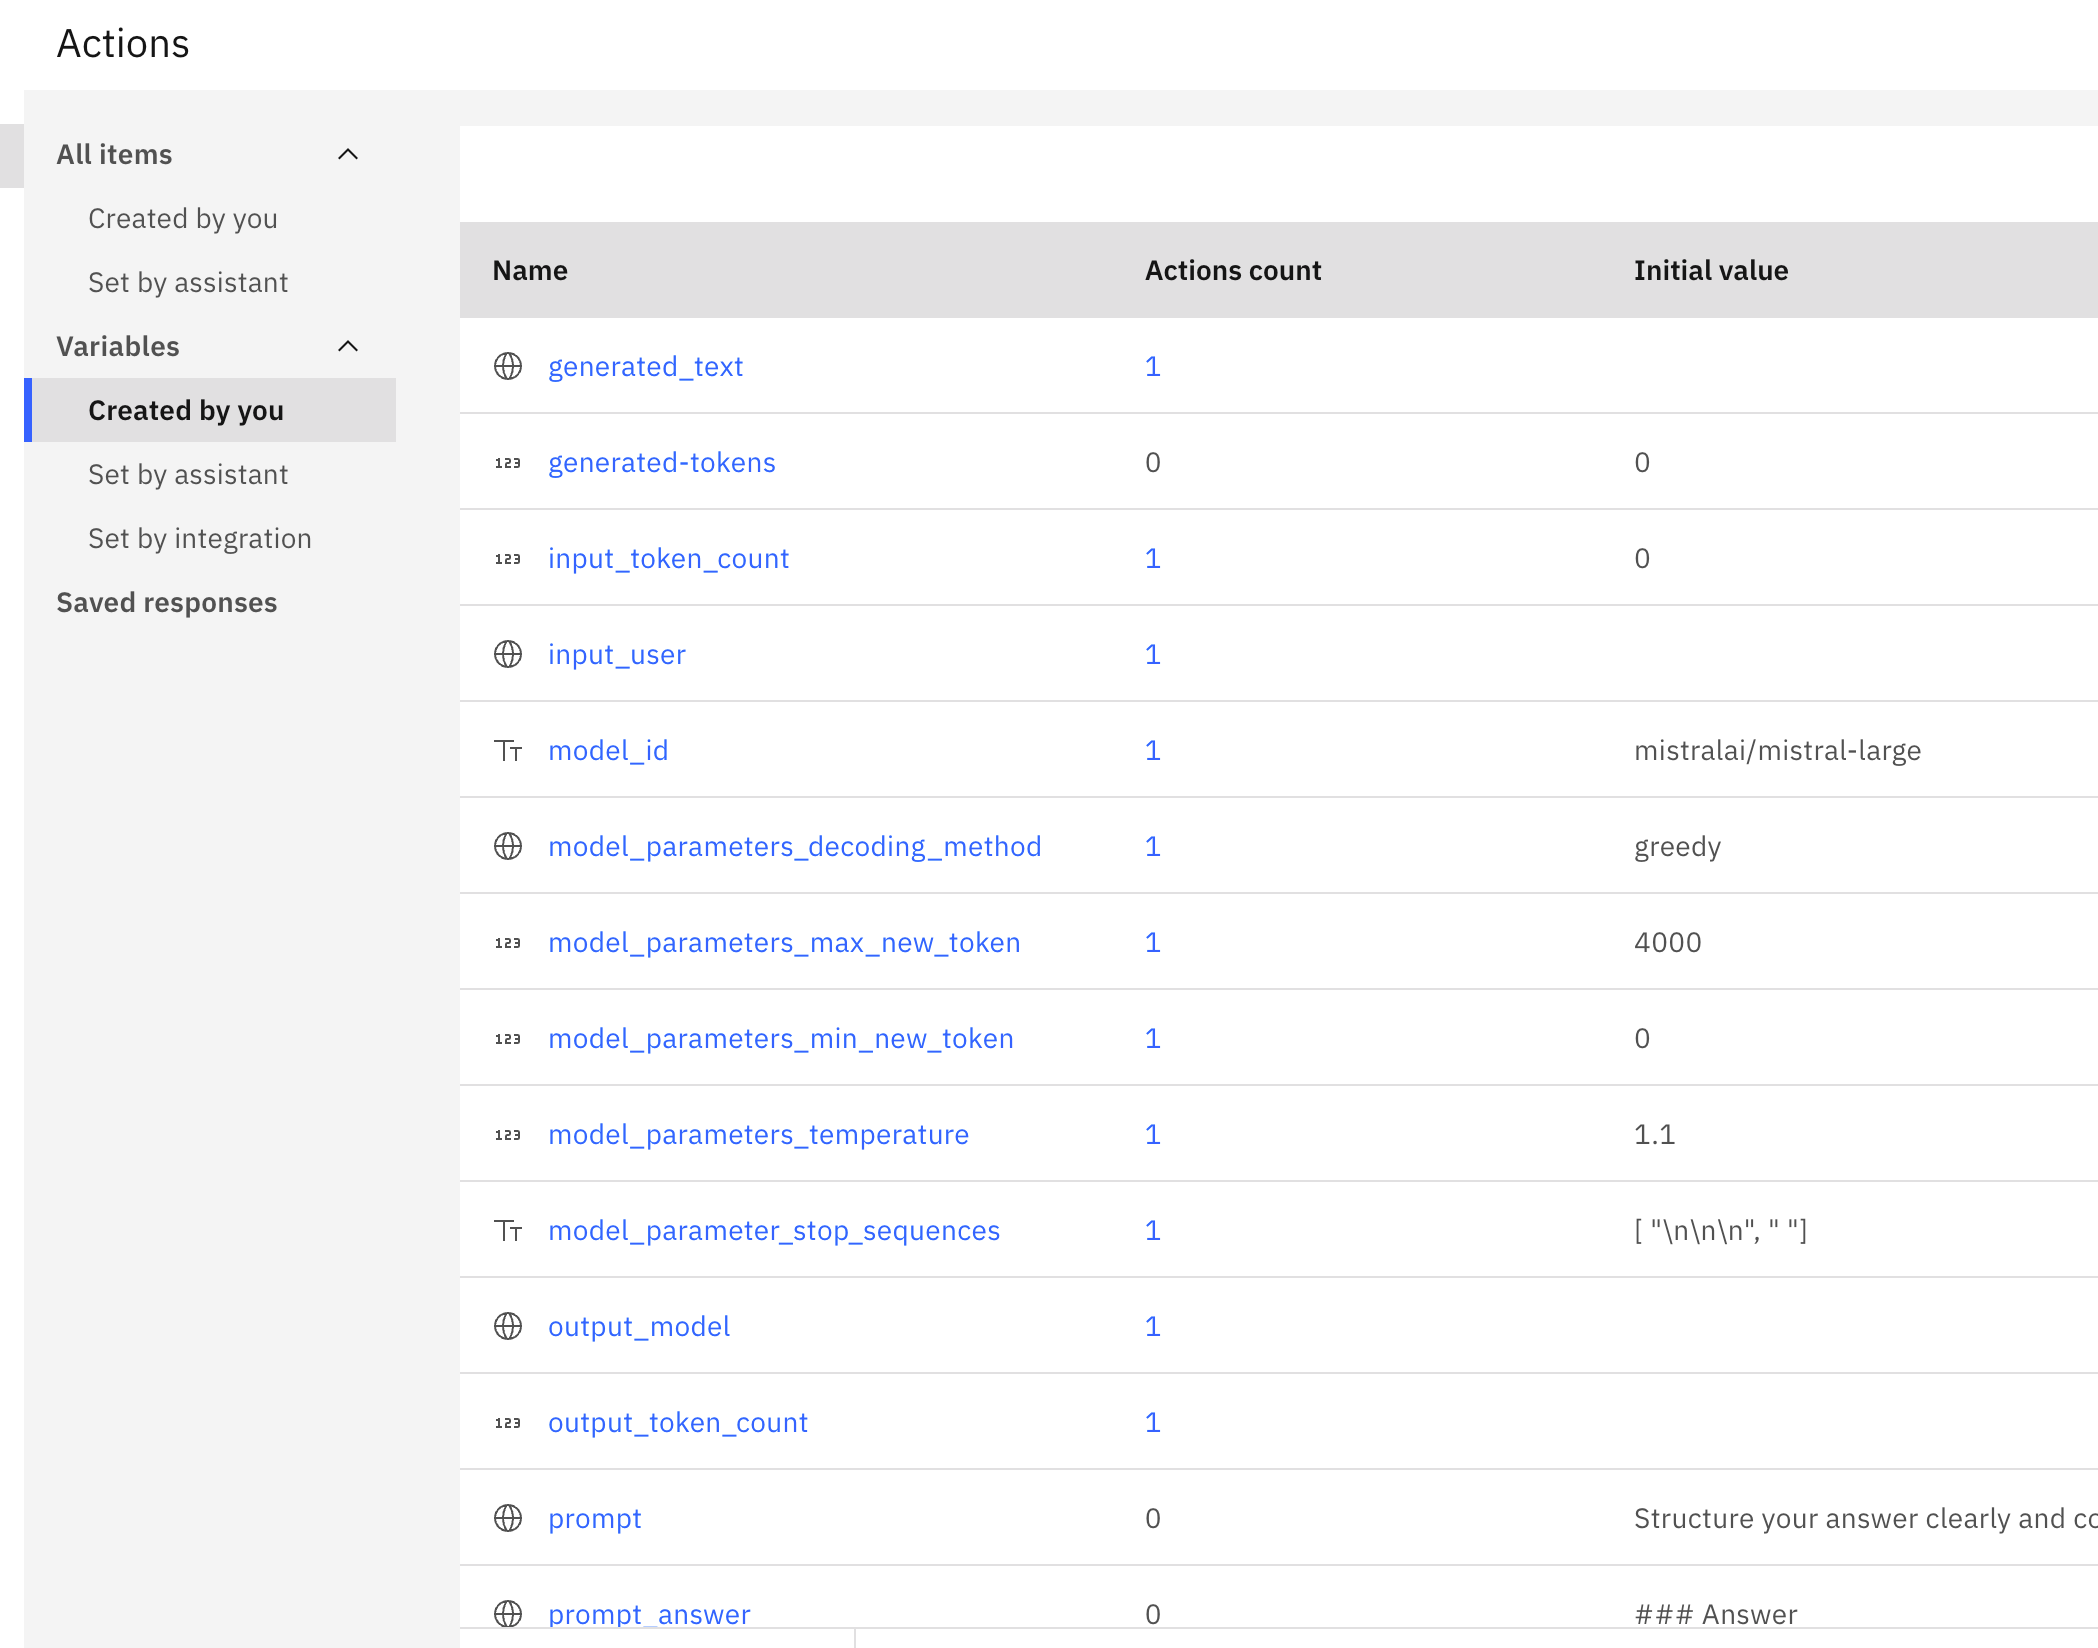
Here is an extraction of the variables:
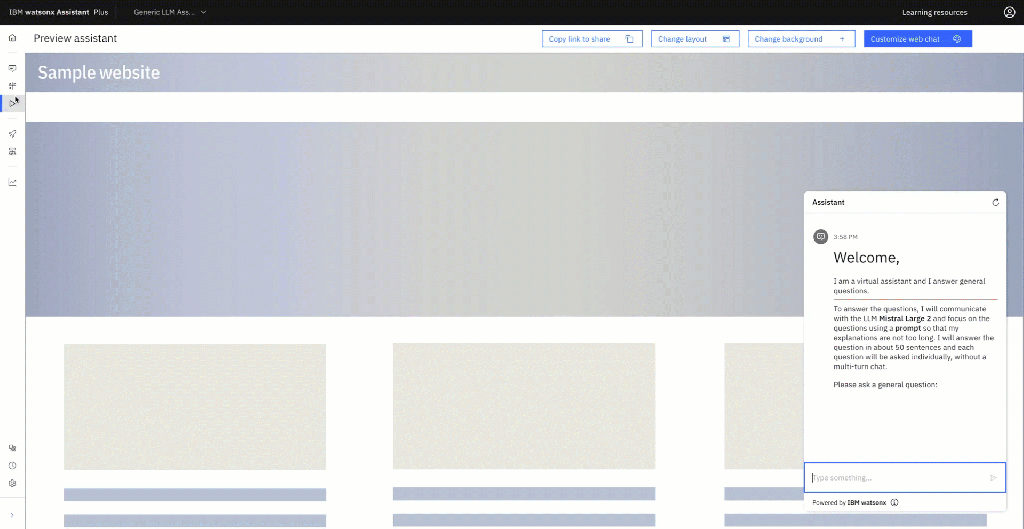
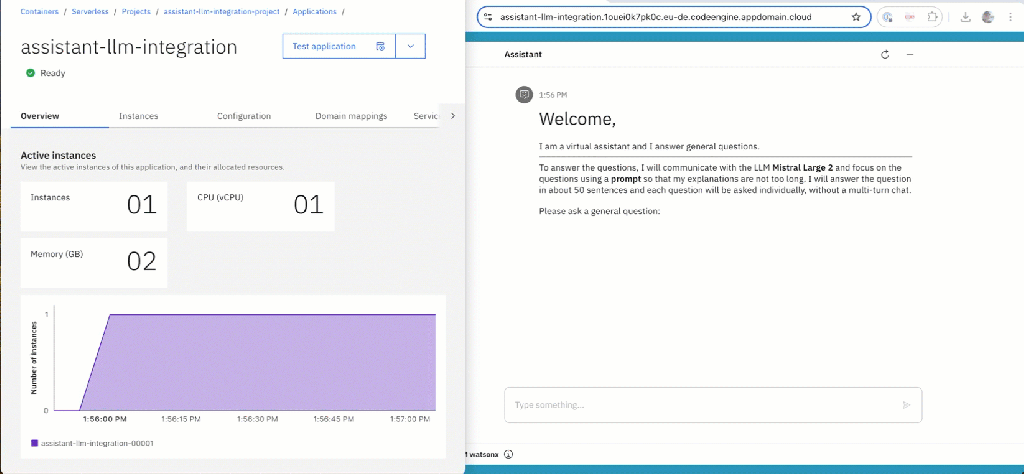
The example will later be deployed to IBM Code Engine. The GIF below shows an example of usage:
4. Setup
4.1 Pre-requisites
- Locally installed:
- Podman
- GitHub CLI
- IBM Cloud CLI
- IBM Cloud Code Engine Plugin
- IBM Cloud Container Registry Plugin
kubectlcommand line- GitHub CLI
- Instances/Service on IBM Cloud:
4.2 Clone the repository to your local machine
Please clone the GitHub repository to your local computer. This repository contains the needed configuration/automation and source files; we can follow along to build the example.
git clone https://github.com/thomassuedbroecker/watsonx-assistant-chat-ui-and-watsonx.git
4.3 Configuration
4.3.1 Set up a project in watsonx.ai
Therefore you can follow the IBM Cloud Documentation or my blog post AI Prompt Engineering: Streamlining Automation for Large Language Models.
Later you need collect the project_id form the watsonx project to access the model on watsonx.ai.
4.3.2 watsonx Assistant
Step 1: Create an Assistant service instance
To get into watsonx Assistant, you can follow the getting started in the IBM Cloud Documentation.
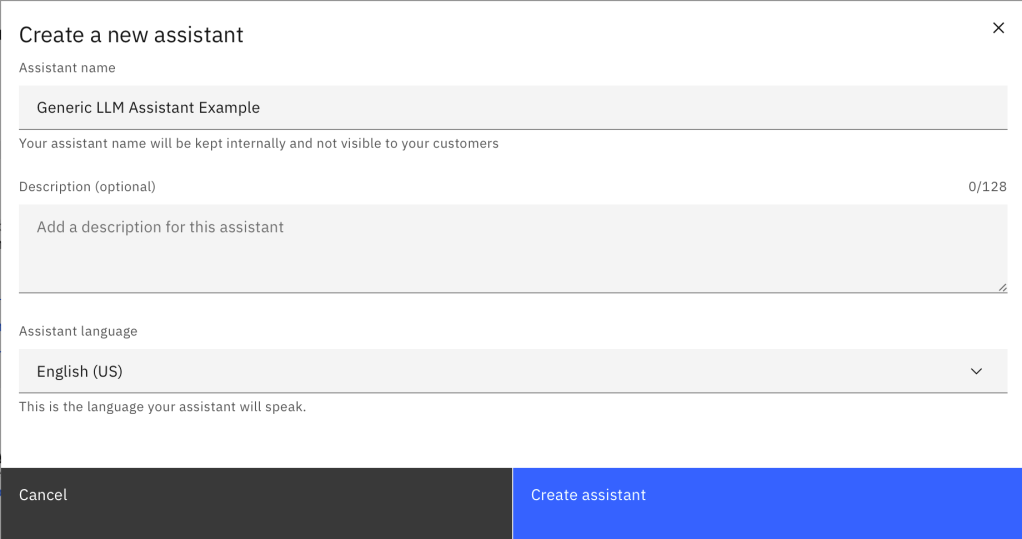
Step 2: Create an assistant
- Name:
Generic LLM Assistant Example
4.3.3 Create a watsonx Assistant extension to access watsonx LLMs
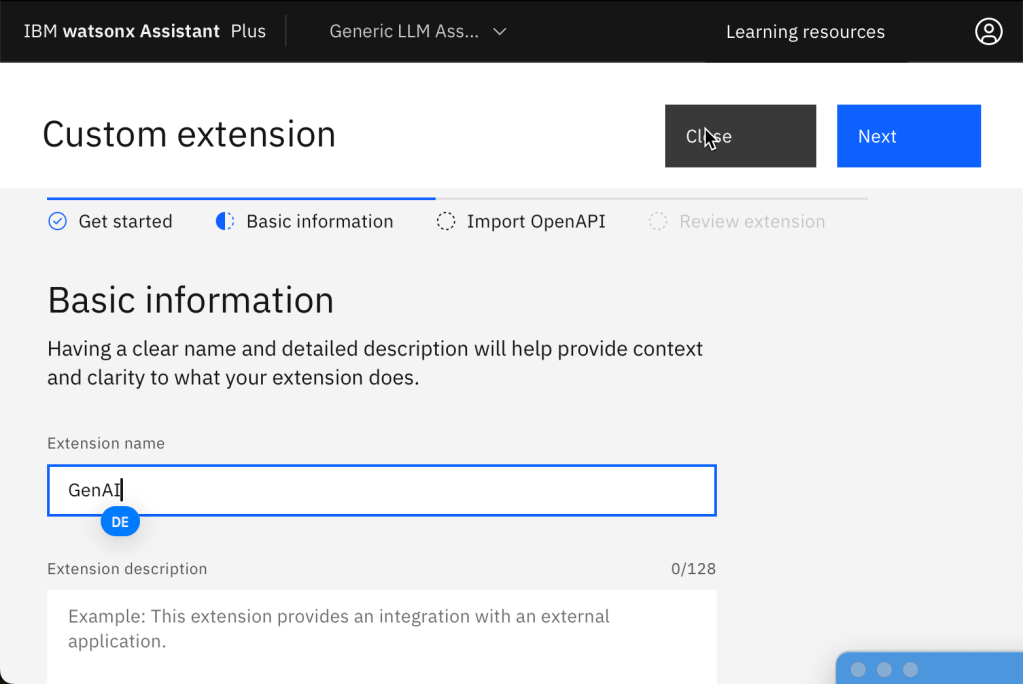
Step 1: Create an extension
- Press ‘
Integrations.Extensions.'Build custom extension'
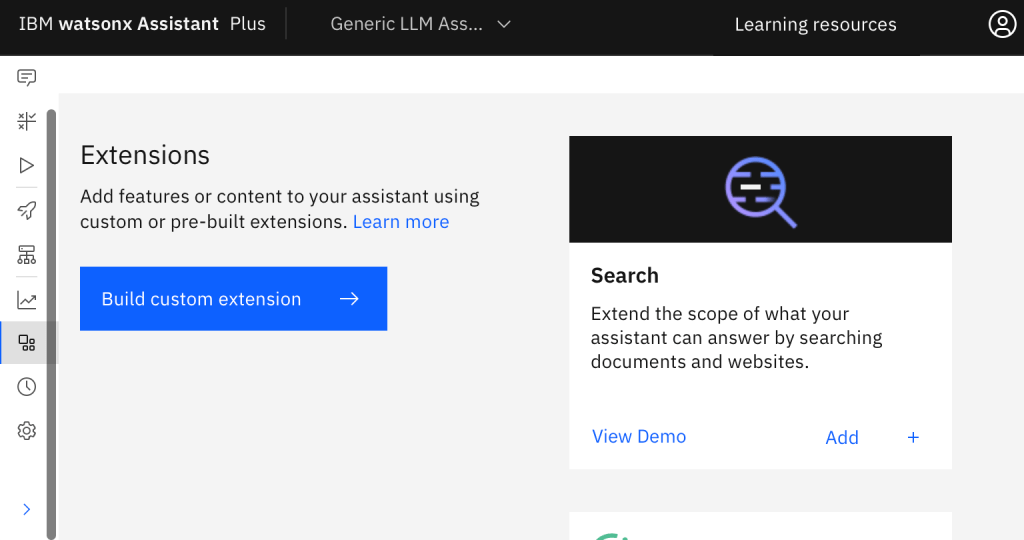
- Give the extension a name

Step 2: Import the Open API specification
- Upload the file
code/watsonx-assistant-configuration/watsonx-openapi.jsonand accept that the import will override all your current settings.
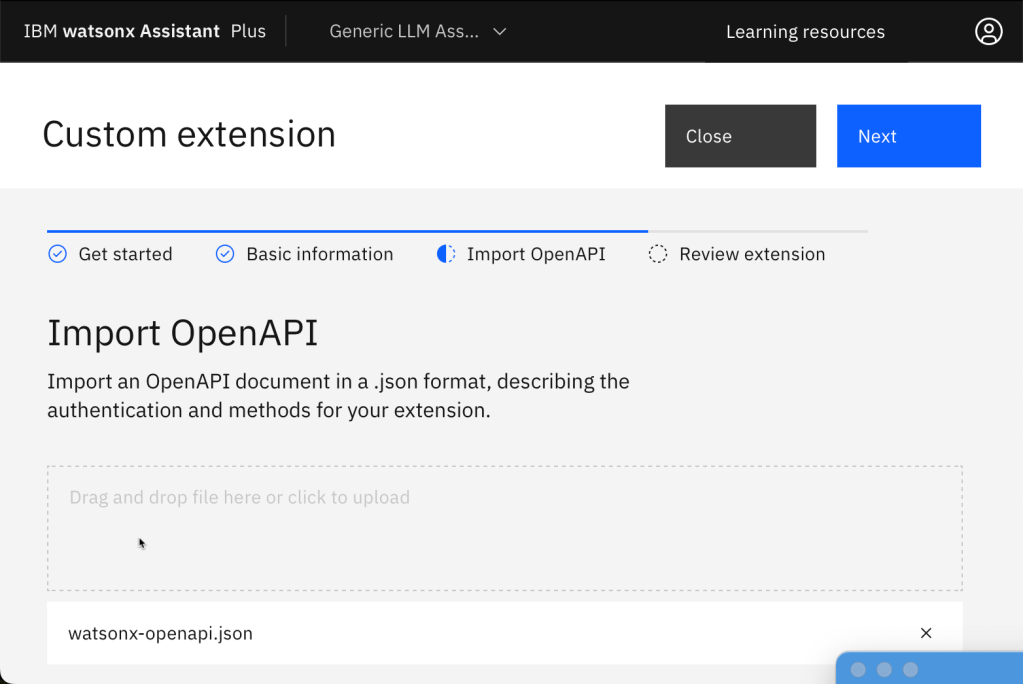
- Verify the specification and press
Finish.

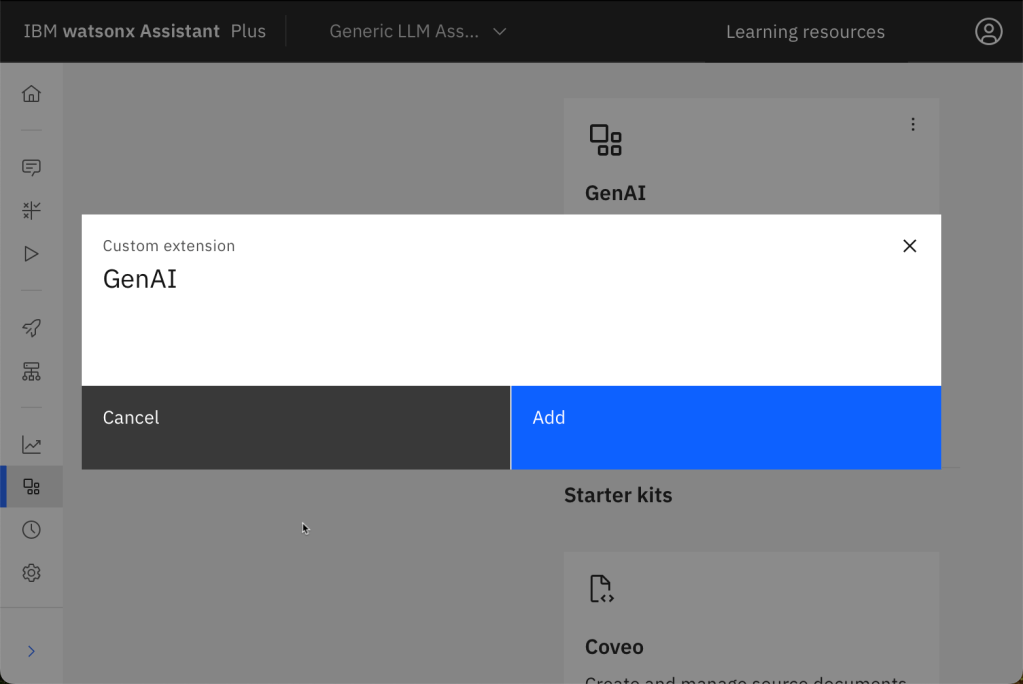
- To add the extension to an environment, select “Add”.
- Configure the authentication and region to access watsonx.
- Authentication Type:
OAuth 2 - Region:
eu-de - IBM Cloud API-KEY: Creating your IBM Cloud
API KEY
Move on and press Finish.

4.3.4 Create the needed actions
Now we create the actions in our Assistant from the template in the repository.
Step 1: Select actions and then Global settings
Step 2: In Global settings you chose the tab Upload/Download
Here, we will upload the file code/watsonx-assistant-configuration/generic-LLM-assistant-example-action.json and accept that the import will override all current settings.
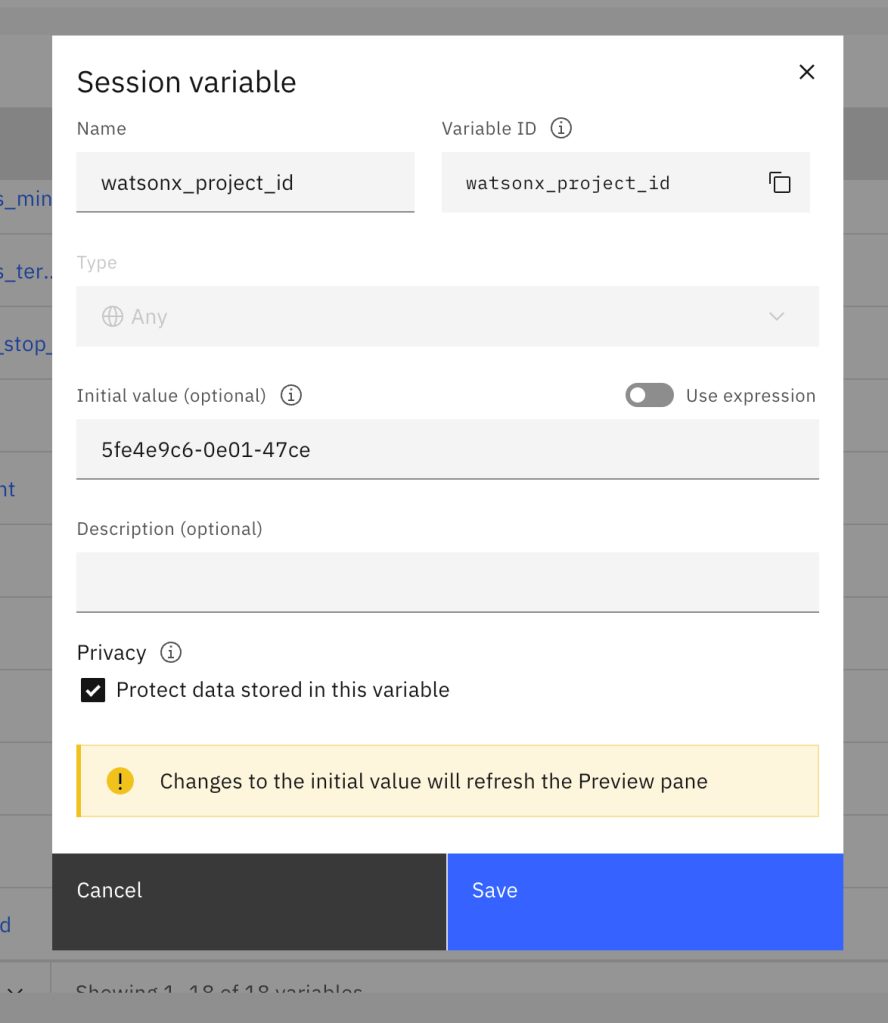
Step 5: Get the needed project ID to access the watsonx models.
Projects.YOUR_PROJECT.Manage.General
- Copy the project ID from your watsonx project

Step 6: Past the project ID into the action variable watsonx_project_id
4.3.5 Customize the web chat
Ensure you switch off the Home screen to ensure the welcome page is shown on the web page later startup
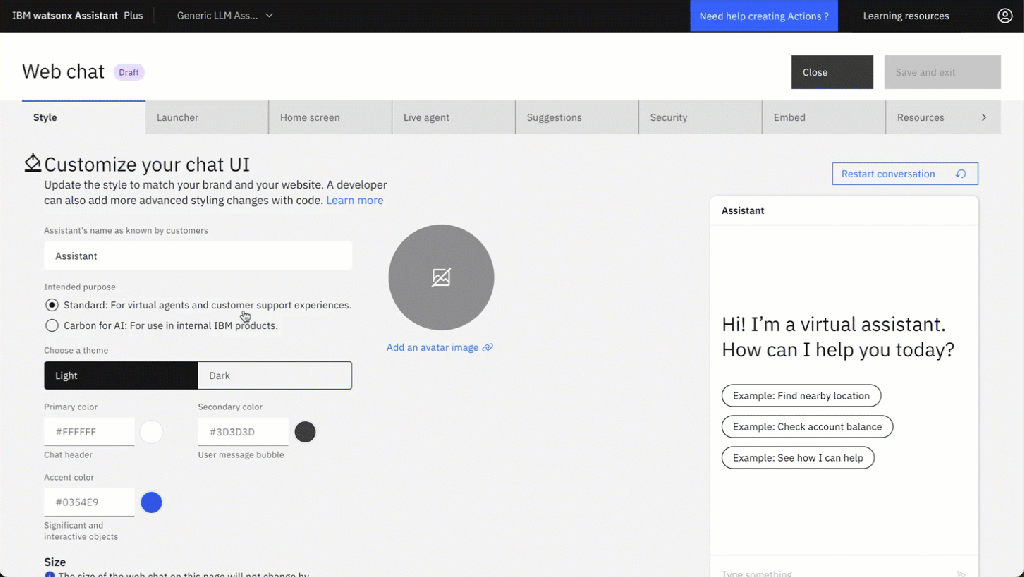
- Optional: Configure the display
- Theme:
Dark - Color settings
- Primary Color:
#2596be
- Primary Color:
- Theme:
4.3.5 (optional) Configure the usage of the extension in the action “Ask a general question”
This step is only needed if the “Ask a general question” extension is not configured automatically. (which generally should be the case)
Here, you can see the defined extension, which may not be used at the moment.
- Click on red marked step 2.

2. Now click on the red marked extension and press Edit extension.
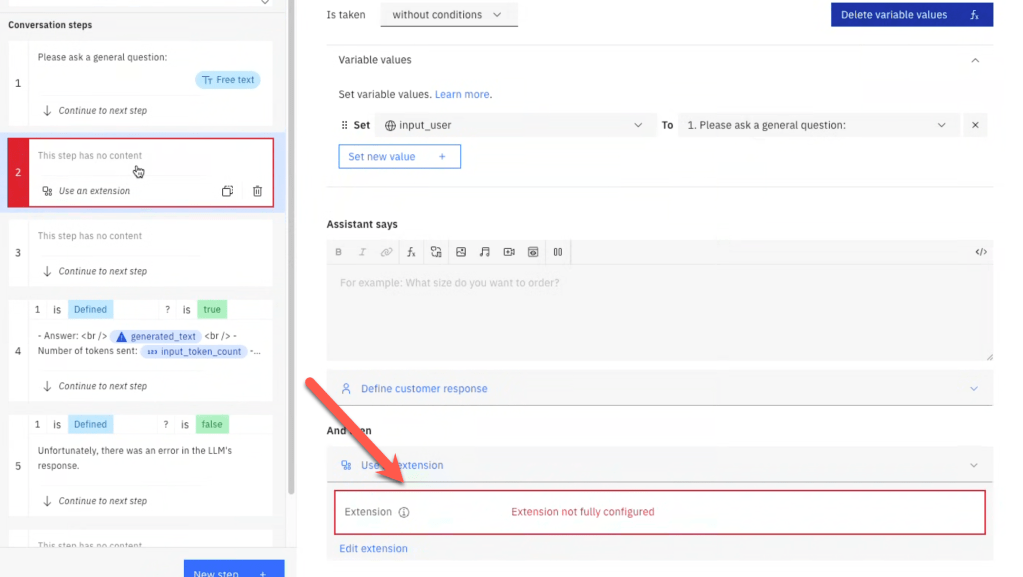
Note: Ensure you have added and fully configured the extension defined in the section 4.3.3 Create a watsonx Assistant extension to access watsonx LLMs.
3. Now you need to configure how the extension is used.
The input to the model contains the prompt definition built with a combination of variables in an expression.
4.4. Deploy the web page to Code Engine
The deployment process is automated in the bash script. That bash automation is a part of the repository, but before you execute this automation, ensure you set the environment variables for the web page because the web page needs access to the web chat in watsonx Assistant, this is done with the emded identifications. This information will be copied into the environment variable file during the container’s startup.
#!/bin/bash
cat <<EOF
REGION=${REGION:-''}
INTEGRATION_ID=${INTEGRATION_ID:-''}
SERVICE_INSTANCE_ID=${SERVICE_INSTANCE_ID:-''}
EOF
Step 1: Create the needed web page environment variables
In your cloned project create a new environment file.
cd code
cat .env_template > .env
That file contains following variables.
export REGION="eu-de"
export INTEGRATION_ID="XX"
export SERVICE_INSTANCE_ID="XXX"
You can copy values from the preview->customize web chat->Embed in the Generic LLM Assistant Example.
Step 2: Follow the steps for the automated deployment
Open the /code/ce-deployment/README.md in your cloned repository and follow the steps.
5. Execution
5.1 Local web page
Just open the web page in your browser and interact. Ensure you inserted the environment variable content into the web page.
5.2 Local container
When we build the container we will not add the index.html.
The index.html file will be generated during the container’s start because the generate_index_html.sh will use the environment variable to insert the IDs needed to access the watsonx Assistant.
This is an extract of the Dockerfile.
COPY ./nginx-os4-webapp.conf /etc/nginx/nginx.conf
COPY ./docker_entrypoint.sh .
RUN mkdir src

WORKDIR /src
COPY ./generate_index_html.sh .
Step 1: Set the environment variables
cd code
cat .env_template > .env
Set the variables of the environment file.
export REGION="eu-de"
export INTEGRATION_ID="XX"
export SERVICE_INSTANCE_ID="XXX"
You can copy values from the preview->customize web chat->Embed in the Generic LLM Assistant Example.
Step 2: Build the container
podman build -f Dockerfile.nginx.podman -t "localhost/watson-assistant-demo:0.0.1" .
Step 3: Run the container
source .env
podman run -it -p 8080:8080 -e REGION=${REGION} \
                            -e INTEGRATION_ID=${INTEGRATION_ID} \
                            -e SERVICE_INSTANCE_ID=${SERVICE_INSTANCE_ID} \
                               "localhost/watson-assistant-demo:0.0.1"
Step 4: Invoke the URL
http://localhost:8080/index.html
5.3 IBM Cloud Code Engine container
Just use the deployment from section 4.4 Deploy the web page to Code Engine.
Note: Open the /code/ce-deployment/README.md in your cloned repository and follow the steps.
6. Additional resources
- For the Ngnix Integration
- watsonx Assistant toolkit
- Define a JSON response in watsonx Assistant
- Layout definition
- Handle variables in watsonx Assistant
- IBM watsonx Assistant Toolkit
7. Summary
We use watsonx Assistant at the end only as a Front UI for Web Chat to interact with a Large Language Model LLM in watsonx.ai and not what it is built for.
However, as we have seen, this was a simple way to provide a simple professional UI with a minimum of coding.
The combination of
can be, in many situations, an easy start to get something running.
If you want to integrate security and build more complex integration’s, visit the Web Chat Security Complex example with a Node.js application in the watsonx Assistant toolkit.
I hope this was useful to you and let’s see what’s next?
Greetings,
Thomas
#watsonx, #ai, #ibm, #assistant, #webchat, #watsonxassistant, #ibmcloud, #watsonxai, #llm, #prompt, #userinterface
