
In this blog post I want to show, how to setup a local remote Java development container for Eclipse MicroProfile with OpenLiberty in Visual Studio Code.
I did that for the Authors microservice from the Cloud Native Starter project with MicroProfile 3.2, OpenJDK Java 11, and the latest OpenLiberty version.
That blog post is structured in:
- Setup and configuration of Visual Studio Code
- Run the Authors microservice in the remote development container
- Debug the Authors microservice in the remote development container
The documentation of remote development with Video Studio Code is here and Java Dev Environments with Containers is a great blog post, which does also cover the remote development with container.
1. Setup and configuration
Ensure you have installed Docker Desktop on your local machine.
Step 1: Install the following extensions in Visual Studio Code
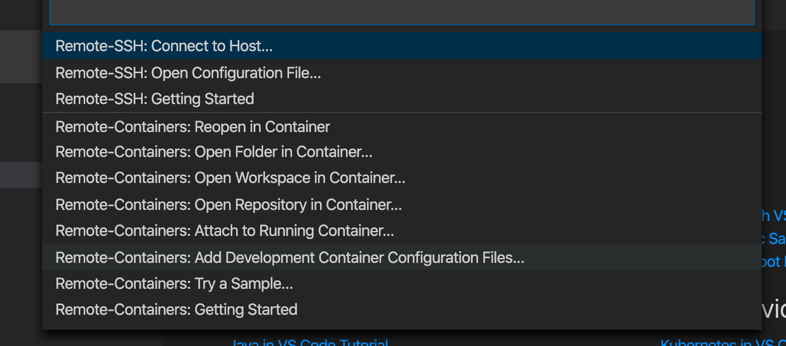
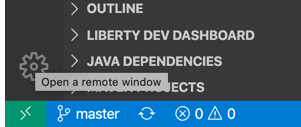
Step 2: Open in your Visual Studio Code workspace the Remote containers extension window
Step 3: Click the option “Add Development Container Configuration Files”

Step 4: Search for Java 11 an select “openjdk-11-jdk” Dockerfile
Step 5: Verify the newly created folders and files
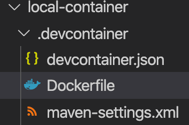
Step 6: Configure the devcontainer.json file. The gif shows the relevant folder and files for the remote container extension.

For the Authors microservice I need to configure a port forward configuration “forwardPorts”: [8080,3000,7777]
- Port 8080: as the default port for the development container
- Port 3000: is the port we use for the microservice on the OpenLiberty server
- Port 7777: is the remote debugging port for the OpenLiberty server
{

"name": "Java 11",
"dockerFile": "Dockerfile",

// Set *default* container specific settings.json values on container create.
"settings": {
"terminal.integrated.shell.linux": "/bin/bash",
"java.home": "/docker-java-home"
},
...
// Use 'forwardPorts' to make a list of ports inside the container available locally.
"forwardPorts": [8080,3000,7777],
....

}
Step 7: Configure the created Dockerfile to enable Maven in the container, therefore uncomment the section “install the Maven CLI Tools”
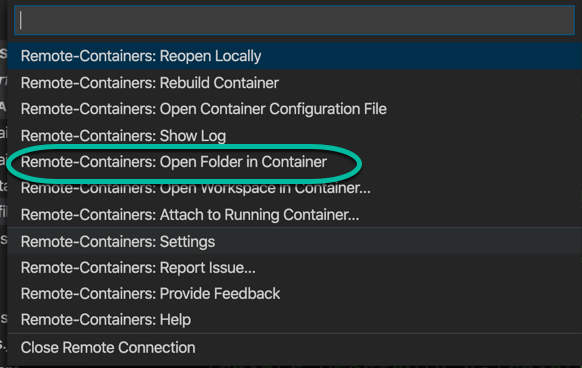
Step 8: Now open the local folder of the workspace in the remote development container. That will map the folder as volume to the development container and code changes will be saved on your local file system.

2. Run the Authors microservice in the development container
<plugins>
  <!-- Enable liberty-maven plugin -->
  <!-- tag::libertyMavenPlugin[] -->
  <plugin>
   <groupId>io.openliberty.tools</groupId>
   <artifactId>liberty-maven-plugin</artifactId>
   <version>3.1</version>
   <!-- tag::libertyMavenConfiguration[] -->
   <configuration>
     <serverName>authorsDevServerOnContainer</serverName>
     <configFile>liberty/server-container.xml</configFile>
    </configuration>
   <!-- end::libertyMavenConfiguration[] -->
  </plugin>
  <!-- end::libertyMavenPlugin[] -->
  <!-- Enable liberty-maven-plugin -->
</plugins>

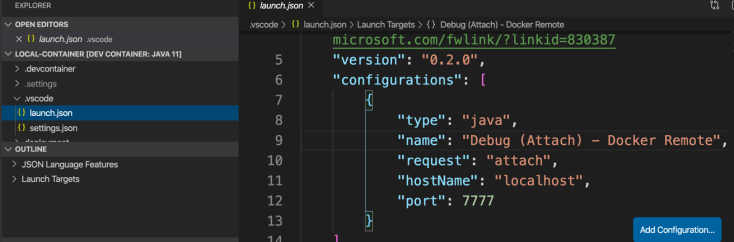
3. Debug the Authors microservice in the development container
Step 1: Create a break point in one of the classes of the Authors microservice
Step 2: Start the server with mvn liberty:dev
Step 3: Open the Authors mircoservice in a browser http://localhost:3000/openapi/ui
Step 4: Start the debugging with the configuration Debug (Attach) – Docker Remote
The two gifs are showing the 4 steps
- Start OpenLiberty in the development mode

- Debug the Authors microservice

I hope this was useful for you and let’s see what’s next?
Greetings,
Thomas
PS: My GitHub project with the source code is here.
#Docker, #Container, #Java, #VisualStudioCode, #RemoteDebug, #OpenLiberty, #RemoteDevelopment
