

In this blog post I want to show, how to create a new realm with Keycloak REST API 20.0.1. The Keycloak API has changed and my older blog post How to create a new realm with the Keycloak REST API? doesn’t work anymore for version 20.0.1. I automate the Keycloak realm creation for an example realm by using cURL in a bash script. First I created the blog post about Export a Keycloak (Version 20) realm and now I show the creation of an example realm in Keycloak. I took a look in the new Keycloak REST API documentation and into the Keycloak Node.js client. In this blog post I use an example realm I exported before, here is the link to the example-realm.
You can find the code for the bash script example in this GitHub repository Create a realm in Keycloak version 20.0.1 using bash scripting.
The blog post is structured in:
- Three tasks to create the new example realm
- Run the example
- Summary
Three tasks to create the new example realm
Here are the three tasks to create an example realm in Keycloak using bash scripting for local development.
- Start Keycloak in the development mode on a local container.
- Use
cURLwith the Keycloak REST API to authenticate to get aJWTaccess-token for the master realm to create the new example-realm. - Use the
cURLwith the givenJWTaccess-tokento create theexample-realm.
Run the example
Step 1: Clone the project
git clone https://github.com/thomassuedbroecker/keycloak-create-realm-bash.git
cd keycloak-create-realm-bash/scripts
Step 2: Start Keycloak locally in the development mode
Execute the local-start-keycloak.sh bash script.
sh ./local-start-keycloak.sh
- Example output:
Updating the configuration and installing your custom providers, if any. Please wait.
2022-12-12 19:30:35,726 INFO  [io.quarkus.deployment.QuarkusAugmentor] (main) Quarkus augmentation completed in 5105ms
...
2022-12-12 19:30:43,666 INFO  [org.keycloak.services] (main) KC-SERVICES0009: Added user 'admin' to realm 'master'
2022-12-12 19:30:43,670 WARN  [org.keycloak.quarkus.runtime.KeycloakMain] (main) Running the server in development mode. DO NOT use this configuration in production.
Step 3: Open a new terminal and ensure you in the same folder as before
pwd
- Example output:
/Users/..../keycloak-create-realm-bash/scripts
Step 4: Create the new realm
The following to entries are showing the new Keycloak REST API calls used in the bash script and if you follow the link you get to the relevant code in the bash script.
- Get JWT access-token $KEYCLOAK_SERVER_URL:PORT/realms/master/protocol/openid-connect/token
- Create a real $KEYCLOAK_SERVER_URL:PORT/admin/realms
Execute the local-configure-keycloak.sh bash script.
sh ./local-configure-keycloak.sh
- Example output:
************************************
 Configure Keycloak realm
************************************
  % Total    % Received % Xferd  Average Speed   Time    Time     Time  Current
                                 Dload  Upload   Total   Spent    Left  Speed
100  1887  100  1818  100    69   3393    128 --:--:-- --:--:-- --:--:--  3580
Access token : eyJhbGciOiJSUzI1NiIsInR5cCIgOiAiSldUIiwia2lkIiA6ICIyTXNJRzdtWmhCRWFoaWc2X2ItclNxLVBoRnlkczNjUF8yd3U5OHBrSDE0In0.eyJleHAiOjE2NzA4NDk5NTgsImlhdCI6MTY3MDg0OTg5OCwianRpIjoiN2E4NTYxZmEtN2NhZi00NjE5LWEyMDEtMzFiNTEwMTA4OGY3IiwiaXNzIjoiaHR0cDovL2xvY2FsaG9zdDo4MDgwL3JlYWxtcy9tYXN0ZXIiLCJzdWIiOiJlMjQ5ZjBkNC01Njk0LTRiZTAtOTI4MS0xOWIwMTVkNzFlMGUiLCJ0eXAiOiJCZWFyZXIiLCJhenAiOiJhZG1pbi1jbGkiLCJzZXNzaW9uX3N0YXRlIjoiZDIxYzU3M2ItZGQyMS00MWZmLTlkZWEtM2I4ZDRkZTAzNzc5IiwiYWNyIjoiMSIsInNjb3BlIjoicHJvZmlsZSBlbWFpbCIsInNpZCI6ImQyMWM1NzNiLWRkMjEtNDFmZi05ZGVhLTNiOGQ0ZGUwMzc3OSIsImVtYWlsX3ZlcmlmaWVkIjpmYWxzZSwicHJlZmVycmVkX3VzZXJuYW1lIjoiYWRtaW4ifQ.ZwWiv0Q-VWpwKzOjg_7YbkIAL_29AfNbGoqJoNKA8eCwpnplFKwv6HYlp3VfsFPVvO4hjekfxq8vXrx6QugBkE5fo7PJ06zDHFbtNzOmWR7RpX9Q4uOjRAHq2Gnvs3sHqEWUX0O4dkm5TRW81Cu7GTfiHgZkRtsVMk1OjV7ZtSJ7Ke4dK5C-IIvdNjN_NYxYq7fkWj2_hVqeHRLp31OXu8p8DgQeEKQo940kSu8yCMHQG-QjISiasu9onS94GkOep8DWIGpLQvzndBDMvmr-zHX_519CPldXpkbrwh3nUVM3JGaXdcn3CMloNFgZjgTujWgpThZKiUOah53vxI7qoA
------------------------------------------------------------------------
Create the realm in Keycloak
------------------------------------------------------------------------

  % Total    % Received % Xferd  Average Speed   Time    Time     Time  Current
                                 Dload  Upload   Total   Spent    Left  Speed
100 70726    0     0  100 70726      0  64574  0:00:01  0:00:01 --:--:-- 65065
------------------------------------------------------------------------
The realm is created.
Open following link in your browser:
http://localhost:8080/admin/master/console/#/example-realm
------------------------------------------------------------------------
Summary
Overall the creation of a new example realm with cURL worked fine and the bash script is working robust.
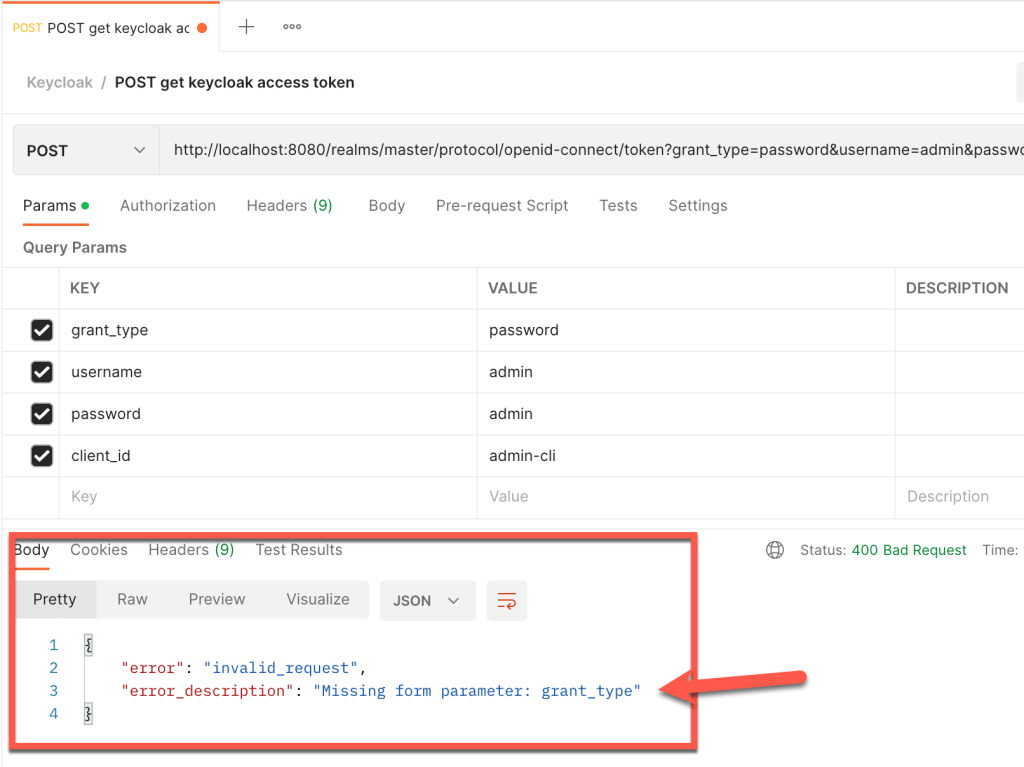
When I worked with the Keycloak REST API, I run into the known problem “error_description”: “Missing form parameter: grant_type” with Postman.
In Postman I used following configuration:
- RESTful command: POST
- URL: https://KEYCLOAKSERVER/realms/master/protocol/openid-connect/token
- Header:
| Key | Value |
| Content-Type | application/x-www-form-urlencoded |
- Body:
| Key | Value |
| grant_type | password |
| client_id | admin-cli |
| username | admin |
| password | admin |
The images show the problem in postman.
Maybe I will take a look into topic development mode for Keycloak in more detail in the future.
I hope this was useful for you and let’s see what’s next?
Greetings,
Thomas
#Keycloak, #RESTAPI, #CURL, #bashscripting
