

That blog post is about the usage of the “Quarkus Security OpenID Connect Multi Tenancy” implementation in an own small example, how to extract a tenant and reconfigure OIDC configuration for Keycloak.
This blog post is structured as followed:
- Objectives
- Use case definition
- Architecture
- Multi tenancy realization
- Technologies
- Implementation
- Summary
You can find the code in the under construction GitHub project.
Basics understanding: “… A tenant is a group of users who share a common access with specific privileges to the software instance. …” Wikipedia
Keep in mind there is no common single definition what exactly multi tenancy is in detail. One definition you can find in Wikipedia or one in the IBM learn hub, and many more exist.
Objectives
I wanted to start with a very simple microservices based application example for multi tenancy implementation, and for this application is a simple use case defined. The starting point from the technical and usage perspective, are these two workshops:
Get started to deploy a Java Microservices application to Code Engine- Authentication and Authorization for Java Microservices with Keycloak, Quarkus and Microprofile
So, if you want to get even more details of the implementation, just take a look in these workshops and the related blog posts.
Here is a related live stream to this blog post.
Use Case definition
Show articles based on a email domain, validated role and user authentication and authorization.
Basic Flow
- Insert email address.
- Based on the domain of your email address you are routed to the right tenant (example
blog.deandblog.com) - Login to the right realm on the identity and access management system.
- The articles are displayed according to the user role and tenant.
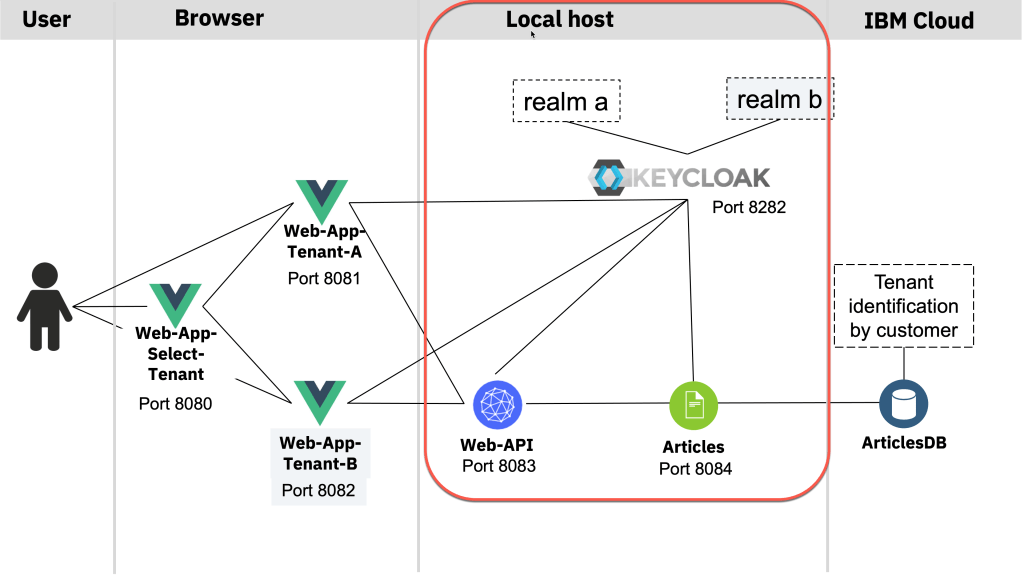
The following gif shows an example implementation overview of this use case on the local machine.

Architecture
The gif shows a simplified overview of the dependencies of the architecture in following sequence:
- Invoke
web-app-selectonport 8080and insert your email to select the domain for the tenant ((blog.de == tenantA) and (blog.com == tenantA)) - The related webfrontend for
blog.deis invoked, it’sweb-app-tenant-a(port 8081) that redirects to the right Keycloak realm (tenant-A) which provides the login and returns the access-token. We use that token to access theweb-apimicroservice (port 8083). Therefor we invoke theweb-apiREST endpoint related to the right tenant (realm), in this case it’s tenant-a. (user:alice;role:userin both realms) - The microservice
web-apiuses the the functionalities for multi tenancy provided by Quarkussecurity openID connect multitenancyto extract the invoked endpoint from therootcontextand set the right configuration for the given tenant, that means in this case for theKeycloak realm. Quarkus also does the validation of the access token at right Keycloak realm and forwards the given access-token to the microservice articles, by using the right REST endpoint for the given tenant. - The
articlesmicroservice does the same validation asweb-apiusing Quarkus and uses the right query to provide the needed articles data from the Cloudant database.
Multi tenancy realization
For the given use case following multi tenancy realization will be used.
- Variable frontends for each domain
- Microservice using Quarkus Security OpenID Connect Multi Tenancy
- Database will have an additional entry to separate the domains
- Identity and access management will be managed by different Keycloak realms
Technologies
The example application currently uses following technologies.
- Identity and access management (Keycloak)
- Multi tenancy (Quarkus Security OpenID Connect Multi Tenancy) for the microservices.
- Microservices (Quarkus)
- Web frontend Vue.js (Web frontend with JavaScript)
- (optional a Database) Cloudant
Implementation
The Quarkus Security OpenID Connect Multi Tenancy for the multi tenancy of the Java microservices is used for the implementation. Here we focus only on the example implementation for the web-api microservice.
These are the steps:
- Provide a REST endpoint for each tenant
- Extract the invoked endpoint from the
rootcontextand set the right configuration in theCustomTenantConfigResolverclass for the given tenant, that means in this case for theKeycloak realm. - Based on the known tenant invoke the right endpoint of the
articles microservice.- Create REST client for each tenant
- Invoke the right client
Provide a REST endpoint for each tenant
Relevant code in ArticleResource.java of the web-api service.
In this case these are the two endpoints: @Path("/articlesA") @Path("/articlesB") you find in the code.
   @GET
    @Path("/articlesA")
    @Produces(MediaType.APPLICATION_JSON)
    //@Authenticated
    @RolesAllowed("user")
    @NoCache
    public List<Article> getArticlesA() {
        try {
            List<CoreArticle> coreArticles = articlesDataAccess.getArticles(5);
            System.out.println("-->log: com.ibm.webapi.ArticleResource.getArticles -> articlesDataAccess.getArticles");
            return createArticleList(coreArticles);
        } catch (NoConnectivity e) {
            System.err.println("-->log: com.ibm.webapi.ArticleResource.getArticles: Cannot connect to articles service");
            throw new NoDataAccess(e);
        }
    }

    @GET
    @Path("/articlesB")
    @Produces(MediaType.APPLICATION_JSON)
    //@Authenticated
    @RolesAllowed("user")
    @NoCache
    public List<Article> getArticlesB() {
        try {
            List<CoreArticle> coreArticles = articlesDataAccess.getArticles(5);
            System.out.println("-->log: com.ibm.webapi.ArticleResource.getArticles -> articlesDataAccess.getArticles");
            return createArticleList(coreArticles);
        } catch (NoConnectivity e) {
            System.err.println("-->log: com.ibm.webapi.ArticleResource.getArticles: Cannot connect to articles service");
            throw new NoDataAccess(e);
        }
    }
Extract the endpoint and set the right configuration in the CustomTenantConfigResolver
Extract the invoked endpoint from the rootcontext and set the right configuration in the CustomTenantConfigResolver for the given tenant, that means in this case for the Keycloak realm.
Relevant code in CustomTenantConfigResolver.java of the web-api service.
"articlesA".equals(parts[1])"articlesB".equals(parts[1])
package com.ibm.webapi;

import javax.enterprise.context.ApplicationScoped;

// Tenant
import io.quarkus.oidc.TenantConfigResolver;
import io.quarkus.oidc.OidcTenantConfig;
import io.vertx.ext.web.RoutingContext;

@ApplicationScoped
public class CustomTenantConfigResolver implements TenantConfigResolver {

    @Override
    public OidcTenantConfig resolve(RoutingContext context) {
        System.out.println("-->log: com.ibm.web-api.CustomTenantResolver.resolve : " + context.request().path());

        // 1. Extract path
        String path = context.request().path();
        String[] parts = path.split("/");

        if (parts.length == 0) {
            // resolve to default tenant configuration
            return null;
        }

        // 2. Verify path with given tenant options
        if ("articlesA".equals(parts[1])) {
            OidcTenantConfig config = new OidcTenantConfig();

            System.out.println("-->log: com.ibm.web-api.CustomTenantResolver.resolve A: " + config.getToken().getIssuer().toString());

            // 3. Set the right configuration for the Keycloak realm
            config.setTenantId("tenantA");
            config.setAuthServerUrl("http://localhost:8282/auth/realms/tenantA");
            config.setClientId("backend-service");
            OidcTenantConfig.Credentials credentials = new OidcTenantConfig.Credentials();
            credentials.setSecret("secret");
            config.setCredentials(credentials);

            System.out.println("-->log: com.ibm.web-api.CustomTenantResolver.resolve A: " + config.toString());

            return config;
        }

        if ("articlesB".equals(parts[1])) {
            System.out.println("-->log: com.ibm.web-api.CustomTenantResolver.resolve");
            OidcTenantConfig config = new OidcTenantConfig();

            System.out.println("-->log: com.ibm.web-api.CustomTenantResolver.resolve issuer: " + config.getToken().getIssuer().toString());

            config.setTenantId("tenantB");
            config.setAuthServerUrl("http://localhost:8282/auth/realms/tenantB");
            config.setClientId("backend-service");
            OidcTenantConfig.Credentials credentials = new OidcTenantConfig.Credentials();
            credentials.setSecret("secret");
            config.setCredentials(credentials);

            System.out.println("-->log: com.ibm.web-api.CustomTenantResolver.resolve B: " + config.toString());

            return config;
        }


        return null;
    }
}
Based on the known tenant invoke the right endpoint of the articles service
Now we can invoke articles microservice, which is implemented in the same way.
1. CREATE REST CLIENT FOR EACH TENANT
Relevant code in ArticlesDataAccess.java of the web-api service.
URI apiV1 = null;

        apiV1 = UriBuilder.fromUri(articles_url_tenant_A).build();
        System.out.println("-->log: com.ibm.web-api.ArticlesDataAccess.initialize URI (tenantA) : " + apiV1.toString());
        articlesServiceA = RestClientBuilder.newBuilder()
                .baseUri(apiV1)
                .register(ExceptionMapperArticles.class)
                .build(ArticlesService.class);

        apiV1 = UriBuilder.fromUri(articles_url_tenant_B).build();
        System.out.println("-->log: com.ibm.web-api.ArticlesDataAccess.initialize URI (tenantB) : " + apiV1.toString());
        articlesServiceB = RestClientBuilder.newBuilder()
                .baseUri(apiV1)
                .register(ExceptionMapperArticles.class)
                .build(ArticlesService.class);
2. INVOKE THE RIGHT CLIENT
Relevant code in ArticlesDataAccess.java of the web-api service.
String tenant = tenantJSONWebToken();
            System.out.println("-->log: com.ibm.web-api.ArticlesDataAccess.getArticles (tenant): " + tenant );

            if ("tenantA".equals(tenant)){
                System.out.println("-->log: com.ibm.web-api.ArticlesDataAccess.getArticles " + tenant);
                return articlesServiceA.getArticlesFromService(amount);
            }

            if ("tenantB".equals(tenant)){
                System.out.println("-->log: com.ibm.web-api.ArticlesDataAccess.getArticles " + tenant);
                return articlesServiceB.getArticlesFromService(amount);
            } else {
              System.out.println("-->log: com.ibm.web-api.ArticlesDataAccess.getArticles(NO TENANT)");
              return null;
            }
Summary
With all this in mind this was a good first step for the example application implementation.
Now the example application needs to externalize the hardcoded parts to enable a containerized usage on different container orchestration platforms such as Kubernetes, OpenShift or on a serverless framework like IBM Cloud Code Engine.
The “Quarkus Security OpenID Connect Multi Tenancy” gives an effective framework to implement an endpoint related selection for multi tenancy. I don’t know, if I will continue on this project, but I just wanted to capture what I’ve found out so far and share.
I hope this was useful for you and let’s see what’s next?
Greetings,
Thomas
#keycloak, #quarkus, #java, #multitenancy

Leave a comment