

This blog post is about, how to create a custom dictionary model for Watson NLP. One capability of the Watson NLP is the “Entity extraction to find mentions of entities (like person, organization, or date).” We will adapt the Watson NLP model to extract entities from a given text to find single entities like names and locations which are identified by an entry and its label.
Note: Watson NLP for Embed only supports at the moment only Text classification – Ensemble model and Text classifcation – BERT model.
We are going to create a custom model to recognize entities using a custom dictionary for Watson NLP model. We use Watson Studio on IBM Cloud with a Juypiter notebook and a Watson NLP to customize the Watson NLP model.
Then we will follow these three main steps:
- We define training data
Therefor we define a dictionary list with names like Peter and a table with a label for a location type and its entry and a label mapping. The labels are sight or place and an entry is for example Time Square.
Here is the sample data:
- Dictionary of entities
| Names |
|---|
| Bruce |
| Peter |
- Table mapping
| Label | Entry |
|---|---|
SIGHT | Times Square |
PLACE | 5th Avenue |
- We customize the model for Watson NLP by training the model with the given dictionary data.
- Then we test the custom model with a sample sentence: ” Bruce is at Times Square “
The Watson NLP result for the sentence will be: “The sentence contains 1 name, in this case Bruce , and it includes one location called Times Square” that is labeled SIGHT for example.
Then we will save and download the custom model. You can get the final Jupyter Notebook in the GitHub project Watson NLP custom model.
For more details, please visit the IBM Cloud documentation Detecting entities with a custom dictionary and Creating your own models.
Detailed steps to create the custom model for
Here are the main topics to create a custom model:
- Create the
WatsonStudio instance - Create a project with an
ObjectStorage - Create a
Juypter notebook - Create a customized
Watson NLPmodel - Save and download the custom model
1. Create the WatsonStudio instance
Step 1: Create a WatsonStudio instance for example with a free plan
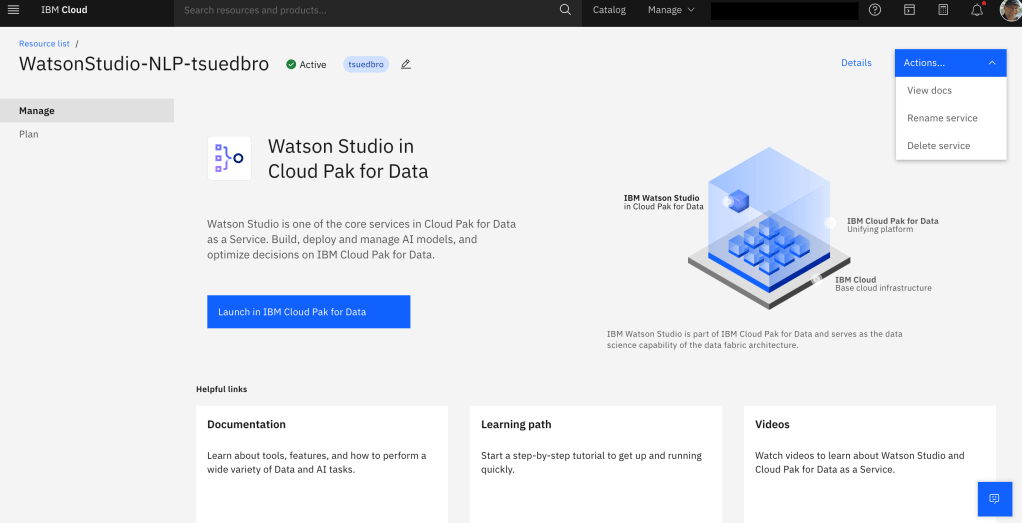
Step 2: Press Launch in IBM Cloud Pak for Data
- Skip the Tour for now
Step 3: Press Cancel

2. Create a project with an ObjectStorage
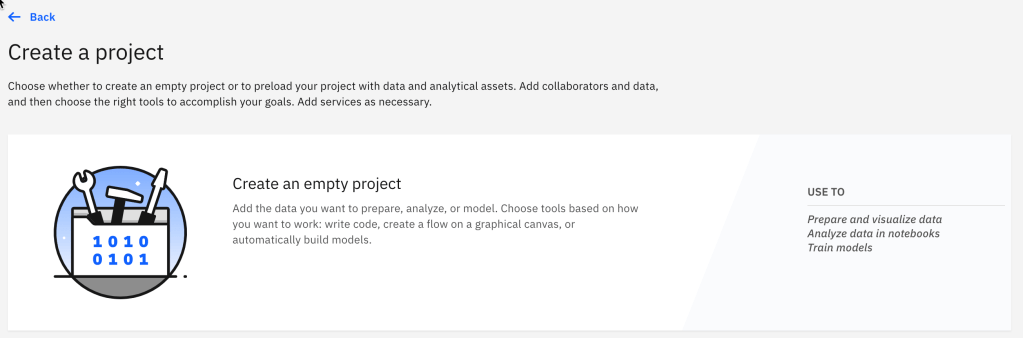
Step 1: Create a new project

Step 2: Select an empty project
Step 3: Create an Object Storage instance with a free plan

Step 4: Select the create tab and define plan, name, and resource group and press Create
A new browser tab is create and you can create a Cloud Object Storage instance.

Step 5: Go back to the browser tab with Watson Studio
- Refresh your browser
- Select the newly create Object Storage
- Choose a new for your project
- Press
Create

3. Create a Jupyter notebook
Step 1: Select Assets in the project and chose New asset

Step 2: Click Code Editors and select Jupyter notebook editor

Step 3: Now select a Watson NLP runtime and give the notebook a name. Then press Create
Note: Runtime information Watson Natural Language Processing library Here we use the
Runtime 22.1.

Step 4: Now your notebook is ready for Watson NLP

4. Create a customized Watson NLP for Embed model
Step 1: Create a module directory
Insert the code and press Run.
import os
import watson_nlp
module_folder = "NLP_Dict_Module_1"
os.makedirs(module_folder, exist_ok=True)
- Example output:

Step 2: Create data
Insert following code and press Run.
# Create a term list dictionary
term_file = "names.dict"
with open(os.path.join(module_folder, term_file), 'w') as dictionary:
     dictionary.write('Bruce')
     dictionary.write('\n')
     dictionary.write('Peter')
     dictionary.write('\n')

# Create a table dictionary
table_file = 'Places.csv'
with open(os.path.join(module_folder, table_file), 'w') as places:
     places.write("\"label\", \"entry\"")
     places.write("\n")
     places.write("\"SIGHT\", \"Times Square\"")
     places.write("\n")
     places.write("\"PLACE\", \"5th Avenue\"")
     places.write("\n")
- Example output:

Step 4: Include the Watson NLP library to load dictionaries and configuring matching options
We have chosen the Runtime 22.1 environment that include the Watson Natural Language Processing library. So we move on with following code and press Run.
# Load the dictionaries
# Use the following helper method when using a Runtime 22.1 environment with NLP
dictionaries = watson_nlp.toolkit.DictionaryConfig.load_all([{
      'name': 'Names',
      'source': term_file,
      'case':'insensitive'
  }, {
      'name': 'places_and_sights_mappings',
      'source': table_file,
      'dict_type': 'table',
      'mappings': {
          'columns': ['label', 'entry'],
          'entry': 'entry'
      }
  }])
- Example output:

Step 5: Train the model
Insert following code and press Run.
custom_dict_block = watson_nlp.resources.feature_extractor.RBR.train(module_folder,
language='en', dictionaries=dictionaries)
- Example output:

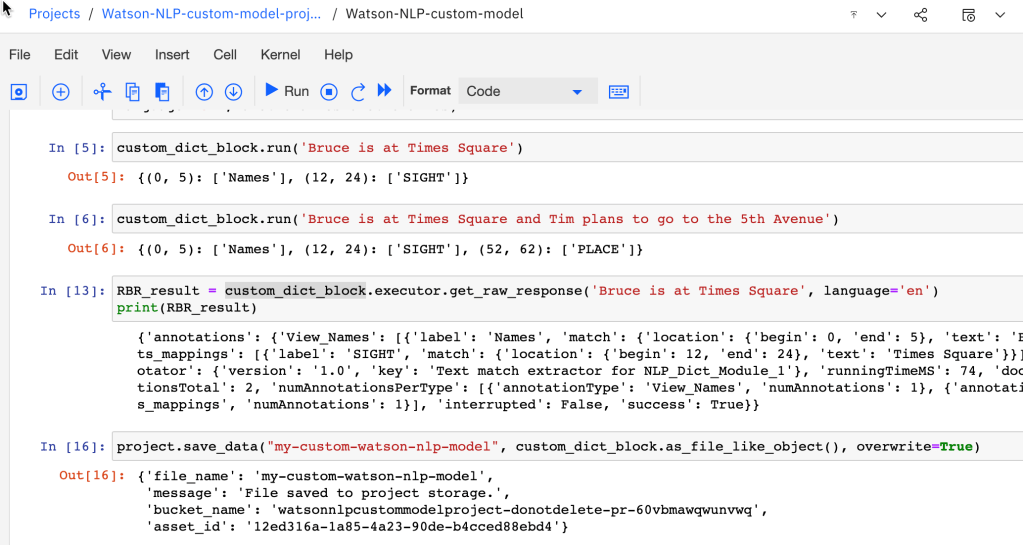
Step 6: Check the custom model with some sample sentences
Insert following code and press Run.
custom_dict_block.run('Bruce is at Times Square')

Insert following code and press Run.
custom_dict_block.run('Bruce is at Times Square and Tim plans to go to the 5th Avenue')
- Example output:

Step 7: Show the detailed result for one sentence
Insert following code and press Run.
RBR_result = custom_dict_block.executor.get_raw_response('Bruce is at Times Square', language='en')
print(RBR_result)
- Example output:

5. Save and download the custom model
Step 1: Select Insert project token.

Step 2: Press “Watson-NLP-custom-model-project”.

Step 3: Define a name and select Editor

Step 4: Select again Insert project token.
Now the access token was inserted to your project. Check the code and press Run.
- Example output:

Step 5: Save the model
Insert following code and press Run.
project.save_data("my-custom-watson-nlp-model", custom_dict_block.as_file_like_object(), overwrite=True)
- Example output:
Step 6: Navigate to the project

Step 7: Check to model was save

Step 8: Download the model

I hope this was useful to you and let’s see what’s next?
Greetings,
Thomas
#ibmcloud, #watsonnlp, #jupyternotebook, #ai, #watsonstudio
