

This blog post is about, how to customize a classification model for Watson NLP for Embed and use it on your local machine.
One capability of the Watson NLP is “classifying a text”. Let us start with some examples for a statistical classification from Wikipedia:
“Assign a classification to a given email as a "spam" or "non-spam" class or assigning a diagnosis to a given patient based on observed characteristics of the patient (blood pressure, presence or absence of certain symptoms, etc.).”
Watson NLP does “classifying text” by the usage of:
- Classic machine learning using SVM (Support Vector Machines)
- Deep learning using CNN (Convolutional Neural Networks)
- A transformer-based algorithm using the Google BERT multilingual model.
I created a customized simplified example based on following resources:
- Tutorials
Explore text classification with Watson NLPon IBM DeveloperServe a custom model using stand-alone containerson IBM Developer
- GitHub project
IBM Build Lab teamClassifying customer complaints using Watson NLP
- Blog post
- A blog post from Niklas Heidloff Training Text Classification Models with Watson NLP
- IBM Cloud documentation
The blog post is structured in:
- Objective of the example
- Technical prerequisites
- General walkthrough
- Summary
1. Objective of the example
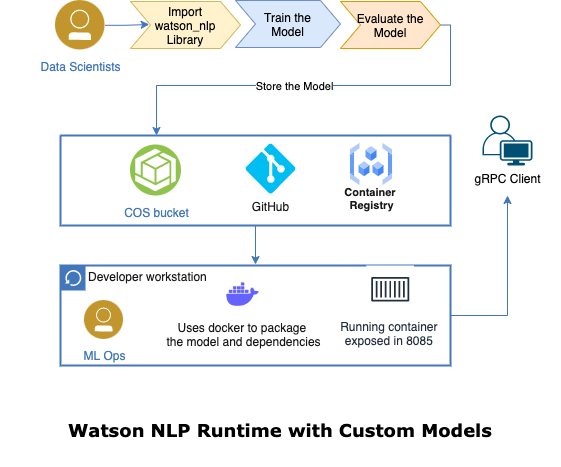
The goal of the example is to create a custom model Watson NLP for Embed and use this model on the local computer. The following diagram shows what we are going to do in that blog post and shows the end-to-end journey we will have.
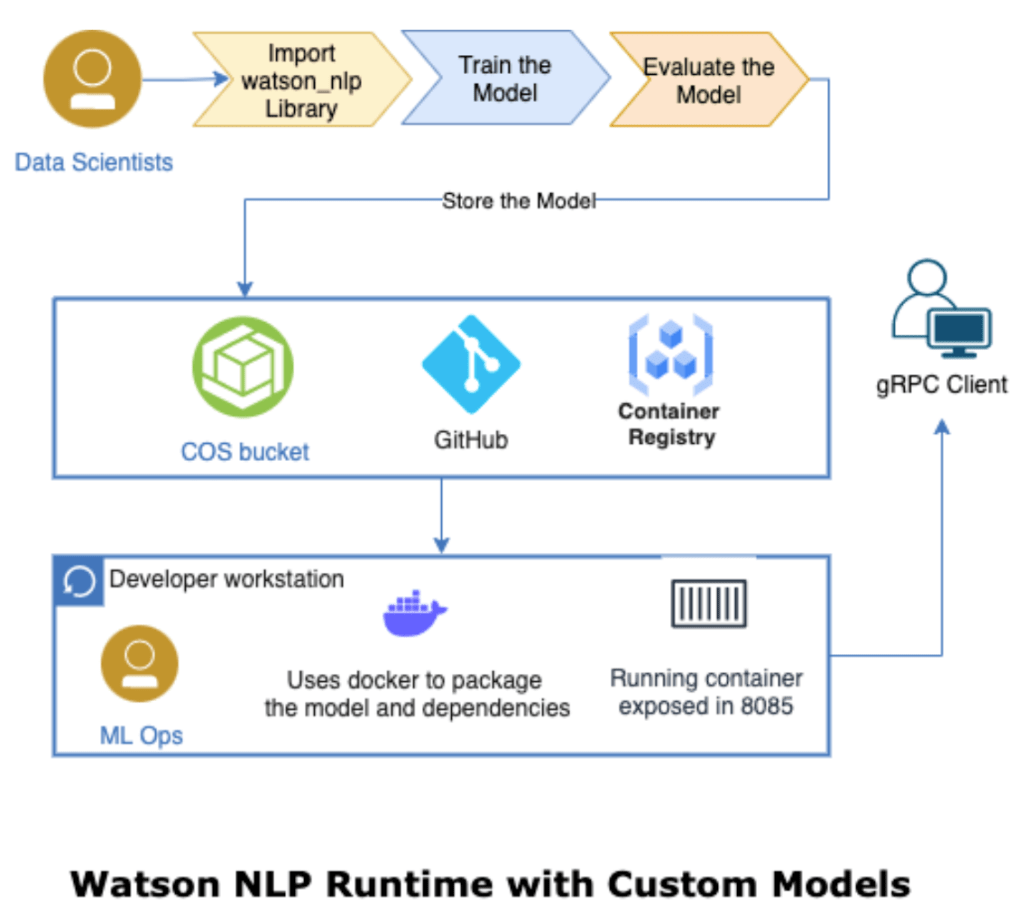
Source: Serve a custom model using stand-alone containers
That means we do some Data Scientists tasks and some ML Ops tasks. (ML Ops reference architecture from IBM)
We want to classifying customer complaints for this example, to do this we need to know which types (category, classes, labels) of complaints we have, and we need text examples for these complaints.
Let’s imagine we want to classify incoming financial complaints, but at the moment we have no idea about categories or examples of complaints in this area.
Note: I’m not a
data scientistso I encourage you to look at related and linked resources inside my blog post, if you want to learn more.
2. Technical prerequisites
- You need an IBM Cloud account
- Watson Studio instance
- An easy way to start is that you follow the step in my blog post
Customize a model for Watson NLP - Docker installed
- An IBM entitlement key to download the runtime container for Watson NLP to your local computer
(your can also try here)
3. General walkthrough
The following steps are general, non-hands-on steps and they don’t contain technical details.
Sometimes the steps link to hands-on steps in the GitHub project Watson NLP custom model, this GitHub project contains the source code of the example.
Step 1: Find the data for our example
We want to classify incoming financial complaints, but at the moment we have no idea about categories or examples of complaints in this area. We can obtain data from on official data source from Consumer Financial Protection Bureau website. Here we get different types of complaints related to financial business.

On this page we find information data on complaints.

Step 2: Get the data and define the usage
- Get the data
Here we see that the data is officially available and we can use it.
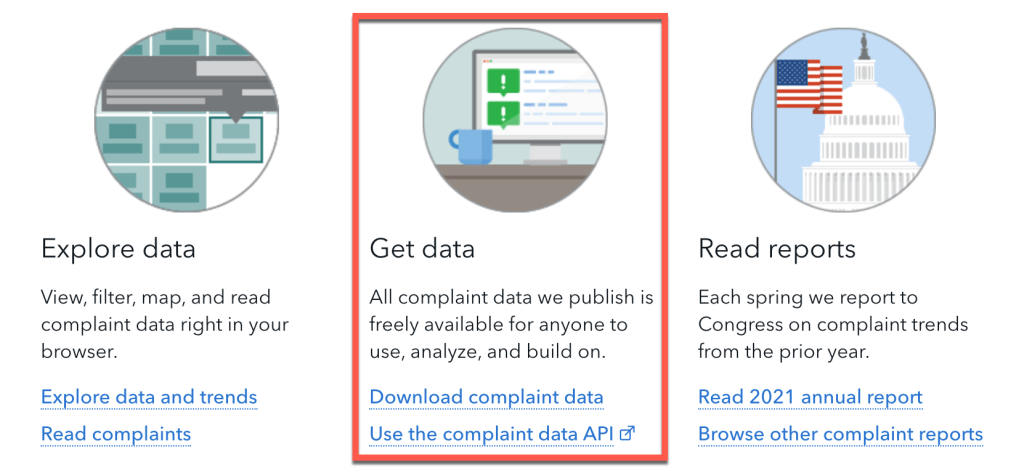
Then we can see formats for the publicly available data.

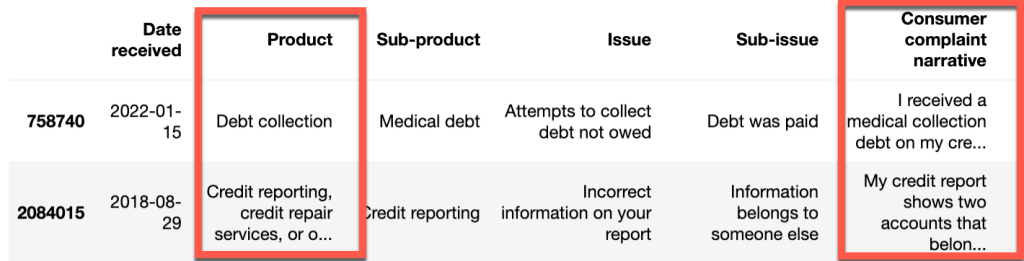
- Define the usage
In our example, we will use the product column to select some of the given categories of the provided data. For example, we will use the 'Mortgage' as one of our classes and we will use the Consumer complaint narrative column as the text examples for these categories (type/class/label).
Step 3: Prepare the data
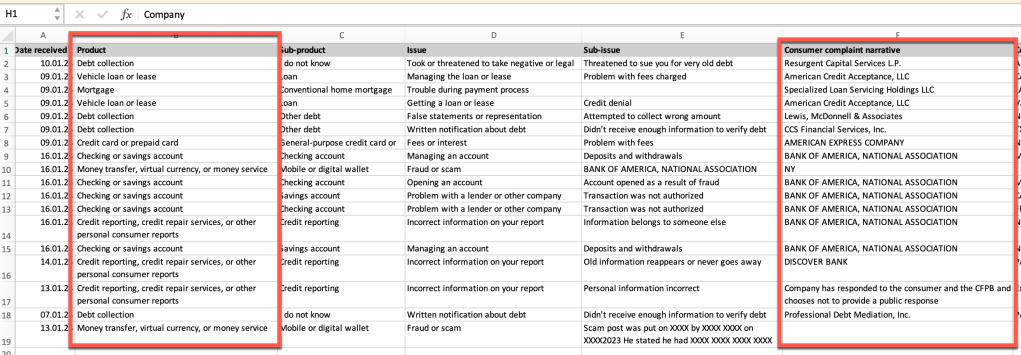
Step 3.1: Clean the data
The following image contains the raw data in an excel file, here we will see not all rows we selected do contain data, so we need to clean the data.
Here’s cleaned data in a jupyter notebook:
Step 3.2: Create training and test data
We will split the given data in training data and test data.
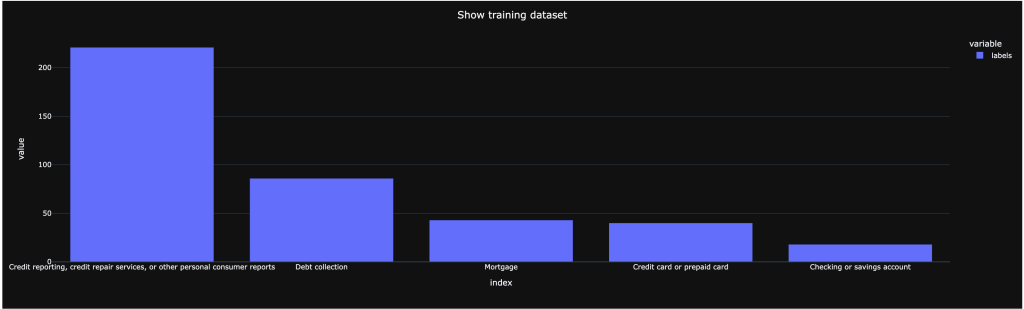
- Training data example
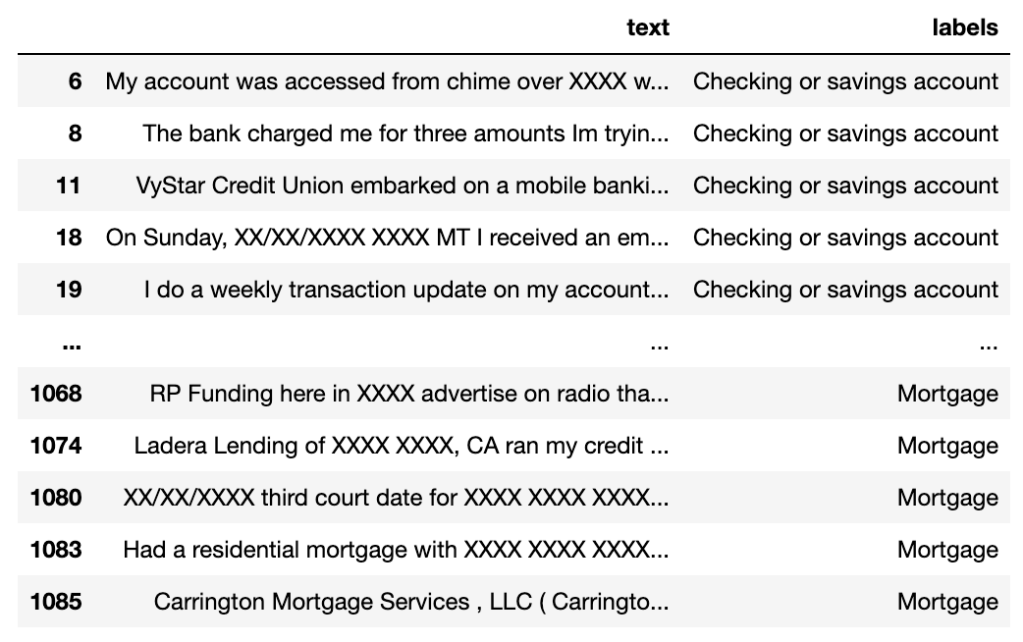
- Here we have a distribution of training for our classes (types/categories/labels), we need to make sure we have enough examples for the categories in the training data. Because for a class training, we should have at least 5 records.
Step 4: Create the model
In our case we will not create a model. We use existing models from Watson NLP as our starting point and we will customize them by using the training data we have prepared.
These are the models we use:
syntax_izumo_en_stockembedding_use_en_stock
Please visit the IBM Cloud documentation Classifying text with a custom classification model for more details.
Step 5: Train the model (customize the model)
Now we use the training data we created to train the models, that means we customize the models to use our classes (types/categories/labels), for example ‘Mortgage’.
Therefor we use SVM and Ensemble training from Watson NLP (later we will only download the ensemble model, because SVM isn’t currently supported for Watson NLP for Embed)
- For
SVMwe usewatson_nlp.blocks.classification.SVM. SVM stands for Support Vector Machines. It’s an established classification method. We will run it based on USE (Universal Sentence Encoder) embeddings of the input text. - For
VotingEnsemblewe usewatson_nlp.workflows.classification.Ensemble. The Ensemble model combines three classification models: CNN, SVM with TF-IDF and SVM with USE (Universal Sentence Encoder). It computes the weighted mean of classification predictions using confidence scores.
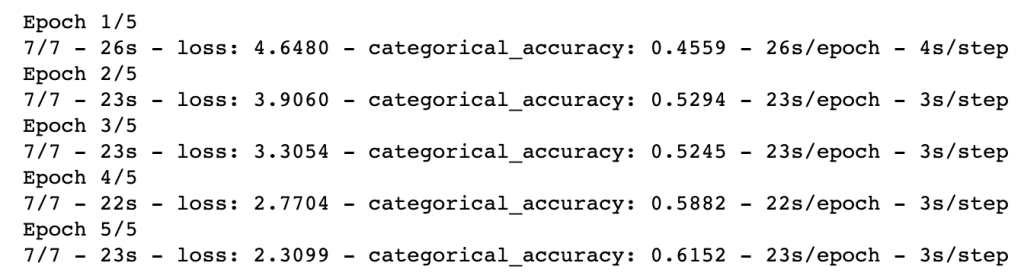
The image contains an example training:
Step 6: Model evaluation
There are several possibilities to evaluate a model one is using a confusion matrix this “specific table layout that allows visualization of the performance of an algorithm”.
Here we compare the results with the different training models we used, SVM and Ensemble training. When we compare the results we see that the Ensemble training works better in our situation, with the data we we used.
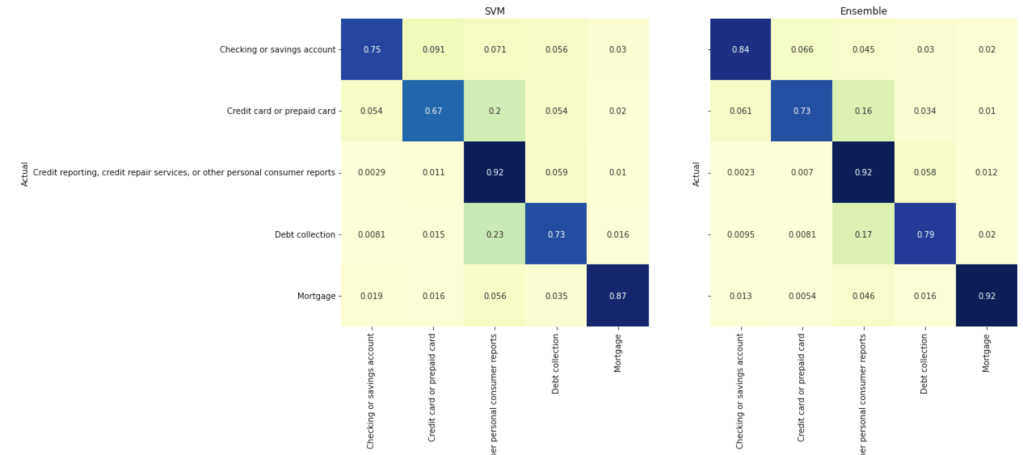
| Class | SVM | Ensemble |
| Checking for savings | 0.75 | 0.84 |
| Credit card or .. | 0.67 | 0.73 |
| Credit reporting .. | 0.92 | 0.92 |
| Debit collection | 0.73 | 0,79 |
| Mortgage | 0.87 | 0,92 |
So, we will use the ensemble model on our local machine to detect different types of customer complains in a finance area, from a text.
Step 7: Use the model locally
Step 7.1: Save the customized models
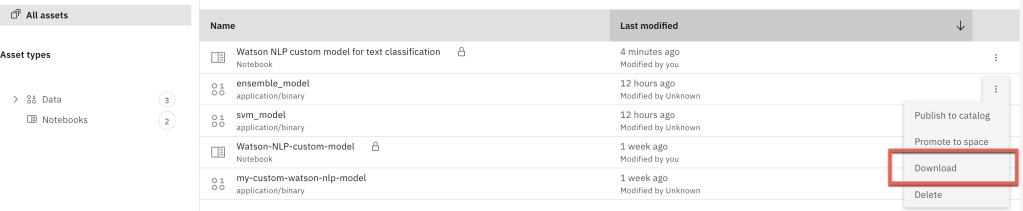
Step 7.2: The Download the customized model
Ensure your download the ensemble_model. (supported models for Watson NLP for Embed)
Step 7.3: Following the steps in the GitHub project Run Watson NLP for Embed with a customized model
Result will look like this output:
curl -s -X POST "http://localhost:8080/v1/watson.runtime.nlp.v1/NlpService/ClassificationPredict" \
  -H "accept: application/json" \
  -H "grpc-metadata-mm-model-id: ensemble_model" \
  -H "content-type: application/json" \
  -d "{ \"rawDocument\": \
    { \"text\": \"The credit card doesn't work, and I look at the savings, but I need more money to spend.\" }}" | jq
{
  "classes": [
    {
      "className": "Credit card or prepaid card",
      "confidence": 0.5404788
    },
    {
      "className": "Debt collection",
      "confidence": 0.22745371
    },
    {
      "className": "Credit reporting, credit repair services, or other personal consumer reports",
      "confidence": 0.22019744
    },
    {
      "className": "Checking or savings account",
      "confidence": 0.100063786
    },
    {
      "className": "Mortgage",
      "confidence": 0.043992974
    }
  ],
  "producerId": {
    "name": "Voting based Ensemble",
    "version": "0.0.1"
  }
}
4. Summary
We touched a huge and wide technical area in this blog post. Getting into these different topics takes more time, especially the topic of data science.
These are the topics we touched:
- Understanding how to create, train, and evaluate models
- Save and manage models
- Here we saved the models in Watson Studio and locally. Watson Studio saves the models in its related Cloud Object Storage.
- Usage of the custom classification in the Watson NLP for Embed runtime locally (ML Ops)
Here’s the diagram again, showing the end-to-end journey we took.

I hope this was useful to you and let’s see what’s next?
Greetings,
Thomas
#ibmcloud, #watsonnlp, #jupyternotebook, #ai, #watsonstudio, #docker, #mlops, #classification
