
This longer blog post shows how to :
- … build a model init container with a custom model for
Watson NLP for Embed. - … upload the
model init containerto the IBM Cloud container registry. - … deploy the
model init containerand theWatson NLP runtimeto an IBM Cloud Kubernetes Cluster. - … test
Watson NLP runtimewith the loaded model using theREST API.
Therefor the project reuses information from the IBM Developer tutorial Serve a custom model on a Kubernetes or Red Hat OpenShift cluster. The related source code is in the GitHub project watson-nlp-custom-init-container.
First let us resume how you can add models to Watson NLP for Embed runtime container.
- You can build a
Watson NLP for Embedruntime container image including the models. You usually use this for testing at local or serverless environments. (Example gif) (example Dockerfile for direct copy of the models) - You can build a
Watson NLP for Embedruntime container image including the models using a multistage build (example Dockerfile) with pretrained model container images. - You can run a
Watson NLP for Embedruntime and load models from a mounted location (load from Docker volumes). You usually use this for local testing. (Example gif) - You can run a
Watson NLP for Embedruntime and load the models withinit containers. Example image. You usually use this for Kubernetes deployments. - You can serve a model from KServe. (Example gif). This is the best production approach, from my perspective.
And now we are going to build a
custom model container imagewe will use as aninit container.
The blog post is structured in:
- Architectural overview
- Build a model
init containerimage - Deploy Watson NLP for Embed with the model to Kubernetes
- Summary
1. Architectural overview
You should be aware that an init container only runs once, as the job of an init container is to ensure that the required environment is available for the runtime container. In our case, the container needs to provide a model to be loaded by the runtime.
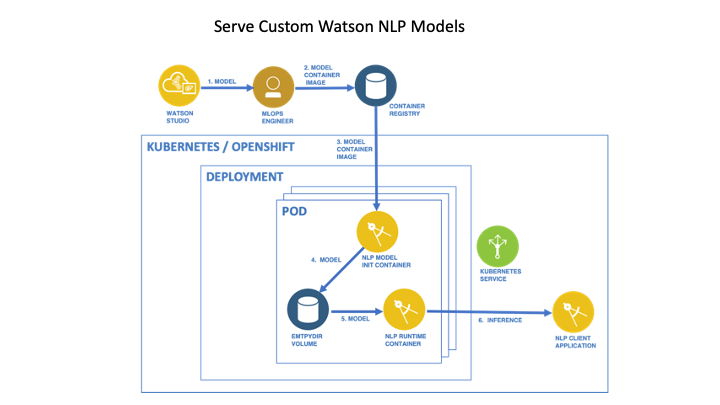
The following image is from the tutorial Serve a custom model on a Kubernetes or Red Hat OpenShift cluster and shows the Architecture reference custom models and is slightly customized.
In context to our blog post, we can map the steps like this:
- In
Watson Studiowe created the model. For example we followed the steps in the blog postWatson NLP for Embed customize a classification model and use it on your local machine. - In this project we will create a
model init container imageon the local machine. - In the bash script automation, we will:
- Upload the
model init container imageto the IBM Cloud registryDeployWatson NLP runtimeusing helm.
- (4) The
model init containerwill save the containing model in a volume on the pod. - (5) The
Watson NLP runtime containerwill load the model from the pod - Invoke the
Watson NLPREST API to test the loaded model.
- Upload the

2. Build a model init container image
We will build a model init container image with the ibm-watson-embed-model-builder python library. This container image will contain our custom model, downloaded from Watson Studio.
- Step 1: Clone the repository
- Step 2: Prepare python environment on your local machine
- Step 3: Download a created model and copy it to the folder
code/tmpmodel - Step 4: Save the custom model
- Step 5: Prepare the custom model container image
- Step 6: Create the custom model container image
- Step 7: Verify the created model container image
Note: Here is the IBM Watson Natural Language Processing Library for Embed API documentation
Step 1: Clone the repository
git clone https://github.com/thomassuedbroecker/watson-nlp-custom-init-container.git
cd watson-nlp-custom-init-container
Step 2: Prepare python environment on your local machine
We need a Python library that will manage the process of building a collection of Docker images that wrap individual watson_embedded models for delivery with an embeddable Watson runtime. This functionality is implemented in the GitHub project called ibm-watson-embed-model-builder.
export TMP_HOME=$(pwd)
cd code
python3 -m venv client-env
source client-env/bin/activate
pip install watson-embed-model-packager
ls
cd $TMP_HOME
- Example output:
This will create a folder called client-env.
...
app                     helm_setup              tmpmodel
client-env
Step 3: Download a created model and copy it to the folder code/tmpmodel
If you don’t have built model, you can build one by following this blog post Watson NLP for Embed customize a classification model and use it on your local machine.
Step 4: Save the custom model
Ensure you followed the steps in the readme.md here in GitHub project and your copied model archive file must have the file extension .zip!
export TMP_HOME=$(pwd)
export MODELFILE_NAME=ensemble_model.zip

cd $TMP_HOME/code/tmpmodel
cp $MODELFILE_NAME $TMP_HOME/code/app/models/

cd $TMP_HOME
Step 5: Prepare the custom model container image
The watson_embed_model_packager creates a model-manifest.csv which contains the information how to package the custom model init container image.
export TMP_HOME=$(pwd)
cd $TMP_HOME/code
export CUSTOM_MODEL_LOCATION=./app/models
export CUSTOM_TAG=1.0.0
python3 -m watson_embed_model_packager setup \
    --library-version watson_nlp:3.2.0 \
    --image-tag $CUSTOM_TAG \
    --local-model-dir $CUSTOM_MODEL_LOCATION \
    --output-csv model-manifest.csv
ls
cd $TMP_HOME
- Example output:
..
2023-01-31T12:52:42.622576 [SETUP:INFO] Running SETUP
2023-01-31T12:52:42.622966 [SETUP:INFO] Library Versions: {'watson_nlp': VersionInfo(major=3, minor=2, patch=0, prerelease=None, build=None)}
2023-01-31T12:52:42.623034 [SETUP:INFO] Local Model Dir: /YOUR_PATH/code/models
2023-01-31T12:52:42.623099 [SETUP:INFO] Module GUIDs: []
2023-01-31T12:52:42.623150 [SETUP:INFO] Image tag version: 1.0.0
app                     helm_setup              tmpmodel
client-env              model-manifest.csv
Step 6: Create the custom model container image
Now we build the custom model container image by using the model-manifest.csv.
export TMP_HOME=$(pwd)
cd $TMP_HOME/code
python3 -m watson_embed_model_packager build --config model-manifest.csv
cd $TMP_HOME
- Example output:
2023-01-31T12:57:33.601886 [BUILD:INFO] Building model [custom_model]
2023-01-31T12:57:34.193581 [BUILD:INFO] Building with --platform
[+] Building 105.4s (21/21) FINISHED
...
 => => writing image sha256:4034108815be4eee1a1248e4032e646c136d0e74b  0.0s
 => => naming to docker.io/library/=> => naming to docker.io/library/watson-nlp_ensemble_model:1.0.0 0.0s
Step 7: Verify the created model container image
Make sure the container exists.
docker images | grep watson-nlp_ensemble_model
- Example output:
watson-nlp_ensemble_model 1.0.0 dc9d68f955ae 47 seconds ago 1.3GB
With docker inspect we get the details of the watson-nlp_ensemble_model container image.
docker inspect watson-nlp_ensemble_model:1.0.0
- Example output:
[
    {
        "Id": "sha256:dc9d68f955aed57c0724d903412cac2fe9dcbd55aaf261a47c85b65ab6dd3fba",
        "RepoTags": [
            "watson-nlp_ensemble_model:1.0.0",
...
Step 7: Start the model container locally
export CONTAINER_NAME=verify-model
export CONTAINER_IMAGE=watson-nlp_ensemble_model:1.0.0
docker run -it --name "$CONTAINER_NAME" "$CONTAINER_IMAGE" /bin/bash
- Example output:
Archive:  /app/model.zip
  inflating: config.yml
  ...
3. Deploy Watson NLP for Embed with the model to Kubernetes
We will deploy the custom Watson NLP for Embed model with a preconfigured Helm chart to an existing Kubernetes Cluster. The deployment steps will be mostly automated with an bash script automation.
We are using in this section from IBM Cloud:
- An existing IBM Cloud Kubernetes cluster
- The IBM Cloud Container Registry
Step 1: Navigate to the Helm setup
cd code/helm_setup
Step 2: Set environment variables in the .env file
cat .env_template > .env
Edit the .env file.
# used as 'environment' variables
export IC_API_KEY=YOUR_IBM_CLOUD_ACCESS_KEY
export IC_EMAIL="YOUR_EMAIL"
export IBM_ENTITLEMENT_KEY="YOUR_KEY"
export IBM_ENTITLEMENT_EMAIL="YOUR_EMAIL"
export CLUSTER_ID="YOUR_CLUSTER"
export REGION="us-east"
export GROUP="tsuedbro"
Step 3: Run the bash script automation to deploy the model
sh deploy-watson-nlp-custom-to-kubernetes.sh
Automation steps of the bash script with the link to the source code in the GitHub project:
- Log on to IBM Cloud.
- Configure the IBM Cloud registry and a namespace, if needed.
- Change the
tagof the custom container image anduploadthe custom image to the IBM Cloud registry container registry. - Create the
Docker config fileneeded to create a pull secret for the custom container and the runtime container. (Docker config.json file template) - Connect to the Kubernetes Cluster
- Install
HelmChart - Verify REST API invocation from the running container
- Verify REST API invocation from the local machine
- Uninstall Helm chart
Helm templates with the link to the source code in the GitHub project:
- Example interactive output of the script:
*********************
loginIBMCloud
*********************

API endpoint: https://cloud.ibm.com
Region: us-east
Authenticating...
OK

...

# ******
# Configure IBM Cloud Registry
# ******

The region is set to 'us-south', the registry is 'us.icr.io'.
...
a4c04ef9f22e: Layer already exists
1.0.0: digest: sha256:7dad37c2eb633eb569df6617c6895d39a9741fe5be2b0991c93f9b3a4acd7510 size: 1994

*********************
createDockerCustomConfigFile
*********************

- custom_config.json
IBM_ENTITLEMENT_SECRET:
...
- charts/values.yaml
Set values:
- us.icr.io/custom-watson-nlp-tsued/watson-nlp_ensemble_model:1.0.0
...

*********************
connectToCluster
*********************

OK
...

*********************
installHelmChart
*********************

...

1 chart(s) linted, 0 chart(s) failed
NAME: watson-nlp-custom
LAST DEPLOYED: Thu Feb  9 19:55:14 2023
NAMESPACE: default
STATUS: deployed
REVISION: 1
TEST SUITE: None

*********************
verifyDeploment
*********************


------------------------------------------------------------------------
Check for (watson-nlp-custom)
(1) from max retrys (4)
Status: watson-nlp-custom
2023-02-09 12:55:16 Status: watson-nlp-custom is created
------------------------------------------------------------------------

*********************
verifyPod could take 10 min
*********************


------------------------------------------------------------------------
Check for (watson-nlp-custom)
(1) from max retrys (10)
Status: 0/1
2023-02-09 19:55:16 Status: watson-nlp-custom(0/1)
------------------------------------------------------------------------
(2) from max retrys (10)
Status: 1/1
2023-02-09 19:56:17 Status: watson-nlp-custom is created
------------------------------------------------------------------------

*********************
verifyWatsonNLPContainer
*********************

Pod: watson-nlp-custom-85b6d4c664-snkx6

Result of the Watson NLP API request:
http://localhost:8080/v1/watson.runtime.nlp.v1/NlpService/ClassificationPredict

{"classes":[{"className":"Credit card or prepaid card","confidence":0.61427313},{"className":"Credit reporting, credit repair services, or other personal consumer reports","confidence":0.104456775},{"className":"Checking or savings account","confidence":0.1030437},{"className":"Debt collection","confidence":0.08048885},{"className":"Mortgage","confidence":0.0071709333}],"producerId":{"name":"Voting based Ensemble","version":"0.0.1"}}

Verify the running pod on your cluster.

Press any key to move on:
- Now your IBM Cloud UI will be opened again, and you can open the Kubernetes Dashboard if you want to.

...
NAME                                 READY   STATUS    RESTARTS   AGE
watson-nlp-custom-85b6d4c664-snkx6   1/1     Running   0          66s
Verify in the deployment in the Kubernetes dashboard.

Press any key to move on:
...
- You can verify the deployment in Kubernetes dashboard.

*********************
verifyWatsonNLP_loadbalancer
this could take up to 10 min
*********************


*********************
verifyLoadbalancer
*********************

...
------------------------------------------------------------------------
Status: 52.XXX.XXX.XXXX
2023-02-09 20:06:31 Status: watson-nlp-custom-vpc-nlb is created (52.XXX.XXX.XXXX)
------------------------------------------------------------------------
EXTERNAL_IP: 52.XXX.XXX.XXXX
Verify invocation of Watson NLP API from the local machine:
{
  "classes": [
    {
      "className": "Credit card or prepaid card",
      "confidence": 0.59203154
    },
    {
      "className": "Checking or savings account",
      "confidence": 0.10723788
    },
    {
      "className": "Credit reporting, credit repair services, or other personal consumer reports",
      "confidence": 0.107137166
    },
    {
      "className": "Debt collection",
      "confidence": 0.08883385
    },
    {
      "className": "Mortgage",
      "confidence": 0.008399018
    }
  ],
  "producerId": {
    "name": "Voting based Ensemble",
    "version": "0.0.1"
  }
}

*********************
uninstallHelmChart
*********************

Press any key to move on with UNINSTALL:
- Now you can decide if you want to uninstall the configuration directly.
release "watson-nlp-custom" uninstalled
4. Summary
Now we covered the last part for Watson NLP for Embed. to build, configure and deploy.
Once again we could see that it is awesome that Watson Natural Language Processing Library for Embed is a containerized implementation and we can run it anywhere.
These were the topics we have touched in various blog posts.
Customize a model:
Run on a Kubernetes infrastructure:
Run on a serverless platform
Run locally on Docker
Use an “Automation with Techzone Deployer” to deploy it to Red Hat OpenShift
I hope this was useful to you and let’s see what’s next?
Greetings,
Thomas
#ibmcloud, #watsonnlp, #kubernetes, #ai, #containerregistry, #docker, #bashscripting

Hi Thomas,
Your blog posts are excellent! Keep them coming.
I have to say, that as an IBM business partner, thanks to people like yourself, you make the technology simple and easy to understand versus understanding the sales, marketing and performance characteristics of Watson NLP for Embed. Iâve been trying REALLY HARD to get answers (listed below) to know which approach to use that relate to price / performance and scaling without results.
Are there any Blogs out there that focus on these other aspects. E.g.
Performance comparison of running NLP via Cloud API vs. NLP Embed â How big a cluster must you put-up to get similar throughput when using NLP?
If youâre building an APP to run both on-prem and in the Cloud, should you use NLP for Embed for each or use the Cloud API when running within the Cloud?
Are there code differences?
Can you obtain multiple API keys to run multiple simultaneous calls using the Embed solution or is it one at a time?
Are there limits on this for embedded?
Price per call comparison of each?
Frankly, Iâm baffled how one can make a decision about moving to embedded without this type of information ð
Thanks,
Reid Karabush
[Decision Systems Incorporated]http://www.decisionsystems.com/
1122 Greenleaf Ave. 1A
Wilmette, IL 60091, USA
office: 1.847.433.0876 ext. 101
mobile: 1.847.722.7870
http://www.decisionsystems.comhttp://www.decisionsystems.com/
[view_my_linkedin_profile]https://www.linkedin.com/in/reidkarabush
LikeLike
Hi Kris, sorry for the late reply. I would say these are interesting topics, so maybe you can get in direct contact with IBM. That would be the best way I think. Greetings Thomas
LikeLike