

In this blog post, we’ll take a look at Jekyll to get a basic understanding how usage and setup works. We won’t use an existing template, we’ll follow the initial steps for implementation and then we configure the source code for a custom deployment to GitHub pages by using GitHub actions and add a custom domain.
Jekyll has the following objective:
“Transform your plain text into static websites and blogs.”
This blog post contains following sections:
- Basic comparison of some existing blog platforms
- Explore Jekyll functionality by following the getting started documentation
- Configure the project to use GitHub pages to host the getting Started blog
- Configure your own custom domain for GitHub pages
The source code related to this blog post is available on the GitHub project test-blog-with-jekyll. Here is the running blog on GitHub pages of the example project.
1. Basic comparison of some existing blog platforms
Before we take a look at how Jekyll works, let’s do a quick comparison for some capabilities and uses of Jekyll, WordPress.com and Medium.com from my point of view:
| Topics | GitHub pages with Jekyll | WordPress.com | Medium.com | Notes |
|---|---|---|---|---|
| Costs | 0 | 8 Euro (Premium)/Month | $50 (Medium Membership) / Year | From a cost perspective, GitHub sites with Jekyll can’t be beaten. |
| Editor | Markdown | WordPress custom editor | Medium custom editor | What is easy-of-use depends on your preferences. The Medium editor is the most limited one at the moment, but also the easiest for now. |
| Get a free domain | yes | yes | yes | All do provide you a Domain you can use, but it is always a kind of subdomain of the provider. |
| It has blog community included | no | yes | yes | Currently Medium has the widest community to exchange topics. |
| You can integrate a custom domain | yes | yes | yes | Costs are 10 to 20 dollar a year |
Out-Of-The-Box Page view analytics | No | Yes | Yes | Jekyll doesn’t analytics Out-Of-The-Box it can be added for example with the this gem. |
Out-Of-The-Box Analytics | yes | yes | yes | WordPress currently has the widest range of blog post analytics, for example: “Who used your blog posts”, “How many times are your pages viewed”, “Discussion” and so on. |
| CSS and HTML programming knowledge | would be good | not really needed | not needed | In general, it’s good if you have HTML and CSS coding skills, but for WordPress and Medium, you don’t really need to know how to implement websites with CSS and HTML. |
| Free layout templates | yes | yes | yes |
2. Explore Jekyll functionality by following the getting started documentation
Let us follow the getting started and the source code is available on the GitHub project called test-blog-with-jekyll.
2.1 Installation of Jekyll
Follow the instructions to install Jekyll on macOS.
2.2 Get started
You can find the detailed steps in the awesome documentation for the Setup.
2.2.1 Basic project setup
Step 2.2.2.1: Create a project
bundle init
- Example output:
The command creates a Gemfile to manage dependencies for a ruby application.
# frozen_string_literal: true

source "https://rubygems.org"

# gem "rails"
Step 2.2.2.2: Configure the project to use "jekyll"
Edit the Gemfile file and add following code to add the “jekyll” gem.
# frozen_string_literal: true

source "https://rubygems.org"

# gem "rails"
gem "jekyll"
Step 2.2.2.3: Create the package for the application
Execute the bundle command. A bundler provides a consistent environment for Ruby projects by tracking and installing the exact gems and versions that are needed.
bundle
- Example output:
Fetching gem metadata from https://rubygems.org/............
Resolving dependencies...
Using bundler 2.3.26
Using eventmachine 1.2.7
....
Using addressable 2.8.1
Using jekyll-sass-converter 3.0.0
Using jekyll-watch 2.2.1
Using jekyll 4.3.1
Bundle complete! 1 Gemfile dependency, 30 gems now installed.
Use `bundle info [gemname]` to see where a bundled gem is installed.
The bundle command has created a Gemfile.lock.
GEM
  remote: https://rubygems.org/
  specs:
    addressable (2.8.1)
      public_suffix (>= 2.0.2, < 6.0)
...

PLATFORMS
  x86_64-darwin-22

DEPENDENCIES
  jekyll

BUNDLED WITH
   2.4.3
Step 2.2.2.4: Create the first webpage index.html
Create an index.html file as our first page of our website for our blog.
<!DOCTYPE html>
<html>
  <head>
    <meta charset="utf-8">
    <title>Home</title>
  </head>
  <body>
    <h1>My Test Blog Post!</h1>
  </body>
</html>
- Run following command to
buildthe application
jekyll build
- Run following command to serve the application locally
jekyll serve
- Example output:
Configuration file: none
            Source: /Users/****/test-blog-with-jekyll
       Destination: /Users/****/test-blog-with-jekyll/_site
 Incremental build: disabled. Enable with --incremental
      Generating...
                    done in 0.012 seconds.
 Auto-regeneration: enabled for '/Users/.../test-blog-with-jekyll'
    Server address: http://127.0.0.1:4000
  Server running... press ctrl-c to stop.
[2023-01-09 16:14:39] ERROR `/favicon.ico' not found.
- The running application.

2.2.2 Use of liquid
Liquid helps to modify the content of the html page more easier. Code example diff
You can find the detailed steps in the awesome documentation for the step Using Liquid.
Step 2.2.2.1: Change the index.html
index.html
---
---

<!DOCTYPE html>
<html>
  <head>
    <meta charset="utf-8">
    <title>Home</title>
  </head>
  <body>
    <h1>{{ "My Test Blog Post!" | downcase }}</h1>
  </body>
</html>
Step 2.2.2.2: Run the application locally
bundle exec jekyll serve
- The running application.

2.2.3 Use of front matter
Using the front matter to create variable content in the html file. Code example diff
You can find the detailed steps in the awesome documentation for the step Using front matter.
---
title: Home using front matter
---

<!DOCTYPE html>
<html>
  <head>
    <meta charset="utf-8">
    <title>{{ page.title }}</title>
  </head>
  <body>
    <h1>{{ "My Test Blog Post!" | downcase }}</h1>
  </body>
</html>
Step 2.2.3.1: Run the application locally
bundle exec jekyll serve
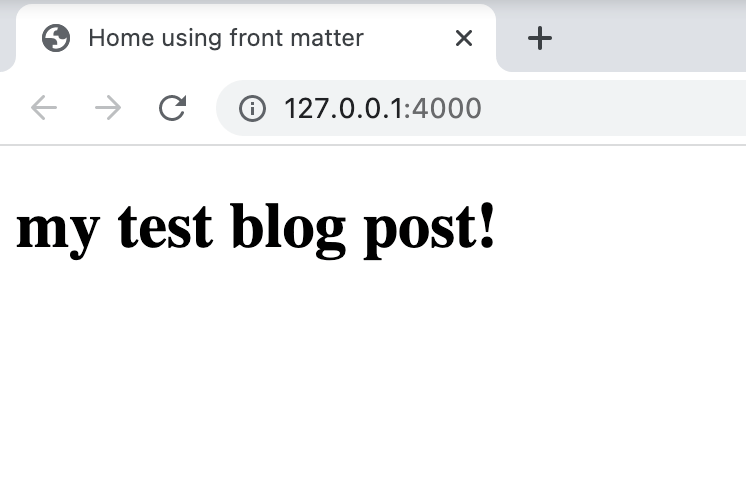
- The running application.
2.2.4 Using layouts
This example uses layouts to create an initial template for web pages of the static web application. Code example diff
You can find the detailed steps in the awesome documentation for the step Using layouts.
We can use the Layout for *.md file and *.html files.
Step 2.2.4.1: Create a new folder called _layouts
Step 2.2.4.2: Create a default.html with following content
<!doctype html>
<html>
  <head>
    <meta charset="utf-8">
    <title>{{ page.title }}</title>
  </head>
  <body>
    {{ content }}
  </body>
</html>
Step 2.2.4.3: Create a about.md with following content
---
layout: default
title: About
---
# About page

This page tells you a little bit about me.
Step 2.2.4.5: Change the content of the index.html to following content
---
layout: default
title: Home using front matter
---

<h1>{{ "My Test Blog Post using layout!" | downcase }}</h1>
Step 2.2.4.6: Run the application locally
bundle exec jekyll serve
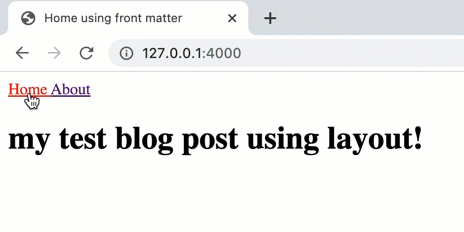
- The running application.

2.2.5 Use of Includes
This example uses includes to create an initial navigation. Code example diff
You can find the detailed steps in the awesome documentation for the step Using includes.
Step 2.2.5.1: Create a new folder called _includes
Step 2.2.5.2: Create a navigation.html file in the created folder
<nav>
  <a href="/">Home</a>
  <a href="/about.html">About</a>
</nav>
You can also add some color coding to the navigation.
<nav>
    <a href="/" {% if page.url == "/" %}style="color: red;"{% endif %}>
        Home
    </a>
    <a href="/about.html" {% if page.url == "/about.html" %}style="color: red;"{% endif %}>
        About
    </a>
</nav>
Step 2.2.5.3: Include the initial "navigation" to the layouts file default.html
<!doctype html>
<html>
  <head>
    <meta charset="utf-8">
    <title>{{ page.title }}</title>
  </head>
  <body>
    {% include navigation.html %}
    {{ content }}
  </body>
</html>
Step 2.2.5.4: Run the application locally
bundle exec jekyll serve
- The running application.
2.2.6 Use of “data”
We use the data to implement an easier navigation. Code example diff
You can find the detailed steps in the awesome documentation for the step Using data.
Step 2.2.6.1: Create a new folder called _data
Step 2.2.6.2: Create a navigation.yml
- name: HomeData
  link: /
- name: AboutData
  link: /about.html
Step 2.2.6.3: Change the navigation.html in the _includes folder
Now we use the site.data.navigation to build the web page.
<nav>
  {% for item in site.data.navigation %}
    <a href="{{ item.link }}" {% if page.url == item.link %}style="color: red;"{% endif %}>
      {{ item.name }}
    </a>
  {% endfor %}
</nav>
Step 2.2.6.4: Run the application locally
bundle exec jekyll serve
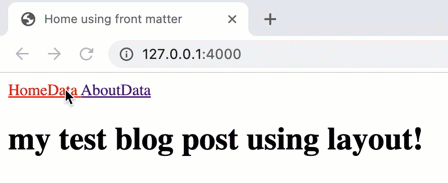
- The running application.
2.2.7 Using Assets
Now we add css to the application. Code example diff
You can find the detailed steps in the awesome documentation for the step Using assets.
Step 2.2.7.1: Create a folder called assets with a subfolder called css
cssStep 2.2.7.2: Create a file called styles.scss with following content
---
---
@import "main";
Step 2.2.7.3: Create a folder called _sass in the root directory
Step 2.2.7.4: Create a file called main.scss with following content
.current {
  color: green;
}
Step 2.2.7.5: Modify the default.html in the _include folder to add the css
<!doctype html>
<html>
<head>
<meta charset="utf-8">
<title>{{ page.title }}</title>
<link rel="stylesheet" href="/assets/css/styles.css">
</head>
<body>
{% include navigation.html %}
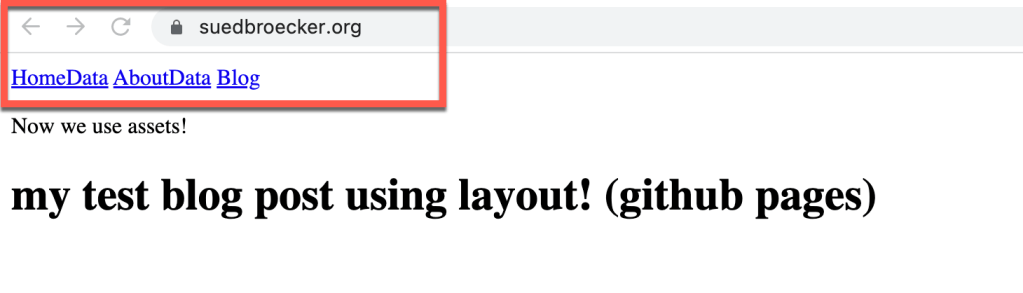
<p>Now we use assets!</p>
{{ content }}
</body>
</html>
Step 2.2.7.6: Modify the navigation.html in the _includes folder
<nav>
  {% for item in site.data.navigation %}
    <a href="{{ item.link }}" {% if page.url == item.link %}class="current"{% endif %}>{{ item.name }}</a>
  {% endfor %}
</nav>
Step 2.2.7.7: Run the application locally
bundle exec jekyll serve
- The running application.
The running application.

2.2.8 Use of Blogging (posts)
Here we will create an initial blog post. Code example diff
You can find the detailed steps in the awesome documentation for the step Using posts.
Step 2.2.8.1: Create a folder called _posts
Step 2.2.8.2: Create a blog post file [DATE]-[TOPIC]
Create a file 2023-01-09-myblogpost.md with following content.
---
layout: post
author: Thomas
---

My awesome blog post.
Step 2.2.8.3: Create a layout for the post
Create a file called post.html with following content in the _layouts folder.
---
layout: default
---
<h1>{{ page.title }}</h1>
<p>{{ page.date | date_to_string }} - {{ page.author }}</p>

{{ content }}
Step 2.2.8.4: List the blog posts
Create a file called blog.html with following content in the root folder.
---
layout: default
title: Blog
---
<h1>Latest Posts</h1>

<ul>
  {% for post in site.posts %}
    <li>
      <h2><a href="{{ post.url }}">{{ post.title }}</a></h2>
      {{ post.excerpt }}
    </li>
  {% endfor %}
</ul>
Step 2.2.8.5: Modify the navigation _data/navigation.yml
- name: HomeData
  link: /
- name: AboutData
  link: /about.html
- name: Blog
  link: /blog.html
Step 2.2.8.6: Create additional blog post files [DATE]-[TOPIC]
Create additional files 2023-01-10-myblogpost_XXX.md with following content.
---
layout: post
author: Thomas
---

My awesome blog post XXX.
Step 2.2.8.7: Run the application locally
bundle exec jekyll serve
- The running application.

3. Using GitHub Actions for the deployment to GitHub pages
Here are some useful links for the implementation of GitHub actions for Jekyll:
- “Create site with Jekyll“ in the GitHub documentation.
- “GitHub Actions for Jekyll“ in the Jekyll documentation.
- “Marketplace for GitHub actions“ for
Jekyll - GitHub runners documentation for a Ruby setup
- Deploy GitHub pages using actions: “This is the link for GitHub Actions to deploy artefacts to GitHub Pages“
3.1 Adjust local implementation
We need to adjust first the local implementation a bit to prepare the deployment and using the right URL mappings.
Step 3.1.1: Add a _config.yml file
First we add a _config.yml and we specify the file following mostly the given steps in the deployment part of the getting started.
# if you want to force HTTPS, specify the domain without the http at the start, e.g. example.com
domain: thomassuedbroecker.github.io
# the base hostname and protocol for your site, e.g. http://example.com
url: "https://thomassuedbroecker.github.io"
# place folder name if the site is served in a subfolder
baseurl: "/test-blog-with-jekyll"
ignore_theme_config: true
plugins:
  - jekyll-feed
  - jekyll-sitemap
  - jekyll-seo-tag
Step 3.1.2: Adjust the _includes/navigation.html file
We add the {{ site.baseurl }} information.
<nav>
    {% for item in site.data.navigation %}
      <a href="{{ site.baseurl }}{{ item.link }}" {% if page.url == item.link %}class="current"{% endif %}>{{ item.name }}</a>
    {% endfor %}
</nav>
Step 3.1.3: Adjust the _layouts/default.html file
We add the {{ site.baseurl }} information.
default.html
<!doctype html>
<html>
  <head>
    <meta charset="utf-8">
    <title>{{ page.title }}</title>
    <link rel="stylesheet" href="{{ site.baseurl }}/assets/css/styles.css">
  </head>
  <body>
    {% include navigation.html %}
    <p>Now we use assets!</p>
    {{ content }}
  </body>
</html>
Step 3.1.4: Adjust the blog.html file
We add the {{ site.baseurl }} information.
---
layout: default
title: Blog
---
<h1>Latest Posts</h1>

<ul>
  {% for post in site.posts %}
    <li>
      <h2><a href="{{ site.baseurl }}{{ post.url }}">{{ post.title }}</a></h2>
      {{ post.excerpt }}
    </li>
  {% endfor %}
</ul>
Step 3.1.4: Configure Gemfile file
# frozen_string_literal: true

source "https://rubygems.org"

# gem "rails"
gem "jekyll"
gem "github-pages", "~> 227", group: :jekyll_plugins
gem "webrick", "~> 1.7"
gem "faraday-retry", "~> 2.0"

group :jekyll_plugins do
    gem 'jekyll-sitemap'
    gem 'jekyll-feed'
    gem 'jekyll-seo-tag'
end
Step 3.1.5: Run the application locally
bundle exec jekyll serve
- The running application.

3.2 Deploy to GitHub pages
Step 3.2.1: Create following folders .github/workflows
Step 3.2.2: Create a workflow file github-pages.yml
Insert following code.
name: test-blog-with-jekyll-action-01
run-name: ${{ github.actor }} is deploying test-blog-with-jekyll-action with GitHub Actions
on:
  push:
    branches:
      - main
permissions:
  contents: read
  pages: write
  id-token: write
concurrency:
  group: "pages"
  cancel-in-progress: true
jobs:
  # Build job
  build:
    runs-on: ubuntu-latest
    steps:
      - name: 1-Checkout
        uses: actions/checkout@v3
      - name: 2-Setup Ruby
        uses: ruby/setup-ruby@v1
        with:
          ruby-version: '3.0.0' # Not needed with a .ruby-version file
      - name: 3-Add specific bundler
        run: bundle lock --add-platform x86_64-linux
      - name: 4-Run bundle install
        run: bundle install
      - name: 5-Build with Jekyll
        # Outputs to the './_site' directory by default
        run: |
         pwd
         echo "** Build"
         echo "** Path: ${{ steps.pages.outputs.base_path }}"
         bundle exec jekyll build
         echo "** List source files"
         ls
         echo "** Site configuration"
         cp -r $(pwd)/assets $(pwd)/_site
         cd $(pwd)/_site
         ls
      - name: 6-configure pages
        uses: actions/configure-pages@v2
      - name: 7-Upload artifact
        # Automatically uploads an artifact from the './_site' directory by default
        uses: actions/upload-pages-artifact@v1
        with:
          path: "_site${{ steps.pages.outputs.base_path }}"

  # Deployment job
  deploy:
    runs-on: ubuntu-latest
    needs: build
    permissions:
      pages: write      # to deploy to Pages
      id-token: write
    environment:
      name: github-pages
      url: ${{ steps.deployment.outputs.page_url }}
    steps:
      - name: 1-Deploy to GitHub Pages
        id: deployment
        uses: actions/deploy-pages@v1
      - name: 2-Verify
        run: |
         pwd
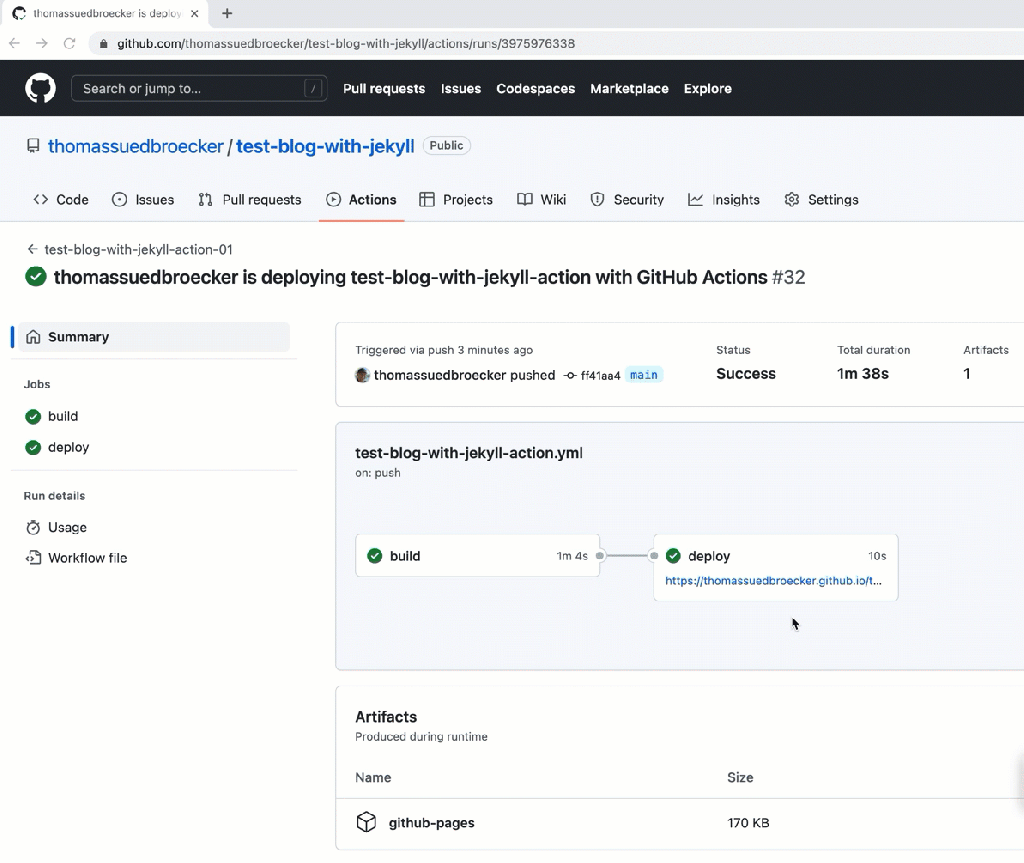
- Push the changes and inspect the GitHub action progress.
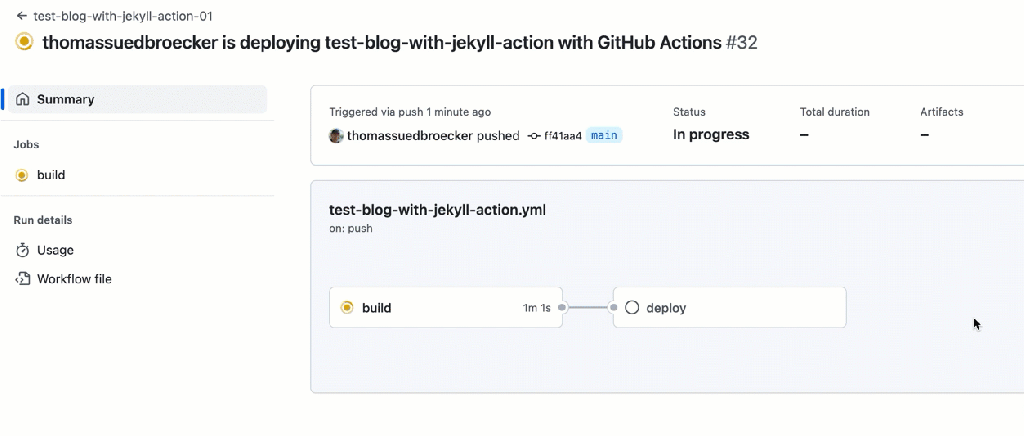
- Verify the created GitHub page.
4. Configure your own domain for GitHub pages
Related GitHub documentation “About custom domains and GitHub Pages”.
Step 4.1: Add a your custom domain to pages of your GitHub account.
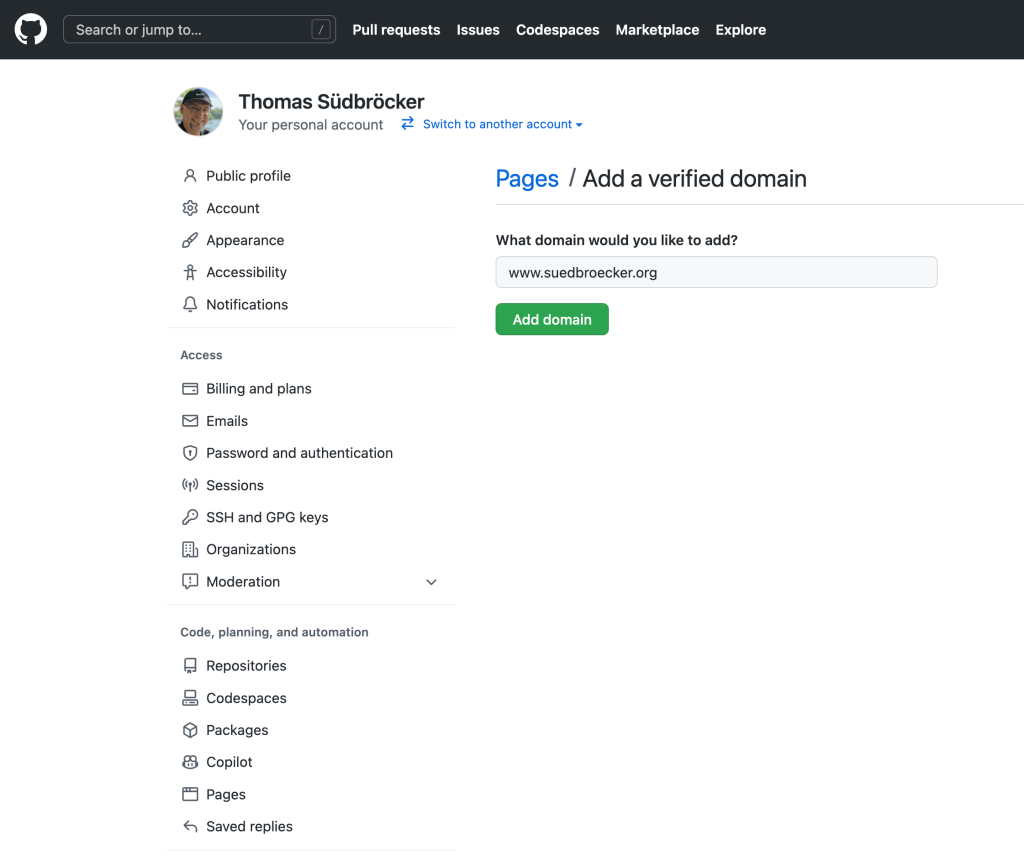
Step 4.2: Get the challenge for a TXT record, that you need to insert to the domain at your provider.
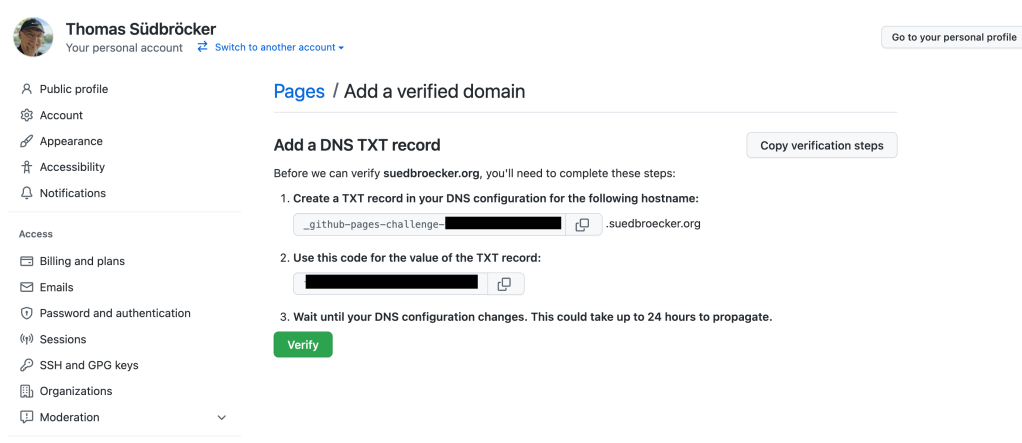
Step 4.3: Insert the challenge for a TXT record, into your domain at your provider.
In my case I use IBM Cloud as my domain provider.

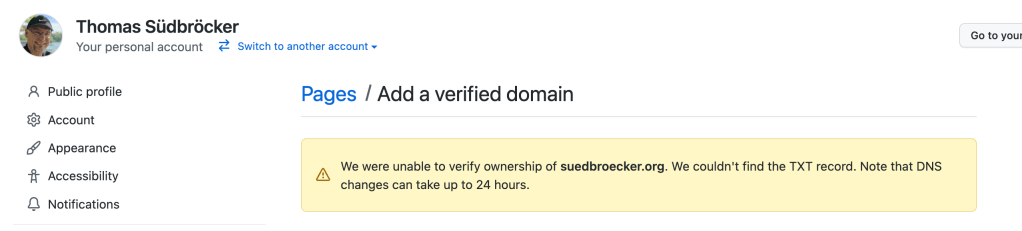
Step 4.4: Verify, if the challenge was successful

Step 4.5 Select your GitHub repository, in my case the Jekyll example project

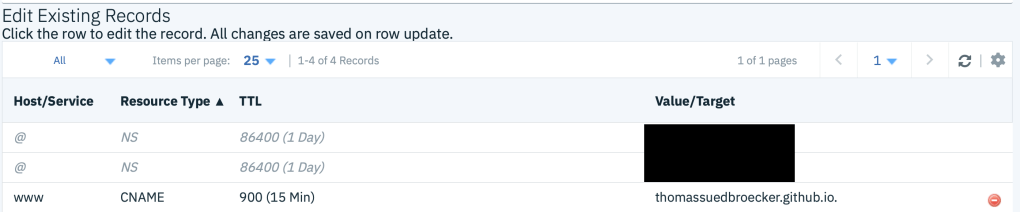
Step 4.6: Insert at you provider a CNAME with the subdomain you are going to use
In my case I used www and map the the GitHub domain for your GitHub pages project [YOUR_USER].github.io. (don’t forget the dot at the end 😉 .
Step 4.7: Now add the domain and enforce HTTPS
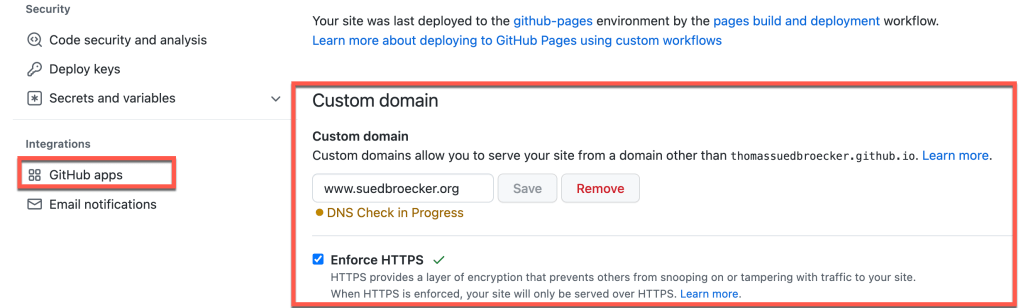
Step 4.8 Verify if your domain works
I hope this was useful to you and let’s see what’s next?
Greetings,
Thomas
#github, #githubpages, #ruby, #jekyll, #html, #css

Leave a comment