

In this blog post I want to share an awesome and simple practice for beginners: How to develop a customized Dockerfile for a container image running on Kubernetes, using minikube.
Usually, when you use an existing container image to create your own customized configuration, you don’t have deep knowledge how that container image is built, and you have questions like: “What are the folder rights?”, or “What are the installation paths of applications?”, or other information you need to customize the container image to your needs.
You can learn about the existing image, when you visit the GitHub or Dockerhub project of that image (for example: links to GitHub “docker-library / repo-info” and Dockerhub “jenkins repo-info” project of Jenkins). But to ensure that your customization works, you have to run and access the running container in the commandline mode and verify your changes step by step running the image in Kubernetes.
Minikube comes with a container engine you can use. So minikube has all you need to build and run your container image on a local Kubernetes installation.
Here are the steps to customize a Jenkins container image I want to run on minikube, you can try it out:
1. Install minikube
2. Start minikube
$ minikube start
3. Enable the container environment inside minikube with docker-env to use it on your local computer.
$ minikube docker-env
The output should look like this:
export DOCKER_TLS_VERIFY="1"
export DOCKER_HOST="tcp://IP:PORT"
export DOCKER_CERT_PATH="/Users/theuser/.minikube/certs"

# Run this command to configure your shell:
# eval $(minikube docker-env)
4. Execute the given command.
$ eval $(minikube docker-env)
Note: Ensure that you switched off your own local Docker desktop installation.

5. Extend an existing container image in a Dockerfile.
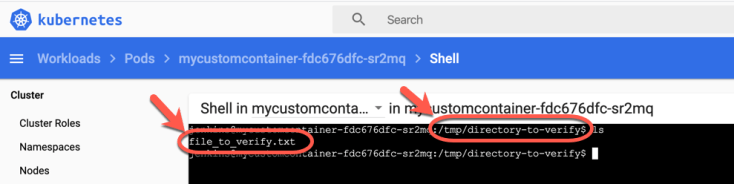
In that example I used the container image jenkins:latest. I only added a folder directory-to-verify and a file called file_to_verify.txt in the Dockerfile.
Note: Ensure you did create a file file_to_verify.txt before you execute the command in step 6. I wrote into the txt file “Yes, I am here.”
FROM jenkins:latest

WORKDIR /tmp
RUN mkdir directory-to-verify
WORKDIR /tmp/directory-to-verify
ADD file_to_verify.txt .
6. Create the container image and run it. Keep in mind the container will be created inside minikube.
I gave the container image the name mycustomcontainer:1.
$ docker build -f Dockerfile -t mycustomcontainer:1 .
Then you can directly test your small changes in the container image by using the container engine from Kubernetes, by running the container in the interactive mode.
$ docker run -it mycustomcontainer:1 bash

Note: You can delete the container image with the normal Docker command.
$ docker image rm -f mycustomcontainer:1
7. Create a deployment.yaml file.
Here is my definition for that example.
kind: Deployment
apiVersion: apps/v1
metadata:
  name: mycustomcontainer
spec:
  selector:
    matchLabels:
      app: mycustomcontainer
  replicas: 1
template:
  metadata:
    labels:
      app: mycustomcontainer
      version: v1
  spec:
    containers:
    - name: mycustomcontainer
      image: mycustomcontainer:1
  ports:
    - containerPort: 8080
    imagePullPolicy: Never
  restartPolicy: Always
Note: I used only the http port of the given specified ports in the Jenkin Dockerfile.
ARG http_port=8080
ARG agent_port=50000
8. Apply the deployment to Kubernetes
$ kubectl apply -f deployment.yaml
9. Create a service.yaml file.
Here is my definition for that example.
kind: Service
apiVersion: v1
metadata:
  name: mycustomcontainer
  labels:
    app: mycustomcontainer
spec:
  selector:
    app: mycustomcontainer
ports:
  - port: 8080
    name: http
  type: NodePort
9. Apply to service in Kubernetes
$ kubectl apply -f service.yaml
10. Open the minikube dashboard
$ minikube dashboard
Now you should see following status in your dashboard.

11. Select the pod and press View logs

Now you should see the logs:

12. Open the command execution for your running pod.
Press Exec into pod.
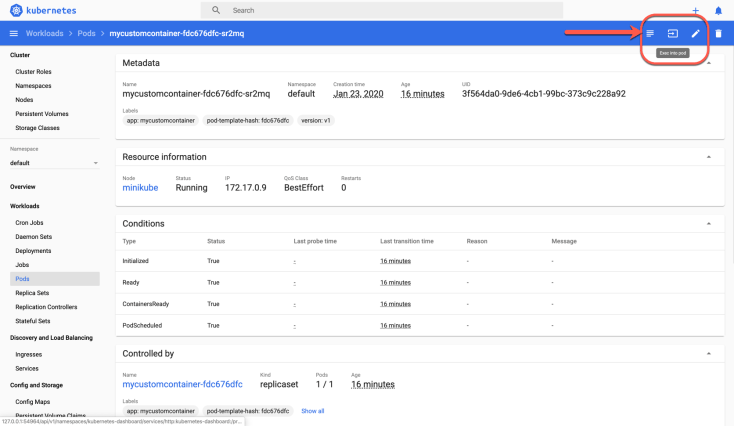
Now you are able to verify: does the additional folder and file exist in container image, which you added inside the Dockerfile.
I hope this was useful for you and let’s see what’s next?
Greetings,
Thomas
PS: You can try out Cloud Foundry Apps or Kubernetes on IBM Cloud. By the way, you can use the IBM Cloud for free, if you simply create an IBM Lite account. Here you only need an e-mail address.
#IBMDeveloper, #Kubernetes, #Dockerfile, #Minikube

Leave a comment